My blog has moved!

You should be automatically redirected in 6 seconds. If not, visit
http://www.unpastiche.com
and update your bookmarks.

Showing posts with label Macarons. Show all posts

Tuesday, December 25, 2012

Two Years On...and I'm migrating (virtually)!

Merry Christmas everyone!

I decided that I should repeat the tradition of updating on Christmas. This year's Christmas is markedly different from last year's, mainly because I'm spending it overseas in Perth with another loved one of mine and I just had a 'barbie' on the beach. That's Aussie for BBQ! It was a novel experience, spending Christmas by the beach, enjoying the gorgeous sunset and the tasty food prepared by yours truly.

I decided that I should repeat last year's post by doing another walk down memory lane. The pickings this year are quite slim, because as compared to 102 posts in 2011, I only wrote 35 posts this year! That's a third but I guess it's understandable considering 2012 was when I got a full-time job which occupies probably 80% of my time.


My Most Beautiful Post and The Post That I Am Most Proud Of 
I guess macarons do photograph very beautifully. Last year's "most beautiful post" was my pink salted caramel macarons and this year, it's my ferrero rocher macarons. Not only were they beautiful, they were delicious too. The only thing I hate about macarons is how finicky it is. Perhaps I haven't got my technique right, but it always seems to be a hit-or-miss deal with me when I'm making macarons.


However, the post that I am most proud of, albeit not a complete post (ie without recipe), is my recent post on what I've been up to. So many reasons why I'm proud of it - I baked 300 cupcakes across 3 weekends, iced them with 12 different types of frosting, baked trays and trays of cookies, and single-handedly raised a sizeable amount for charity! I would definitely want to repeat this next year!


My Most Popular Post 
Again, the list of baking places in Singapore remains the most popular post. However, for a post done in 2012, that would have to be my list of Pizza Places/Pizzerias in Singapore. Come to think of it, my "lists" tend to be really popular, which I guess is good testimony to my information gathering skills (which is an important skill I cultivate on a daily basis thanks to my job).

I do have a few more lists in the pipeline, but as usual, I want everything to be almost perfect before I upload them, hence the delay. 


A Post I Feel Didn’t Get the Attention It Deserved 
Maybe because the photos I took were not spectacular but these chocolate sables were my best selling cookie during the Christmas Charity fair and has been my best cookie so far, according to both friends and family. It is also known as the "World Peace Cookies" by Dorie Greenspan, so do try them out for yourself if you haven't. I can assure you that you will definitely not regret it.

*****

With that, I have a very important announcement to make. For those of you who might have been clicking on the links above, you might have realized that you get sent to a domain called "un pastiche". That is my new domain =] The website is not completely up yet - I still have some remaining things to do like the header and updating the older posts which got screwed up in the process of migrating but I've decided to introduce you guys to my new home on 25 December because of the significance of the date :]

I had a few reasons for migrating, even though it meant losing some readers and the rankings for some of my top posts. One of the main reasons was that I wanted to have a brand which I could use on the products I am selling, which I am increasingly doing, and "not the kitchen sink" sounded a little odd on cake boxes and labels. I also wanted the freedom of my own domain, so well here we go! I spent a good part of the year looking for designers who was willing to do what I wanted within my budget, and boy did I get lucky with Kaiyi. She is a local blogger/designer whom I got to help me design my new blog. I was working with a really tight budget, but I wanted lots of frills for a small budget, and Kaiyi was the only one who fit the bill. And the end result was fantastic :]

I will be updating the blog on unpastiche.com from now on, so please bookmark that page or change your feeds to my new page. I will be holding a couple of giveaways soon in my new home as part of my 'housewarming', so please head on down and keep your eyes peeled! The giveaways are one of my biggest yet and will come from stash bought from Australia!

I'm tucking in early tonight for Boxing Day sales tomorrow - catch you guys around my new home at un pastiche!

Tuesday, March 20, 2012

Ferrero Macarons for Macaron du Jour

Today’s Jour du Macaron or Macaron Day in France, and a couple of other places around the world. If you’ve never heard of Macaron Day, well now you have. It’s created by none other than Pierre Hermé, in a collaboration with members of the Association Relais Desserts to raise awareness for a charity. This year, the charity is Autistes sans frontiers, or Autism without Frontiers. What happens is that you can pop by any participating Pierre Hermé Paris boutique and receive a couple of macarons completely gratuit (free). All you have to do is to drop a donation of any amount in the boxes available at the boutique. Pierre Hermé also has a macaron he creates specially for Macaron Day. What’s interesting is that in the recent years, there is a ‘map’ of the participating Pierre Hermé boutiques and if you pop by every one of them, you will get a complimentary box of 25 macarons! And mind you, there are probably that many macaron flavours available at each outlet!


I really enjoy the message behind Macaron Day. While it might have stemmed from a selfish desire to promote his macarons and his boutiques (I’m just speculating here), it does promote a good cause. And I’m hoping that one day, all the macaron-selling patisseries across Singapore can band together and celebrate Macaron Day as well, whilst promoting a good cause. However, knowing how stingy Singaporeans are, the macarons cannot be sold completely free. Not that I’m shaming Singaporeans but honestly speaking, I know of many who cheat the honor system when taking transport in Europe (most transport systems there require you to buy your own ticket and random checks are done). Can you imagine selling newspapers based on the honor system? Many Swiss cantons have a newspaper box where you can grab a newspaper and drop the appropriate amount of money in the box for it. I can imagine many people paying less or even not paying anything for the newspapers! I guess our society just has not progressed to that stage of development yet? Anyway, I digress. What I mean to say is that even though macarons cannot be sold completely free, I’m sure something can be done this time next year to promote the patisseries selling the macarons as well as a chosen charity. Hopefully someone’s listening? ;)


So anyway, this being Macaron Day (it's Macaron Day over at Mactweets as well!) and Macaron Month over at Aspiring Bakers (Aspiring Bakers #17 is March Macaron Madness! hosted by Alan of Travellingfoodies), I decided that it was appropriate for me to try something more interesting. And I decided to make myself some Ferrero Macarons! :] Okay, I know that this perhaps isn’t too spectacular, but this is a step up from what I usually attempt. Instead of just ground almonds, I used a bit of ground hazelnuts and instead of just one ordinary ganache, I used two! Yes nothing too fantastic but who cares, it’s my prerogative; p I love hazelnuts and chocolate (otherwise known as gianduja), and I love Nutella (which is gianduja paste) and Ferrero Rochers, so it’s only natural that I make macarons modelled after them. In fact, I guzzled down jars of nutella when I was studying in Europe, where jars were humongous and it was dirt cheap. I also have fond memories of unwrapping the gold-foil wrappers of ferrero rochers and slowly eating it layer by layer, until I got to the hazelnut at the heart of the sphere.


So without further ado, I present you my ferrero macarons (aka gianduja macarons)!

Ferrero Macarons
Adapted from David Lebovitz
Makes about 40 2-cm large macarons shells 

For the shells: 
80g icing sugar, or confectioner's sugar
20g ground almonds
20g ground hazelnuts
20g cocoa powder

50g egg whites
50g castor sugar 

For the hazelnut praline or gianduja: 

Method 1 (the lazy person method): 
30g chopped hazelnuts, toasted
50g cream
30g milk chocolate 

Method 2 (making hazelnut praline): 
30g hazelnuts
20g castor sugar
50g milk chocolate 
10g neutral oil (grapeseed or canola or olive oil)
Pinch of salt 

For the chocolate ganache: 
90g cream (at least 35% fat)
70g bittersweet chocolate (I used a mix of 66% and 70% chocolate)

Method:
  1. For the macaron shells: Toast raw whole almonds and hazelnuts (without skin) on a tray at 150°C for about 10 minutes. Allow the nuts to cool before grinding them separately. Sift the nuts individually and weigh about 20g of each. The ground nuts can be stored in the fridge for at least a week. 
  2. Sift the ground almonds, hazelnuts and icing sugar together. Sift at least twice before setting aside. 
  3. Beat the egg whites (which are at room temperature) with the castor sugar. You can put in the castor sugar right from the start. Beat until you obtain stiff peaks. This should take slightly less than 10 minutes, depending on the strength of your mixer. 
  4. Using a spatula, dump in all of the dry mixture into the stiff meringue. At first, the mixture will seem clumpy and impossible to fold, but do press on and continue to gently fold the mixture. After about 25 folds, all the dry ingredients will 'magically' be incorporated. The mixture will still seem clumpy, so continue folding until you get a shiny, viscous mixture which 'flows like magma'.
  5. Spoon the mixture into a pastry bag fitted with a plain tip and proceed to pipe 2 or 3-cm large rounds onto baking sheets lined with nonstick liners. After piping the shells, be sure to rap the baking sheets against the counter to get rid of any excess air. 
  6. Let them sit at room temperature (or air conditioner temperature would be fantastic) until they are dry to touch. You need not actually touch the shells because it will be rather obvious when they dry and form a 'shell'. This should not take more than an hour. 
  7. In the meantime, preheat the oven to 140°C (fan-assisted), with the rack in the middle, with top and bottom heating. Bake the macarons for about 16 minutes, making sure to open the oven door at around the 8th minute (or after feet have formed) to let out excess hot air and to turn the tray from front to back. Once the shells are firm to touch, remove the trays from the oven and let them cool on the trays for at least 15 minutes before proceeding to cool them on cooling racks. If you use a nonstick liner, they should be easily removed, if not, use a knife or metal spatula to release the macaron. Store the shells in an airtight container until ready to assemble. 
  8. For the chocolate ganache: Chop the chocolate into small pieces and place them in a heatproof bowl. Heat the cream in a saucepan until it starts to bubble. Take it off heat and pour the hot cream over the chocolate, making sure to mix quickly until all the chocolate has melted and you get a homogenous mixture. The mixture will appear very liquid but it will thicken after you allow it to cool for at least 30 minutes. 
  9. For the gianduja #1: Follow the same method as the chocolate ganache above by heating the cream and pouring it on the chopped milk chocolate pieces. Then, add in the chopped hazelnut pieces. For convenience, toast these hazelnuts together with those in step 1 and in fact, just use the hazelnut pieces which are too big to sift through for varying sizes. 
  10. For the gianduja #2: You first have to make a hazelnut praline, which requires you to heat the sugar in a saucepan. In the meantime, make sure you have got toasted whole hazelnuts (without skin) neatly lined on a baking tray lined with nonstick liner. Once you get a caramel, i.e. when the sugar turns a medium brown, pour the caramel on the hazelnuts and allow to cool. DO NOT TOUCH THE CARAMEL because it is very hot! If the caramel is at the right temperature, it will harden almost immediately. After it hardens, remove the praline from the nonstick liner and break it up into pieces. Place the pieces into a food processor and process until it breaks into very small pieces. Do not process too much because you still have to add in your chopped chocolate pieces and oil. What I did was to remove some of the processed praline and dumped in the chocolate, salt and oil, and processed until I got a smooth paste. I then added the processed praline back into the mixture to get those chopped pieces of hazelnut praline. 
  11. To assemble: You can choose to use a piping bag or use the lazy method and spoon the ganaches onto the macaron shells. I spooned a teaspoon worth of the chocolate ganache on one side of the shell, and about quarter a teaspoon worth of gianduja on the other shell. Match the shells together and store the shells for at least a few hours (preferably a day) before consuming. Remove the macarons 5-10 minutes before serving for the best experience :]


Janine's jots: 
  • The gianduja: I have included two recipes and methods for the gianduja which I tried. The first method can be accurately called a gianduja paste whereas the second would be more accurately called a hazelnut praline paste. For the trouble undertaken for method #2, I would definitely not recommend making such small portions. I actually made a triple batch of hazelnut praline (to use as a layer in my entremet) - it keeps very well in the fridge. Of course, the second recipe is sweeter (because of the caramel) than the first recipe. 
  • Notes on the ingredients: If you notice, I haven't used cream of tartar or salt with the egg whites in this recipe, as compared to the previous strawberry macarons. Also, I used freshly cracked egg whites here. I have found that there really is no need to dry them out or add egg white powder although that would definitely help in stabilizing the meringue. After numerous attempts at making macarons, I can safely say that it's the macaronage or technique that determines if you have feet or not, because you can use any nut (or not) with varying amounts of sugar and add-ons. So really, practice makes perfect!
  • Taste: The shells by themselves were awesome, because the toasted nuts added a different dimension. For my under baked shells (i.e. those which stuck to the paper), I felt as if I were eating chocolate hazelnut paste because the hazelnut taste was so prominent! I also enjoyed the combination of bittersweet chocolate with milk chocolate and chopped hazelnuts. Deliciously sinful! For more chocolate-hazelnut sinfulness, you can add in some Nutella in the chocolate ganache. 
  • Texture: The macarons were also undermixed this round, because they were bumpy but on the plus side, they dried out in less than 10 minutes, and I could bake them almost immediately. I enjoyed the crisp chewy shells coupled with the chocolate ganache, added to that was the fact that the gianduja paste had chopped hazelnuts in it. To really replicate a ferrero rocher, I'd suggest adding half a hazelnut in the centre of the macaron :]
  • Serving size: I got about 20 paired macarons, but my macarons were about half the standard size - about 2 cm or slightly more than an inch.
  • Modifications: As I said earlier, this is my go-to chocolate macaron recipe, but I would definitely try reducing the amount of sugar in the recipe as the shells were very sweet (too sweet for my liking). I would probably begin by reducing the castor sugar used to about 40g. The bittersweet ganache helped in cutting down the sweetness, but the gianduja had milk chocolate, so that didn't help with the sweetness. 
  • Storage: Because the filling is a ganache, the macaron lasts pretty well at room temperature - it starts to soften and slide apart only after half an hour or so.
  • Would I make this again?: Definitely! This is my 4th or 5th time using this recipe :]

Matched up, unfilled shells :]

If you're looking for another method of making macarons - i.e., the Italian meringue method, do check out my other post on salted caramel macarons. And don't forget to participate in my strawberry powder giveaway!

Wednesday, March 14, 2012

Strawberry Milk Macarons and a Mini Giveaway!

I've been on a kick to use "all natural ingredients" or ingredients that are as unprocessed as possible. This of course translates to less refined flours and sugars, and more wholemeal flours, non-wheat flours, as well as different forms of sugar, such as molasses. This has also translated into using only 'natural food coloring' in my foods, and thus far, I've only experimented with red and green, mainly because they are the most easily accessible colors - for green I use pandan, and for red, I stick with my favorite strawberry (and raspberry).


That, plus my recent infatuation with Sadaharu Aoki (I gorged on his cakes when I was in Taipei) meant I was hooked when I saw Pook's strawberry milk macarons which used strawberry powder AND was a recipe by Aoki. 

For those who might not know who Sadaharu Aoki is, do check out his website and be amazed. In fact, a couple of his pastries (including the black sesame eclair) are rated as one of the top few pastries to try in Paris by Adam. Aoki excels in making French pastries and if I'm not wrong, he is probably one of the few Japanese patissiers to make it big in Paris, which is quite telling. He also has outlets in Japan as well as in Taipei, and I was extremely lucky (well actually not really since I purposely made a few trips down to the outlet in Taipei to eat my fill) to have tasted his cakes. He really does excel in pairing Japanese flavors in the French pastries, and one of his best and most famous works has got to be the Bamboo, a matcha and red bean Opera-like cake. The best thing is that the cakes are not overly saccharine or cloying (which tends to be the case when Europeans at making pastries), which is perfect for the Asian tastebud. 

So suffice to say, anything Aoki is a sure-win, and I was quietly confident that these strawberry milk macarons would be fantastic. I was not wrong. 


Strawberry Milk Macarons 
Makes 50-60 shells

For the macaron shell
65g   ground almonds
90g   icing sugar
5g     strawberry powder

50g   egg whites
15g   castor sugar 
Pinch of salt or cream of tartar

For the strawberry milk buttercream
3g     all purpose flour
60g   fresh milk
65g   unsalted butter
8g     castor sugar

Method:
  1. Sift the ground almonds and icing sugar separately. Next, sift them together with the strawberry powder. Set aside. 
  2. Beat the egg whites (which are at room temperature), and cream of tartar or salt together with the castor sugar. You can put in the sugar right from the start. Beat until you obtain stiff peaks. This should take slightly less than 10 minutes, depending on the strength of your mixer. 
  3. Using a spatula, sift in a third of the almond-flour mixture into the stiff meringue. You need not fold but do mix the ingredients in gently. Sift in the remaining almond-flour mixture in two batches and gently fold to combine. You should get a shiny, viscous mixture which 'flows like magma'.
  4. Spoon the mixture into a pastry bag fitted with a plain tip and proceed to pipe 3-cm large rounds onto baking sheets lined with nonstick liners. After piping the shells, be sure to rap the baking sheets against the counter to get rid of any excess air. 
  5. Let them sit at room temperature (or air conditioner temperature would be fantastic) until they are dry to touch. You need not actually touch the shells because it will be rather obvious when they dry and form a 'shell'. This should not take more than an hour. 
  6. In the meantime, preheat the oven to 140°C (fan-assisted), with the rack in the middle, with top and bottom heating. Bake the macarons for about 12-16 minutes, making sure to open the oven door at around the 8th minute (or after feet have formed) to let out excess hot air and to turn the tray from front to back. Once the shells are firm to touch, remove the trays from the oven and let them cool on the trays for at least 15 minutes before proceeding to cool them on cooling racks. If you use a nonstick liner, they should be easily removed, if not, use a knife or metal spatula to release the macaron. Store the shells in an airtight container until ready to assemble. 
  7. For the strawberry milk buttercream, sift the all-purpose flour into the milk and place into a small saucepan. Bring the mixture to a boil over low heat and stir until the mixture thickens. Once a roux is formed, remove the pan from heat and allow it to cool. In the meantime, beat the butter and sugar together until light and fluffy. Pour the cooled milk roux and gradually beat to combine. Beat in the strawberry jam until you get a homogenous mixture. 
  8. To assemble: Place the buttercream into a piping bag and proceed to pipe it onto matched macaron shells. You may have to chill the buttercream for a few minutes before piping if it is too 'soft' for piping. Refrigerate the sandwiched shells for an hour or until the buttercream has firmed. Remove the macarons 5-10 minutes before serving for the best experience :]


Janine's jots: 
  • Note: I have to admit that the macarons were severely under filled - in fact, you can't even see the filling for most of them. But I've a good reason - the filling wasn't enough because I kept filching it and it's oh so yummy with the sponge cake I made. So well, I didn't have enough for the macarons ^_^ I didn't mind though, since I don't particularly like too much filling in between my macarons. I would definitely recommend making more of the strawberry milk buttercream because it is simply delicious.  
  • Taste: On the buttercream, it wasn't overly sweet because I used less of the strawberry jam and in fact, my homemade strawberry jam is more tart than sweet, which perhaps explains why I loved it so much. This went together very well with the macaron shells, which were slightly flavored due to the use of the strawberry powder.  
  • Texture: Although the macarons were not perfect - I undermixed the macarons for fear of no feet, so you can still see bumps and 'nipples' on some of the shells. Nevertheless, the shells turned out pretty shiny and I'm pretty happy with the sideway feet. One other reason why I liked the recipe is because the shells were just the right level of 'crispiness' and the inside was sufficiently moist when paired with the buttercream.
  • Serving size: I got about 35 paired macarons, but my macarons were a little on the smaller side - about 2.5cm or slightly more than an inch.
  • Modifications: I would definitely want to try this same recipe but with a reduced amount of icing sugar. I've actually tweaked the ingredients quite a bit from the original, and the macaron shells themselves are not overly sweet as in some recipes because of the tanginess of the strawberry powder but for the sake of my waistline, I shall see if I can reduce the sugar even more without sacrificing on the feet! Also, without using red coloring, it is impossible to get the vibrant red colors that Pook got with her macarons. Nevertheless, this dusty rose color found favor with me and the people who ate them. In fact, these macarons were more popular than the salted caramel macarons! 
  • Storage: My only gripe is that the buttercream softens wayyyy too quickly! It is very moist and goes very well with the shells, but you'll have to consume the filled macarons almost immediately to get the best mouthfeel, otherwise the filling will be too soft and 'oily' to eat. Do only fill the shells that you will consume the next day or two (macarons have to be filled at least 24 hours to let the moisture and taste from the filling 'diffuse' into the shells). If not, keep the shells and filling separate until ready to eat.
  • Would I make this again?: Definitely! I foresee using the same recipe with other fruit powders to get different colors and flavours!

Playing around with the 'aged' effect - what do you think? 


Anyway, I previously tweeted about using my strawberry powder in my macaron shells (it really does give a superb tangy strawberry flavor to the shells), as well as in my mom's birthday layered cake. Some of you have asked me where I got this powder from, and sadly, I've to say that I got a friend to purchase it for me from an overseas organic store. It's basically 100% natural powdered freeze-dried organic strawberries, so it perishes pretty quickly even in freeze-dried form. The recommended use-by date is actually in May 2012, and since I've quite a bit of it, I thought to share the love :] 


I'm giving away 10g of strawberry powder each to two lucky persons, which will be packaged in a clean, tiny ziplock bag. This amount should be sufficient for those interested in trying out the strawberry milk macarons above (the original only requires 3g of powder). You can also use them to flavor cake (like what I've done), so simply sprinkle them on your plain yogurt (which is what I've been doing too). It also works well in coloring icing too!

I know it sounds like a tiny amount, but in my defense, let me remind you that it's organic, unavailable in Singapore and pretty costly :S Anyway, this is just a tiny way of saying thank you for reading my blog (silent or not), and if you aren't picked for this giveaway, please do stay tuned because I've a few more small giveaways in store, mainly because I've some 'exotic' ingredients which I bought in bulk to save on costs and I know some of you out there would love to try out these ingredients. If you're really desperate to get some strawberry powder yourself, Pook shared where she got her strawberry powder from here

So to participate, all you have to do is just to leave me a comment below, with your email address and name. It's that simple ;) I'll be opening this giveaway to readers in Singapore and Malaysia, because it's a tiny item which is easily shipped. I'll close the giveaway on 29 March 2012 at 11.59pm. The winner will be randomly selected and contacted via email the next day.

If you're kiasu and want to increase your chances of winning, you can do the following for an extra entry each (please post a new comment for each of the below): 

  1. Like my blog on Facebook and leave an extra comment below. The page is still bare, but I'm working on it!
  2. Share this giveaway on Facebook. 
  3. Follow me on Twitter (@notkitchensink) and retweet this giveaway on Twitter!
  4. Follow my blog by clicking on the "Follow" bottom at the top left corner of this page. 


This macaron post is also in support of Aspiring Bakers #17 – March Macaron Madness! (Mar 2012) hosted by Alan of Travellingfoodies. I'm also posting this over at the #27 edition of Mactweets! If you haven't made macarons before, do use this opportunity to try them - they might be finicky things to make, but I can assure you that your spirits will lift tremendously when you see the little frilly skirts/feet emerging from the shells and they look and taste super yummy too :] 

Wednesday, October 26, 2011

Pink Salted Caramel Macarons for Breast Cancer Awareness Month

This post has been long in the making. Like 8 months kinda long. Ever since my first post on macarons more than half a year ago, I've been making macarons on and off, experiencing more failures than successes. I'm experimented with technique, temperature, equipment, ingredients and a whole lot of other variables, and have come to the conclusion that macarons are indeed iffy little creatures and having a humid and cramped kitchen to work in is definitely not the most ideal of places. I say this with a caveat of course, since I know that bakers in similar situations have churned out beautiful macarons but let's face it - you do get better results if you work in an air-conditioned (or low humidity) environment. Also, let's just say that I impose exacting standards on myself and even the 'successful' macarons you see below still don't pass muster in my books - the feet are a tad too short and the tops are not flat and shiny enough.


I'm still experimenting with different recipes (you might say, just stick to a darn recipe girl! But I'm fickle minded that way), and am still determined to get my french meringue technique right - I'm still in the process of tweaking the different variables to see where I'm going wrong.

Like I mentioned previously, I tried making macarons using the french method for a consecutive five times, and each time, the macarons turned out feet less. I was so dejected and disappointed - at that point, I knew that I had to turn to the italian meringue, which had given me results on my first attempt. And to that I turned, and it did give me results as promised. You might query why the hesitation in using a successful method? Well, for one, I find the steps tedious, and you do need a candy thermometer in order to make the italian meringue and second, I really wanted to get my french meringue method right. Suffice to say, after having successful macarons with the italian meringue, I have given up on making macarons for a while and have focussed instead of using up those macaron shells. Once I've cleared my fridge of all those shells, it'll be back to more macaron experiments for me!

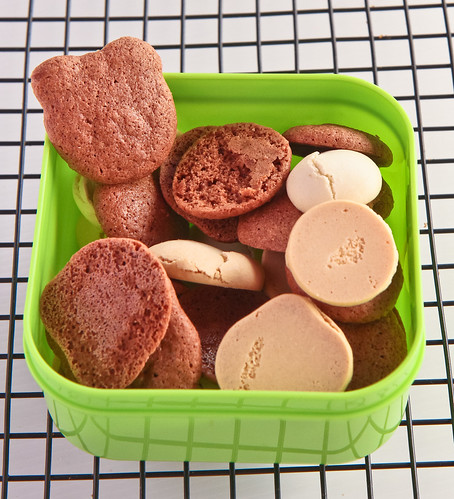
For those interested, these are what my failures looked like:- volcano and cracked tops as well as undercooked bottoms for some.


***
After reading MANY troubleshooting posts (see Not so Humble PieMiso Hungry, Duncan, Vivian for some imminent examples) on why my macarons turn out the way that they do, I have concluded that it was a combination of several factors, including:

1. Not allowing the 'crust' to develop sufficiently, hence the mega cracks
2. Too humid weather and too high baking temperatures (see this useful post by Silvia and Ivan on dehumidifying)
3. Over folding the batter.


Check out the difference in the bottoms of the macs - the left ones are using a generic silicone mat and the right ones are made using baking paper. 

***

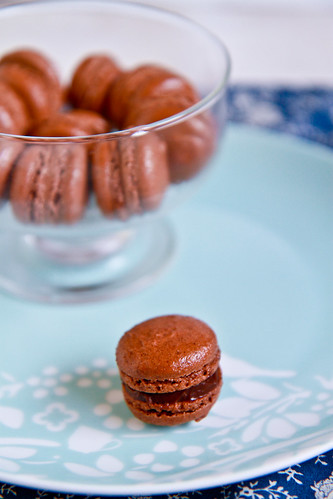
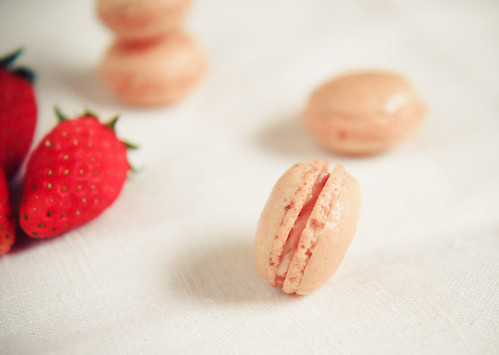
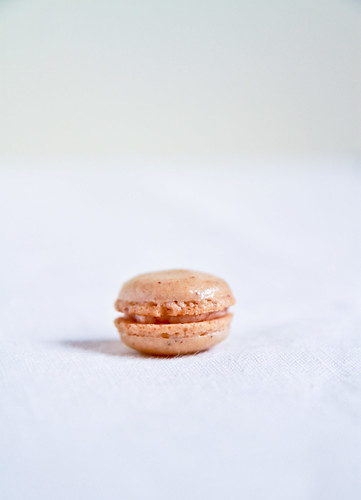
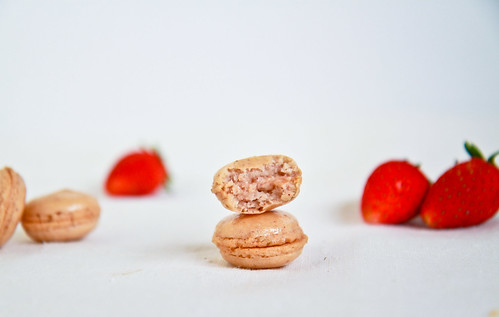
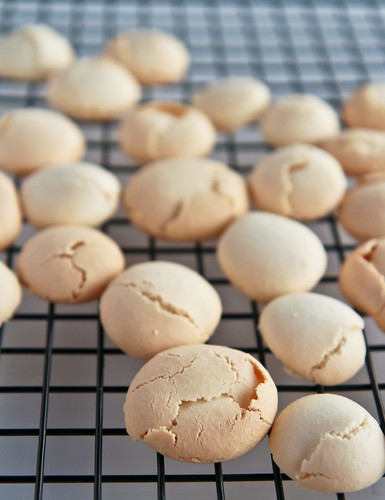
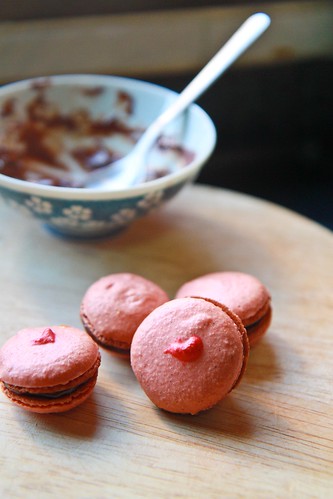
Nevertheless, I was sick of getting failures, so I escaped by using the italian meringue method (yes I'm escapist) and I ended up with this bunch of macarons you see here:

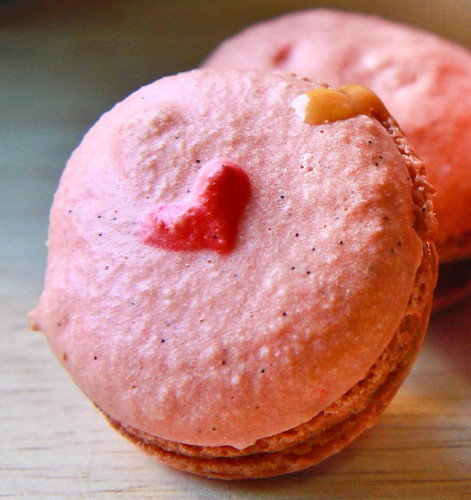
Finally, some successful macarons.

Macarons with relatively smooth shells but super tiny feet. Well, at least they had feet right? And strangely enough, I ended up with salmon pink macarons, even though I used brown coloring. I thought, hey, that might just be serendipity, since I was dying to come up with macarons to qualify for this month's Mactweets Mac Attack Challenge #24, Pink October Macarons. For those not in the know, Mactweets is a monthly macaron challenge started by Jamie and Deeba, both of whom have wonderfully written blogs. This month's Mactweets is special, because it is the second time they are supporting a wonderful cause, since October is also Breast Cancer Awareness Month. I was actually hoping to have some failures which looked like breasts (i.e., those with nipples), but as fate would have it, I didn't get that particular type of maca-fails. So normal pink macarons it is!

I've been wanting to talk about Breast Cancer Awareness this entire month, but time just seems to have passed me by and all my pink-related bakes weren't successful enough to be blogged about. Anyway, I'm at that age where the idea of having breast cancer seems foreign, but I've come to realize that although the risk of getting breast cancer increases with age, being young doesn't mean there is no risk. Women as young as in their early twenties have been diagnosed with breast cancer! I know that many older women have the mentality that this can't happen to me (a friend of my auntie was diagnosed recently and she was in denial, refusing treatment for months before she got some sense knocked into her) - but it does and can happen to ANY of you, male or female! Yes, it does occur in males, though less than 1% of the population. And you can help yourself by doing your own self-examination, and going for a mammogram, especially if you're 40 years or older. Early detection does save lives! I mean, come on - self examinations are free and it costs $50 to go for a mammogram in Singapore. For more information, especially for people in Singapore, please do check out the Breast Cancer Foundation website, where you can get information about breast self examination and other useful information related to breast cancer!

So, if you're female, give yourself some self-love today (terrible pun to tie in the photo below, I'm sorry), and do a self-check to reassure yourself that you're breast cancer free! :]


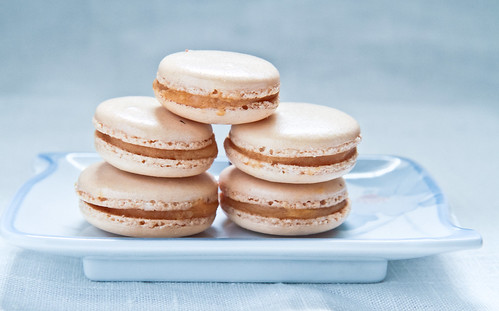
Alrighty, and back to my macarons. I shall be providing you with Pierre Herme's Italian Meringue recipe, which I translated from his Macarons book which I have in French (yes, the English version was just released). I also used his recipe for caramel fleur de sel (salted caramel buttercream filling), which was awesome (as usual). Because I upped the saltiness a little, the filling matched the sweet shells perfectly. 

Macarons with Salted Caramel Buttercream, using the Italian Meringue Method

For the Macarons
150g   ground almonds
150g   icing sugar
55g     egg whites
1 tsp   egg yellow food coloring (I used 2 drops brown coloring)

115g   castor sugar
40g     mineral water
55g     egg whites

Method: 
  1. At least a day (24 hours) before attempting the macarons, separate the egg whites from the yolks and let them rest in the fridge (it is too humid and hot here for them to rest on the counter for more than a few hours) to age and 'liquefy' (in the master's words). 
  2. Sift the icing sugar and ground almonds individually to get rid of the large lumps. Then, sift the icing sugar TOGETHER with the ground almonds. This is known as your "tant-pour-tant" (literally, so much for so much or equal parts). Mix in the food coloring into the first 55g of egg whites. Then, combine these colored egg whites into your tant-pour-tant. Mix well and leave this aside. 
  3. For the remaining 55g of egg whites, place it in a clean mixing bowl. Next, heat the castor sugar and water in a saucepan over a medium heat. Do use a candy thermometer - allow the mixture to boil until it reads 118°C. However, once the syrup reaches the 115°C mark, start whisking the egg whites. The sugar syrup should read 118°C just as the egg whites reach a soft peak (the timing is pretty accurate). Pour the sugar syrup down the sides of the bowl and continue whisking the egg whites until you achieve a stiff peak. The egg whites should read about 50°C when stiff peaks are achieved. 
  4. Fold in the egg whites in 3 additions into your tant-pour-tant mixture, gently folding the batter until it is glossy and 'flows like magma'. I generally use the indicator of how long a fold takes to 'dissolve into itself' - about 15 to 20 seconds to check if my batter is ready. 
  5. Pour the batter into a pastry bag filled with a plain tip (about 10-15mm in diameter should be just right) and begin piping the mixture into circles of about 3cm in diameter onto your baking sheets lined with parchment paper. If you have problems piping evenly sized shells, do print out a template or you can trace out 3.5cm rounds on the back of your parchment paper. Since the shells will spread out a little, do pipe the shells a little smaller than the circles you have drawn. Leave a 2cm space in between each shell. After you are done piping, rap the baking sheet against your work surface to ensure that there are no air bubbles trapped in the shells. 
  6. Allow the shells to develop a 'crust' - this crust is simply a skin that ensures that the shell will not stick to your finger. It literally feels like a thin membrane. For a humid environment like Singapore, try to work in an air-conditioned environment or you can place the shells in front of a fan. My shells took about 1 hour to develop a crust.
  7. Preheat the oven to 160°C (some recommend 180°C but I find that 160°C works best for my oven). Place the tray in the middle rack of the oven and bake for 12-15 minutes. At the 5th minute, the feet should have developed. At the 8th and 11th minute, do open the oven door a little to release the build up of steam. If your macaron shells start to brown, your shells are overcooked. What I do is to remove the tray from the oven at the 12th minute and flip one shell over to check if it adheres to the baking paper. If it does, put the tray back to bake for a few more minutes; if not, the shells are done. 
  8. Once out of the oven, remove the shells from the baking sheet (still on the parchment sheet) and allow them to cool on a cooling rack. This will ensure that the shells don't continue to cook on the hot baking sheet. Once the shells are cool enough to handle, remove them carefully from the parchment sheet (ideally they should not stick at all) and pair them up. 
  9. Fill the shells with your desired filling and store in the refrigerator for at least 24-48 hours before consuming, to allow for an 'osmosis' of the buttercream to the shells. 

For the salted caramel buttercream filling
100g sugar
115g whipping cream
15g butter 

1 tsp fleur de sel, or any sea salt. 
70g butter, softened. 

Method: 
  1. Add half of the sugar to a saucepan and allow it to melt before adding the remaining half of the sugar. Do not stir the mixture and allow all the sugar to melt to a amber color. 
  2. At the same time, bring the cream to a simmer. 
  3. Once the sugar has turned a dark amber color, remove from heat and add the first 15g of butter. Stir quickly and be careful as the mixture might splatter. Then, add in the cream which has been simmering and stir quickly to incorporate. 
  4. Put the saucepan back onto a medium heat and allow it to boil until it reads 108°C on the candy thermometer. Pour the mixture into a heatproof dish to stop the mixture from cooking and allow it to cool. 
  5. Once the caramel mixture has cooled, stir in the sea salt, making sure it dissolves. Begin beating the softened 70g of butter for about 5-10 minutes, or until it becomes soft and fluffy. Add in the cooled caramel mixture in two additions, making sure that the caramel is fully incorporated into the fluffy butter. Place the mixture into a piping bag and your salted caramel buttercream is ready to be piped!


Janine's jots: 
  • Note: Veron from Kitchen Musings has this delightful series on Macarons which you should read - more relevantly, her comments on Pierre Herme's italian meringue method here come in handy should you wish to attempt this recipe. For a photo tutorial, do check out Edd's post for this exact same recipe. If you wish to look at local bloggers attempting the italian meringue method, do check out Swee San's step-by-step tutorial for Wendy, both of whom had beautiful macarons with frilly skirts :]
  • Taste: I enjoyed the saltiness of the caramel but it might be a tad salty for people unused to the taste of sea salt. I would recommend starting with half a teaspoon and working your way up through tasting (you can do that with the cooled caramel). The sweetness of the macaron shells were thus countered with the salted caramel. 
  • Texture: For the best experience, DO allow the filled macarons to rest in the fridge for at least a day or two, because the part of the shell in contact with the buttercream yields more easily and this gives you a crisp and chewy mouthfeel, the hallmarks of a good macaron. 
  • Serving size: I halved both the macaron shells and buttercream recipe, so that I got a smaller number of shells (about 30 pairs). 
  • Modifications: I didn't get my hands on salted french butter or creme fraiche, so I changed that to normal unsalted butter but used instead an extra teaspoon of sea salt to adjust the saltiness to my liking. Creme fraiche was substituted with whipping cream as well. I did reduce the sugar in the sugar syrup by quite a fair bit - the original calls for 150g of sugar and 37.5g of water but I found that reducing the sugar a little worked as well. 
  • Storage: The macarons keep extremely well in the refrigerator - you can even freeze them for a month, but note that the shells will soften and lose its crispiness. 
  • Would I make this again?: Definitely! The italian meringue method requires much more work than the french, but it promises results each time, so I know which recipe to turn to when I have a macaron craving! However, I intend to tweak the recipe a little to see if I can use less sugar for the sugar syrup in order to reduce the sweetness of the shells. 

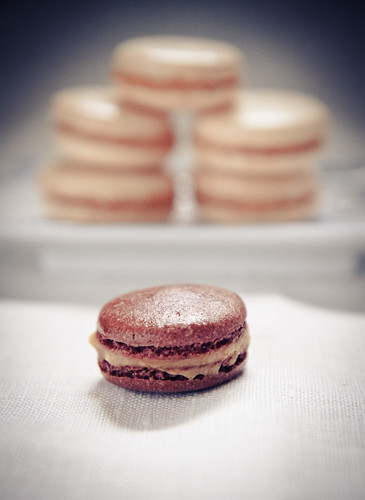
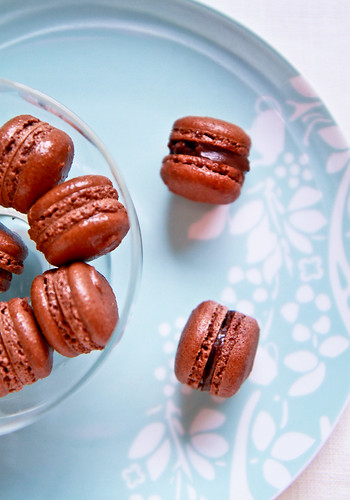
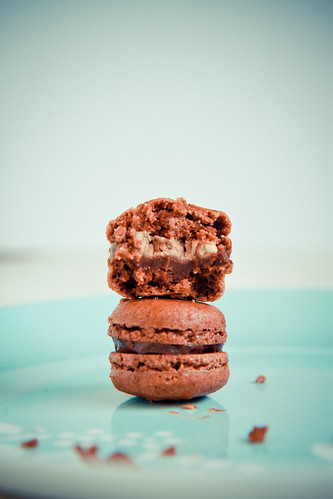
Well, I had ONE successful chocolate macaron from the batch of chocolate failures.
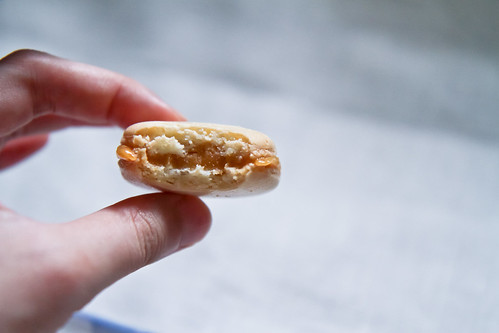
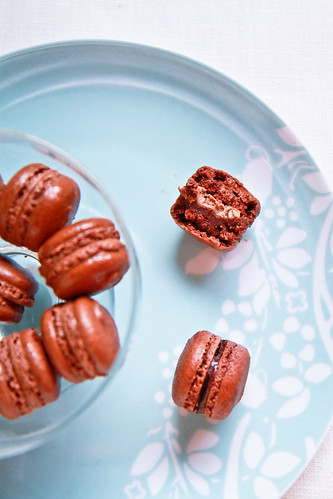
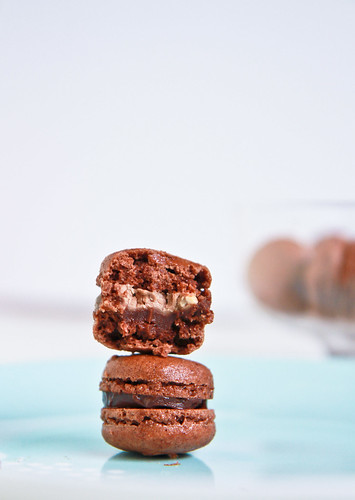
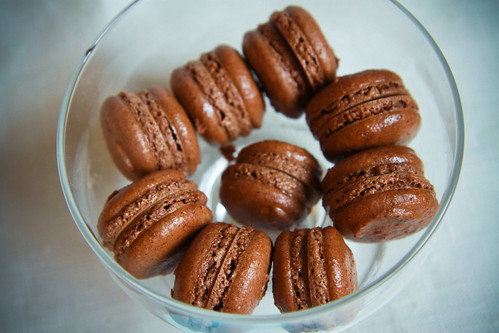
The texture of the shells were pretty good - slightly crispy with a chewy interior. There are also no visible air pockets whee! :]

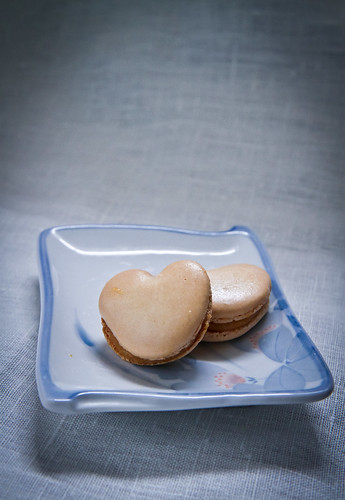
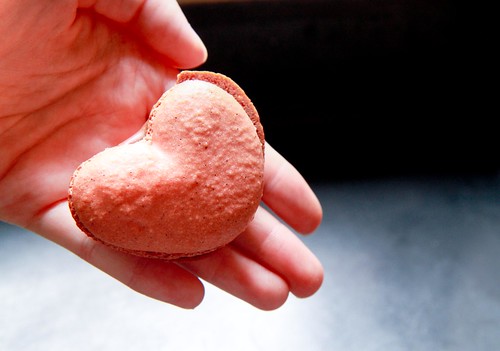
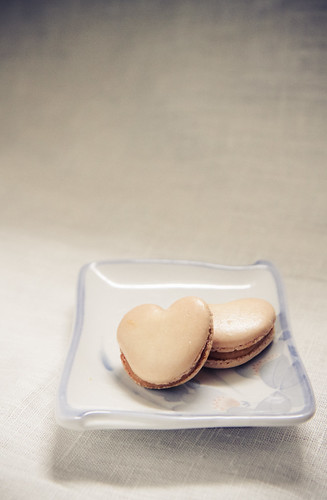
Alright, this post is getting a tad long, so I shall end with a final picture of some heart-shaped macarons I attempted. As you can see, I'm still quite bad at filling the macarons, but I try! ;p

Till my next macaron adventure!

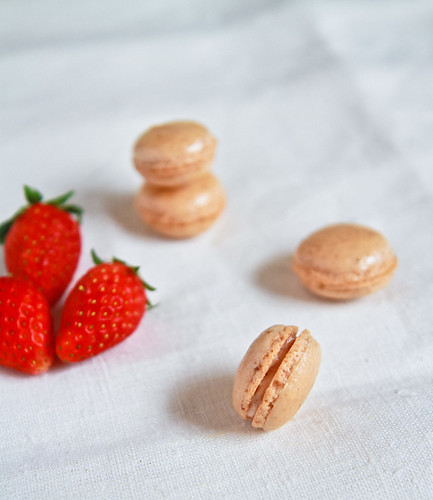
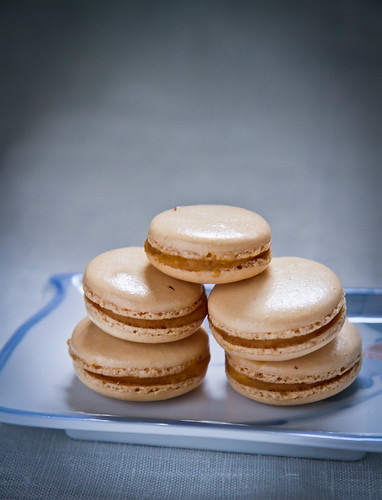
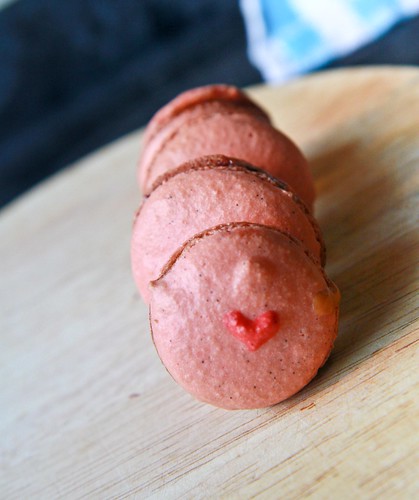
Playing around with colors. I quite like the washed out look here. What say you?

Friday, October 21, 2011

Janine's Failed Macaron Cake aka a Flourless Chocolate Cake made with Maca-fails

I swear by the phrase "out of adversity comes creativity", not only because I am usually pushed by circumstances to think out of the box, but also because much of my (best) work is done when I'm facing a time crunch or other adverse situations. Just take today for example, I was craving ang koo kueh, a traditional glutinous rice treat filled with peanuts or mung beans, and since it was raining heavily and I couldn't go out, I decided that I should make myself some. And so I did. I did so even without the mould required for it, without the banana leaves, and without having peanuts/mung bean paste in the pantry. And it turned out quite successful I must say. I used baking paper and peanut butter as substitutes - creative no? ;p

Anyway, the cake below also stems from one of my 'creative' episodes. I have had many a failure with those dainty little things called macarons, and it's really a pain having to deal with them. This is because with pretty 'footed' macarons, I can gift them to various people, but with macarons that look like whoopie pies...well... let's just say taste is their only redeeming factor, which is sad because many people 'eat' with their eyes first. And the thing is, macarons are always hit-and-fail thing for me, I have as many successes as failures, which makes me hesitant every time I want to make macarons because I'm afraid of the results, or lack there of.


So after a particularly crazy streak of macaron baking which saw me using dozens of egg whites, I ended up with several pretty macarons and a hundred more feetless, shapeless macs. This meant that I had trays and trays of maca-fails, and being the thrifty person that I was, I didn't dump them in the trash right away. I really hate wasting food, so I stored them in airtight containers in the fridge, to the point that there were MANY such containers in the fridge, and my mom started nagging at me, asking me to get rid of them.

So what could I do?


This was when I put on the proverbial thinking cap. I knew that I could do verrines or Eton's mess with crushed macarons, but I'm not exactly a fan of sweet meringue and cream, so after having done it a few times, I had to resort to some other method of getting rid of these feetless horrors. I had always played with the idea of using them in a cake, and after a search on my trusty friend google, I found only one hit for 'failed macaron cake'. The unfortunate (or fortunate perhaps) thing was that the blogger there basically guess-timated her way through her own recipe, and didn't have any particular recipe for her macaron cake. I then deduced that if I pulverized the shells, I could probably replace any recipe which had ground almonds for them. And that was exactly what I did.


So I went about looking for a chocolate cake which made use of ground almonds, mainly because I had lots of chocolate flavored macarons. And as luck would have it, I landed upon Ju's Flourless Almond and Chocolate Cake, which I had bookmarked, a long time ago. If you read the recipe, you'll realize that it's pretty similar to the Queen of Sheba cake, made popular by Julia Child, but that has flour in it.


Anyway, I made a few liberal modifications to the recipe (like using the processor to make the cake), so do check out the original recipe if you're interested in the original cake!


***

Janine's Failed Macaron Cake (Flourless Almond & Chocolate Cake made with Powdered Macarons)
Adapted from Ju, who obtained it from Times Online 
Makes an 8-inch square cake

Ingredients 
200g  dark chocolate (I used a mix of 55% and 70%)
15g    hot brewed coffee (or 1 tablespoon)
15g    rum (or 1 tsp vanilla extract)
95g    caster sugar 
100g  unsalted butter
5        eggs, separated
¼ tsp salt
110g macaron shells


Method: 
  1. Melt the chocolate, brewed coffee, rum and butter in the microwave or on a bain marie. Stir well to combine and allow to cool. 
  2. Place the macaron shells in a processor and blitz them for a minute, or until fine, like ground almonds. Do not over process. Add 70g of the sugar and salt into the processor and blitz for a few seconds to combine the ingredients. Next, add in the 5 egg yolks and process for about 5 seconds. Add in the chocolate mixture and process for 10 seconds, or until all the ingredients are well combined. Empty the mixture into a clean bowl. 
  3. In a metal mixing bowl, beat the egg whites together with the remaining 25g sugar, until you get stiff white peaks. 
  4. Take some of the egg whites (about 10% worth) and mix them into the chocolate mixture to lighten it. You don't need to be gentle with mixing this 10%. Once the egg white is completely mixed into chocolate mixture, gently fold in the rest of the egg whites into the lightened chocolate mixture. This time, making sure to gently fold to retain the air in the egg whites. 
  5. Line your cake tin with baking paper and lightly butter the sides. Pour in the cake mixture and give it a few raps on the counter to get rid of any unsightly air bubbles. 
  6. Bake at 170°C for about 40-50 minutes before removing it. If you want it more fudgey/moussey - bake it for about 40 minutes and your cake tester will come out slightly wet. If you want a more cake-like texture, bake for 50 minutes or more, and some crumbs will still adhere to your tester. 
  7. Cool it in the pan for about 15 minutes before removing it to cool on a wire rack. 


Janine's jots: 
  • BEWARE: I actually made 2 vital errors for this recipe - which accounts for the picture you see above - I used a dark-colored pan, and failed to reduce the baking temperature, which explains why the bottom of the cake is quite over-baked. As for the dense layer slightly above the bottom, that was because I was multitasking while beating my egg whites and I slightly overbeat them, to the point that it was almost turning clumpy :/ This was probably why the cake didn't rise to its requisite height. Nevertheless, I did enjoy the dense layer at the bottom of the cake, because it tasted almost fudgey, and very chocolatey, which was a perfect contrast against the airy cake on top! That being said, I'm not sure if these 2 problems were the result of the powdered macarons, but I doubt so. Anyway, I'll probably try this out again soon (I know I'll have more maca-fails to try them with) and see where I go with it.
  • Note: You should process the macaron shells when they are at room temperature so that they are less 'wet' and can be processed into powder more easily. Otherwise, you might get tiny clumps because of the moistness of the macarons. However, don't worry too much because these clumps will dissolve somewhat after baking (whee!) :]
  • Taste: Having made the original and the modified version, I do feel that there is not much difference in taste, except for the fact that the almonds are much more discernible in the original version. I'd probably use a mix of half almonds and half macarons in the next try to get the best of both worlds :] Do remember to reduce the amount of sugar by a little as well, because the macaron shells after all, are half sugar, and will contribute to the sweetness of the cake. 
  • Texture: The chocolate cake feels almost mousse-y (and tastes that way too), but has a cake-like crust (thanks to my slight over baking), which is a delight to dig into. The best word to describe it would be 'airy'. 
  • Modifications: I reduced the sugar from the original of 150g to 95g, because I took into account that the macarons were half sugar. I felt that the amount of sugar can be decreased further because the cake is still a tad sweet for my liking. My family liked the level of sweetness though. 
  • Storage: The cake does not store well at room temperature because of its gooeyness but they did very well in the refrigerator. Let it sit for a while at room temperature before consuming for the best texture, but even if you don't, it's still really good. I stored a slice in an airtight container for almost 2 weeks and it tasted as delicious (maybe a little drier) as it did when I just baked it. 
  • Would I make this again?: Definitely! Now that I know how to make use of the maca-fails, I have no reason to try and try again :] I'd also serve this with some icing sugar on top, to hide the unsightly cracks - note that this cake WILL sink! Just maybe not as much as mine did.


So there you have it - my secret recipe for disposing of maca-fails! Do try this recipe out if you too have many maca-fails and don't know what to do with them - it's a yummy, alternative way to dispose of them :] If you don't have failed macarons (i.e., all your macarons are perfect) - I hatecha! (I'm jesting!) - this is still a very yummy flourless chocolate cake to try nevertheless :)

Have a great weekend y'all!


PS: I found a new spot in my cramped apartment to take photos and I'm quite happy with the results :) I took these photos in a rather precarious position - balancing on two chairs with the cake placed on a stool which rested on top of my washing machine so that I could get the sun to the side of my cake! What do you think? 

Sunday, February 20, 2011

=)

Here's a smiley face for the upcoming week (because I don't have classes)
Yes, I did take the photo on top of the lid of the lock&lock container I was storing the macarons in.

I'm still quite bad at apportioning filling for the macarons because as you can see, one of the macarons above has ganache flowing out of it and the heart-shaped one doesn't seem to have enough! And I did have a problem with matching heart-shaped shells because although I tried to pipe them uniformly, they turned out uniform BUT unsymmetrical, which meant that none of the shells actually matched one another =S And it's pretty obvious from this close-up picture that my macarons were the teeniest bit undermixed. Btw, here's the link to my vanilla bean macaron recipe if anyone's looking for it!

Here's to a 'light heart' this week!
I finally gave these macarons to my girlfriends when we met over Korean BBQ (2D1N Soju Bang - which was really value for money at $22 per head for a meat buffet) for our belated Valentine's day meal and the verdict was that it was not bad =) I bet they were confused by the filling of the macaron, because it not only contained mint chocolate, it also contained little bits of my salted caramel, which made it minty and salty at the same time! (I quite like the weird combination, btw)

I always look forward to meeting my girlfriends, because like the macarons, they are the nearest and dearest friends that I'll ever have; and my heart immediately lightens whenever I'm out with them because of the great company. On a side note, I'm definitely going to try macarons out a few more times at the very least, because I have yet to come up with a satisfactory filling/buttercream and there are a couple more variations on flavor and technique that I wanna experiment with!

Have a great week everyone!

Tuesday, February 15, 2011

Pink Vanilla Bean Macarons, for Valentine's

I've been thinking about macarons all week along, after my successful attempt with David's macaron recipe here for my cousins on Chinese New Year. I knew I wanted something pink, for Valentine's, and something heart-shaped, so the only thing left was to decide on the flavor of the shell and the filling! I hemmed and hawed, and finally decided on using my vanilla beans (so that I can put the pod into my vanilla extract jar here) in the shell for a vanilla flavor, and a salted caramel buttercream. 

You might notice that in some of the photos, my macarons look as if they have a black, chocolatey filling - well, that's because my salted caramel buttercream was a flop! Although I managed to make a nice salted caramel, I failed making the actual buttercream because I just couldn't get my butter to whip properly. So I used just the salted caramel in some macarons, while using a chocolate mint ganache in others. 

Oops there's extra caramel on the top of the shell!

I'd also like to apologize because I don't have any photos of the macaron-making process and I know how important these are when you are new to making something. Trust me, I've looked at tens (maybe even hundreds! And I'm not exaggerating) of blogposts on how to make this elusive little cookie and looked at many more videos. I've been thinking of writing a post compiling all these tips I've garnered (with the right attributions of course), plus what I myself have learnt, but I just haven't got the time! Plus the fact that I did start on it but my computer gave up on me, swallowing that post up with it, has made me balk a little at re-starting.

Anyway, I was in a real hurry to complete the macarons to give to my friends - I only had about 3 hours to spare, and thankfully, I took 2 hours from start to end (from measuring and sieving the ingredients to finally filling them up with ganache and photographing them)! Hence even the 'end product' photos are quite gross. The amateur photographer in me was practically cringing at the bad exposure and shadows in almost ALL the photos :/ 

Okay, onto the macaron recipe I've used. I won't be sharing the salted caramel buttercream recipe I've used because it was a failure. 

Janine's jots: I've halved the original recipe, which apparently is the same one Canele uses for its macarons. For the life of me, I can't remember where I got this recipe from, but I think I've adapted and edited it sufficiently to call it my own :) The macarons are quite good, and not as sweet as other recipes that I've tried previously. For my next try, I'll try to decrease the icing sugar a little more and increase the ground almond portion.
Vanilla Bean Macaron
Makes approximately 40 shells, or 20 macarons

Special equipment needed: 
Baking paper to line your baking tray
Spatula 
Piping bag with large round tip

Ingredients for the shell: 
50 g almond meal
90 g icing sugar
44 g egg whites
12 g castor sugar 
Seeds from 1 vanilla pod
2-3 drops of red food coloring


Method: 
  1. Weigh the almond meal and icing sugar and sieve them together. If you have a food processor, place both ingredients inside and pulse it a few times to combine. 
  2. Split the vanilla pod in half, and remove the tiny black seeds from the pod, adding it into your almond-sugar mixture. 
  3. Beat the egg whites with your mixer, starting at low speed until it froths and switching to high speed. Once the egg whites start to 'whiten' (the soft peak stage), add in your castor sugar gradually, mixing until stiff peaks are reached.
  4. Using a spatula, start folding your almond-sugar mixture into the stiff meringue. Once it is semi-incorporated, add in 2-3 drops of food coloring and continue folding until everything is fully incorporated. Do not mix the batter because this will break down the air inside the meringue which enables you to get your feet!
  5. The resultant mixture should be shiny, and what people describe as "flowing like lava". My own gauge is that the mixture should be the viscosity of a thick exfoliating facial scrub (those facial washes with beads in them), and if you fold over a trail on the surface of the batter, it should take longer than 30 seconds to disappear. 
  6. Using the spatula again, scoop the mixture into a prepared piping bag and start piping your shells onto your baking sheet. You should try to pipe uniformly, so that the shells bake evenly. My shells are about 1.5 inch in diameter, on average.
  7. Once you are done piping, gently rap your baking sheets in order to remove any extra air bubbles in the shells. 
  8. Here's the important bit - leave the macarons at room temperature for 30 minutes until a skin is formed. This means that when you touch the surface of the shell, it should not stick to your finger and there really is a 'skin' that is formed. What I do to speed up the process is to blow my stand fan directly at the trays so that the top of the shells will dry, inducing the skin to be formed. 
  9. In the meantime, start making the filling of your macaron. After 20 minutes, you should start to preheat your oven to 150 degrees.
  10. The macarons should be baked using the middle rack, so only one tray of macarons in the oven at any single time please! At about 3 minutes, the shells should have rose and the feet formed already. What I do to reduce the steam and humidity in the oven is to open the oven a little at the 6th minute, placing a chopstick in between the gap; then removing the chopstick after 30 seconds. You can also rotate your tray if you see that one side of your tray is baking faster than the other. I repeat the chopstick process at the 10th minute. 
  11. The macarons take about 12 -15 minutes to be done, depending on your oven. Remove them from the oven, and leave them to cool on the tray for 5-10 minutes before lifting them up from the baking paper to cool on a wire rack. 
  12. Fill them with your desired filling once the shells are cooled (about 20-30 minutes) and pair similar-sized shells together. 
  13. And there you have it - a French macaron =D
Here's a few more photos for posterity's sake :]
As you can tell from the shadows, this was taken as the sun was setting! I was in a hurry to get these done for the party in the evening! And as you can see, the shells are not very smooth - because I didn't ground my almond meal fine enough, and the batter could have been mixed just a little more!
Oooh lovely feet (but oh so horrible shadows). The bumps that you see are actually the hearts I added onto the shells. I kept some meringue and made it a deeper pink, and used a chopstick to draw the heart onto the shell. The hearts rose while baking too :) And yes, my shells are not exactly uniform in size =X

And I'm submitting this to Aspiring Bakers #4: Love is in the Air (Feb 2011)! I also made some heart-shaped macarons, as you can see here, but they kinda were packed for my friends before I remembered to take a photo of them :/

ETA: I've finally plucked up the courage to submit this post to Mactweets Mac Attack Challenge #16 here. Mactweets was started by Jamie and Deeba, both of whom have wonderfully written blogs, and they hold a monthly macaron challenge with a theme. Hopefully this will be the start of many challenges that I'll be joining! :)

Sunday, February 13, 2011

Just a little sneak :)

These little sneak peeks were hastily taken with my phone after piping them and while I was waiting for them to form a skin :) Yes, I do know that exposure and lighting are all very off, but it usually happens when I'm all impatient to snap a photo before I forget. 

The tiny black dots are vanilla bean seeds. It's my first time using gel food coloring and I overestimated how much to use, resulting in a slightly garish pink :/


I've made a chocolate mint ganache for them, as well as a salted caramel buttercream. Friends and family who tried them say they're getting better =D Am thinking of getting fresh strawberries tomorrow to try the strawberry buttercream for some of the shells. Whee :)
Related Posts Plugin for WordPress, Blogger...