My blog has moved!

You should be automatically redirected in 6 seconds. If not, visit
http://www.unpastiche.com
and update your bookmarks.

Showing posts with label Italian Food. Show all posts

Tuesday, December 6, 2011

Wholemeal Pizza with Pepperoni and Basil Pesto

Ever since I saw Swee San's Christmas Giveaway post, I've been dying to enter because well, you stand a chance of winning Pantry Magic vouchers! How cool is that? Considering that Pantry Magic in Singapore has closed down and I was a sucker for all their stuff, and knowing the one in Bangsar is huge, I really really really wanted to enter so that I could win hope hehe. 

Anyway, I had many grand ideas as to what green/red thing to make, but suffice to say, time got the better of me. I had wanted to make strawberry macarons, and I did, but I was stubborn and didn't use any red coloring and since the strawberry powder I used just wasn't intense enough, so I got bubblegum-pink macarons instead =X I also wanted something to reflect the theme of Christmas, so I finally decided that pizza would be it. It might be a strange thing to bake to reflect Christmas, but I have fond memories of when my extended family gathered in KL and on the floor under the Christmas tree, were tons and tons of beautifully wrapped presents. I remember us kids would go around the tree and because we were not allowed to touch the gifts before 25th, all we did was to note which present had our names so that once the signal to 'open your presents' was given, we would rush to the tree, grab our presents, and proceed to rip the wrappers off each present in our own spaces. Sadly, as we became older, we didn't like the presents we got and we don't have such a tradition any longer :( Tis a pity really. 

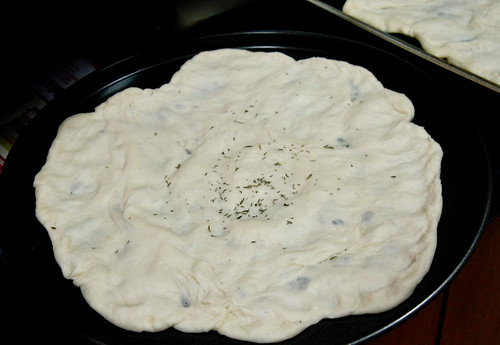
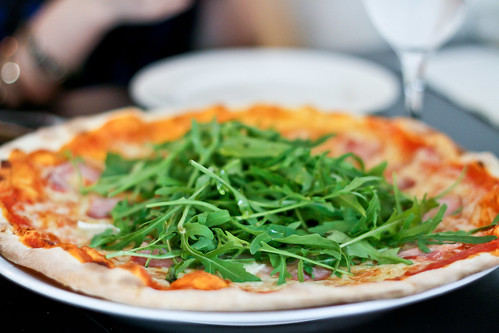
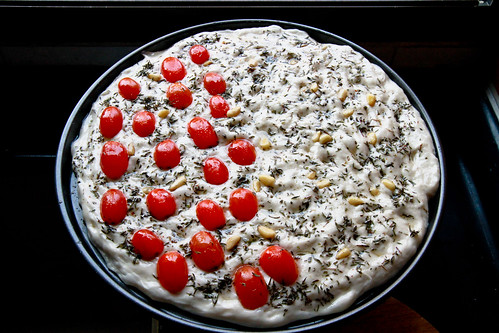
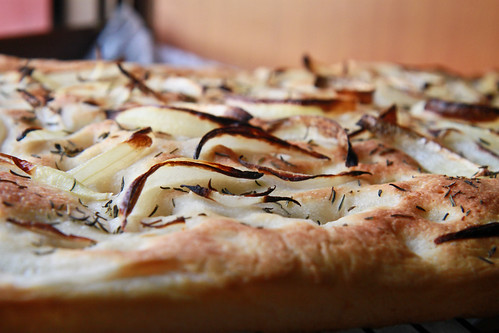
Trying out the 'soft' look here

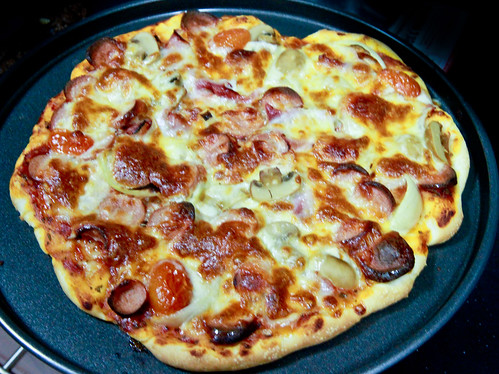
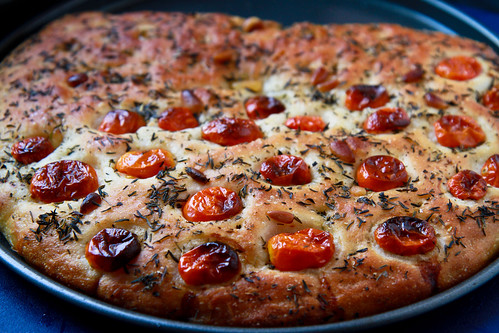
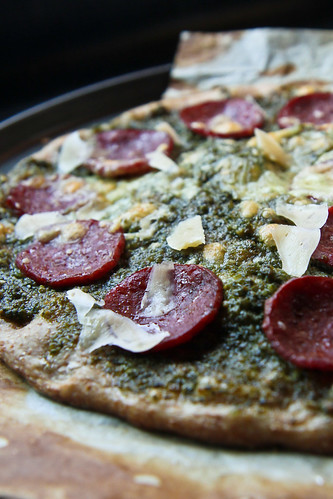
I have deviated, but anyway, on the dinner table, in addition to the yummy chinese dishes that our mothers and aunties would cook, would be pizza. We would order from the usual delivery company, and as young kids, pizza was the first thing we had (or wanted), well, maybe after the fried chicken or wantons and fries, followed by the meehoon and everything else. I vaguely remember having turkey and ham on some years, but pizza was always there. So using that fond memory of mine, I've decided to glamorize and upgrade the pizza. My favorite used to be plain ol' pepperoni, and as we all know, pizza doughs are typically made of normal white flour. Here, I have 'healthified' the pizza by using a wholemeal crust (which is so much more flavorful) and using the freshest ingredients where possible. I have to admit that if you were to compare the cost of making this pizza (plus the effort and planning required) to picking up the phone and ordering, the latter would be the far easier choice. I spent a bomb getting gourmet Italian spicy pepperoni, a block of parmesan cheese, mozzarella (I stinged here so I didn't get buffalo mozzarella). For the basil pesto, I bought a huge bunch of fresh basil and pine nuts. It is not counting the cost of the good quality Italian olive oil I used in the pizza and pesto. And not forgetting the cost of the organic whole meal flour I used. But hey, it was healthy and yummy, so well worth the splurge :]

For the wholemeal crust, I used a recipe from one of my favorite bread bakers - Peter Reinhart. He's probably the only author whose books I all own. I love the way he writes and how detailed he goes into the science and the whys of bread making. So far, none of the recipes I've tried from his book have failed me. In fact, his pizza napoletana recipe is one of my favorites too, if you want a normal white bread flour pizza base. I also love his cinnamon rolls and bagel recipes! I have to caveat this and say that you really don't need to get all his books because most of the recipes in the books are very very similar, and instructions are very similar as well. If you must, get the "Artisan Bread Every Day", I find instructions in that book the clearest and easiest to understand. 

In order not to violate any copyright restrictions, the recipes below are completely rewritten in my own words (as much as possible anyway). I strongly advise you to get the book if you are interested in wholemeal bread baking, because it really is a very good primer into wholemeal baking. In fact, I've just started my own organic wholemeal sourdough starter, and I hope to post results of it soon. I hope to use the sourdough for the pizza that I'll be making on Christmas this year :]

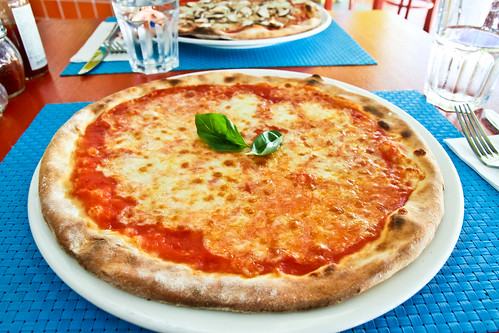
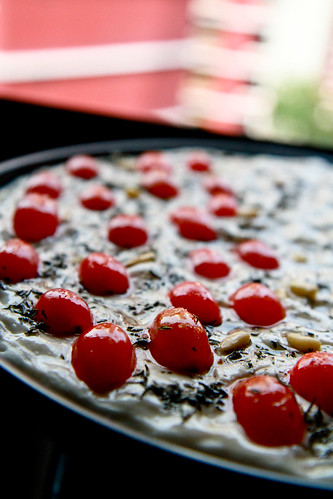
The cheese was patchy here because I ran out =X

To make the pizza, you will need: 
  • Wholemeal pizza dough (recipe below)
  • Basil pesto sauce (recipe below) or a tomato based sauce 
  • Any other toppings you like - I used the following: 
    • Pepperoni
    • Shredded Mozzarella cheese
    • Shaved Parmesan cheese
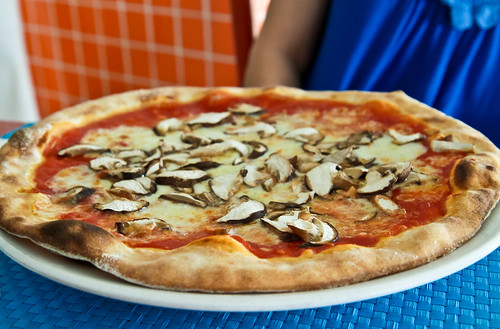
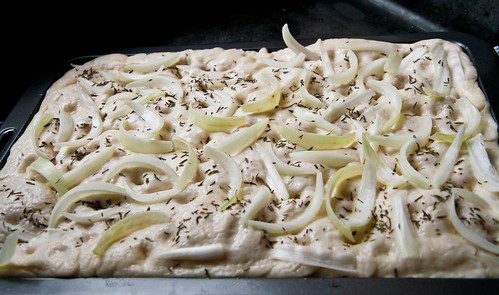
    • (not pictured, on another pizza) White onions and portobello mushrooms 

Wholemeal Pizza Dough
Adapted from Peter Reinhart’s Whole Grain Breads
Makes 5 individual sized (about 8-inch) pizzas

One day before you want to make the pizza, prepare the soaker and biga. 

Soaker:
230g whole wheat bread flour 
½ tsp sea salt
200g water

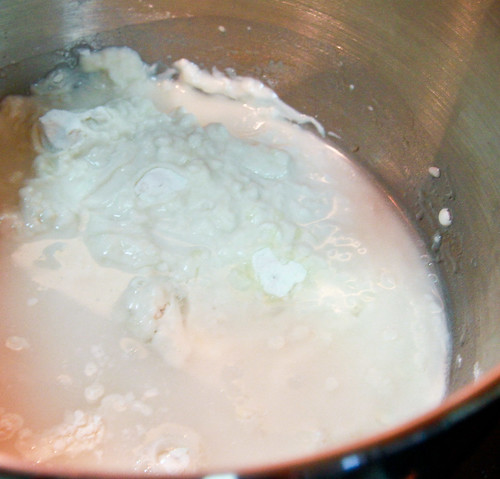
In a container, add water to the whole wheat flour and sea salt. Mix well to combine. Cover it loosely and place in the refrigerator overnight.

Biga:
230g whole wheat flour 
¼ tsp instant yeast
200g water

In a large bowl, combine the flour and yeast with water, mixing until you get a rough ball of dough. Wet your hands slightly with water and knead the dough for about 2 minutes. The dough should feel very tacky but not sticky. Let the dough rest for 5 minutes before kneading it again for another 2 minutes. The dough need not pass the windowpane test but you are aiming for a slightly bouncy, tacky dough. Place the dough in a clean container (large enough for some expansion) and cover tightly. Refrigerate it overnight.

You may refrigerate both the soaker and the biga for a maximum of 3 days. On the day you want to make the pizza, remove the biga and soaker 2 hours before you wish to make the final dough to take off the chill.

Final Dough:

Use all the Biga and Soaker
57g whole wheat flour 
5g salt
1½ tsp rapid-rise yeast
15g sugar
28g olive oil

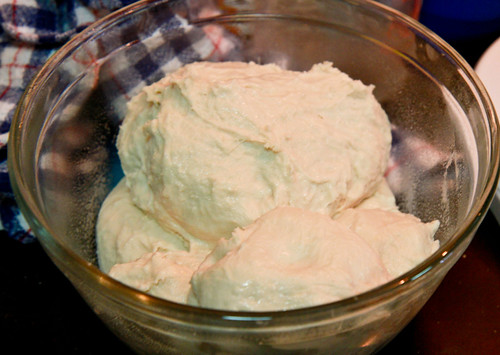
  1. Remove the biga and soaker 2 hours before. Once they are about room temperature, using a scraper or a knife, roughly chop both doughs together into 12 pieces each. 
  2. Place the dough pieces into a large bowl. Add in the flour, salt, yeast, honey and olive oil to the dough. Wet your hands with water and knead for 5 minutes until all the ingredients are evenly distributed. You may also use a bread machine or a stand mixer with a dough hook to do the mixing. The dough should be slightly sticky and a little soft. 
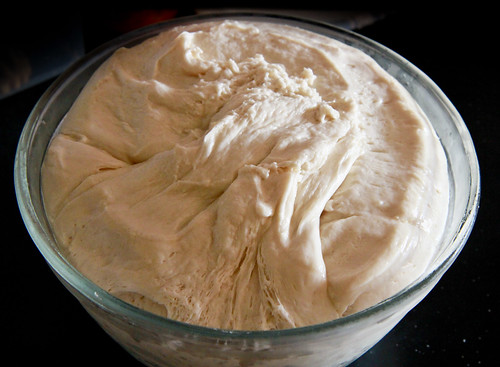
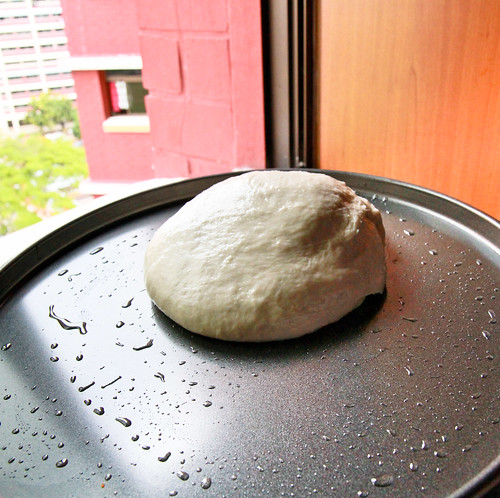
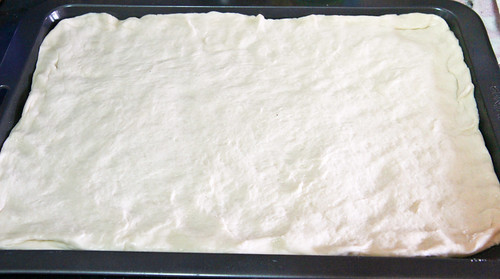
  3. Flour your work surface generously and roll out the pizza dough on it. Knead the dough for a further 5 minutes, using only as much flour as you need. Let the dough rest for 5 minutes. This allows you to give your arms a rest, although it's mainly to allow the gluten to relax. Knead the dough again for a few minutes until you get a tacky dough. At this point, the dough should pass the windowpane test. Divide the dough into 5 (or more) pieces and form each piece into a tight ball.
  4. Line a baking sheet with parchment paper and oil it with the remaining teaspoon of olive oil. Place the balls on the parchment paper, making sure to roll the balls around to coat them in the olive oil. Cover the baking sheet loosely and allow the dough to rise for about an hour, or until it doubles in size (about 1.5 times is okay as well). 
  5. Preheat the oven to the maximum temperature (I used 220ºC fan forced) and adjust the rack to middle position. 
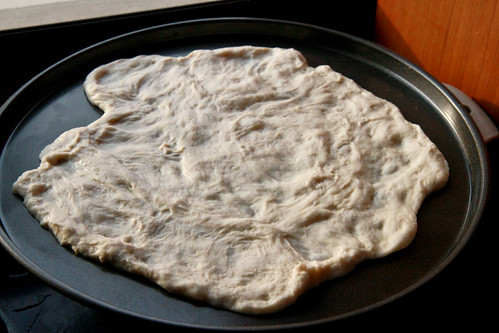
  6. Place one ball of dough on your floured work surface and using a rolling pin, roll the ball out into a 12-inch diameter disk or your desired size. I rolled the dough to about 8 inches, let it rest for a minute and shrink a little, before using my fingers to further expand the dough to about 10 inches. 
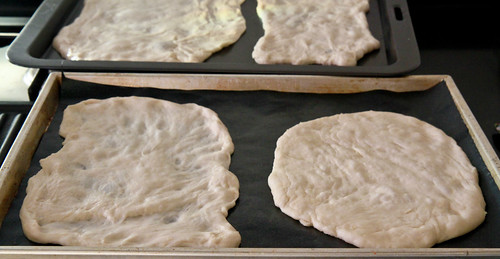
  7. Place the dough onto a lined baking sheet (or pizza stone if you have) and top it with your desired ingredients. I topped it with a generous amount of pesto, followed by pepperoni and mozzarella cheese. On the other pizzas, I added sliced mushrooms and onions as well. Bake for about 10 minutes, or until the cheese is bubbly and golden. Remove from the oven and quickly shave the parmesan cheese onto the pizza. 
  8. Let the pizza cool and rest for about 15 minutes before slicing and serving. 
  9. Repeat steps 6-8 for the remaining balls of dough. 

Basil Pesto 
Adapted from Elise
Makes a cup of pesto, sufficient for all the pizza doughs above. 

2 cups (60g) fresh basil leaves, packed
½ cup (90g) freshly grated Parmesan-Reggiano or Romano cheese
½ cup (100g) extra virgin olive oil
⅓ cup (45g) pine nuts 
3 medium sized garlic cloves
Salt and freshly ground black pepper to taste

Special equipment needed: A food processor or chopper.

Method: 
  1. Peel the garlic and place it in the food processor. Pulse it a few times to mince it. 
  2. Wash the basil and combine it with the pine nuts in the food processor. Pulse them a few times.
  3. Slowly add the olive oil while the food processor is on. You may have to stop to scrape down the sides of the processor with a rubber spatula to ensure all ingredients are evenly blended.
  4. Add the grated cheese and pulse again, until all the ingredients are blended. You can blend longer if you want a smoother paste. I wanted a chunkier paste so I pulsed for less than 15 seconds in total. 
  5. Add a pinch of sea salt and some freshly ground pepper to taste. 

Janine's jots: 
  • Taste: As I mentioned earlier, taste was fantastic. On its own, the pizza dough was so flavorful and so chewy that I literally ate it on its own (as a flatbread) the next day. With the same dough, I also used the traditional tomato version (not pictured because it was all gobbled up), as well as a dessert version (also not pictured because there was none left to photograph - it was a combination of balsamic vinegar, arugula, goat's cheese, figs and honey - a perfect sweet dessert pizza). And yes, I used the exact same ingredients on the dessert pizza as in my salad which I posted earlier. 
  • Texture: I absolutely loved the pizza. It was the right amount of chewy (not too chewy) and you could vary the chewiness through the thickness of the pizza. I made thin crust versions for a crispier base as well as thicker versions with thicker cornicones, which of course were more chewy. 
  • Serving size: The amount of pizzas I got from the recipe was more than enough to feed my family of five. In fact, I had 2 personal sized pizza doughs leftover, which I baked plain for the next day's breakfast. I dipped them in olive oil and balsamic vinegar :]
  • Modifications: I wouldn't change anything about the pizza dough recipe, but I would definitely decrease the amount of olive oil used in the basil pesto because I found it a little too oily for my liking, even though I had decreased the oil in mine to 70g already. You should err on the side of less oil because if you are going to use it on the pizza anyway, you could drizzle some olive oil on top of the pesto if you find it a little too dry. 
  • Storage: You can store the unbaked doughs for up to three days in the fridge, but I would strongly advise you to make all the doughs, and partially bake them, plain, for about 5 minutes in the oven before removing them to cool and storing them in the freezer. You then have readymade wholemeal crusts for whenever you wish to eat pizza!
  • Would I make this again?: Definitely! Although this is the first time I've tried making Peter Reinhart's wholemeal version, this is definitely not my first time making homemade pizza dough. His recipes are my to-go-to for any artisan breads :]


I have to admit that these are not the best photos I've taken, but in my defense, I was very hungry and it was dinner (yes I have dinner at 6plus pm so it's still bright), so there was barely enough time to photograph the pizza before we dug in (although this was the third one after the tomato based pizzas). In fact, I'm surprised the steam was not visible in the pictures because seriously, the pizza was piping hot! Nevertheless, I am submitting this to the Christmas Giveaway in The Sweet Spot. The giveaway closes on 11 December, so you might be a little short of time when you see this post, but do try to join in if you can! Anything green or red will qualify! :]

Tuesday, October 18, 2011

Pizzas in Singapore #2: La Nonna

This is yet another long overdue post. Like I mentioned earlier, I was on a hunt for good pizzas in Singapore, and one of the first places I stumbled upon was this place recommended by Brad, called La Nonna, which according to him, had the best lunch promotion in Singapore. The best thing was, it was located in Holland Village, which is relatively near to where I live. Since then, I've visited La Nonna more than 3 times, mostly during the lunch period (so that I can take advantage of the $10 pizzas!) and for their lovely balsamic vinegar. 

Being the bad food blogger that I am, I only had my camera on one of the occasions that I went, so I only have two pictures. I realized that I'm really quite bad at this restaurant blogging thing, because I believe in eating my food hot, so once the food lands on my table, I just go 'snap' once or twice before digging in. This is why I admire those food bloggers who make the effort to lug around their huge-ass cameras to restaurants and to take proper good shots of the food so that they can entice others to go. 

Alright, the best thing about the promotion is that all pizzas and pastas are 50% off. This 50% actually applies to anything on their ala carte menu and they also have 3-course meal offers for about $22/++, which includes complimentary tea or coffee too. This might not sound impressive, but let me tell you that their pizzas are generally $19 and pastas around the same. This means that after 50%, pizzas are super duper cheap, about $10 or so! Plus the fact that they also serve complimentary bread with the traditional olive oil and balsamic vinegar - this place is really a steal! (Gosh I'm using so many exclamation marks!) And if you're a typical girl eater, you probably can't finish one of these pizzas yourself, so if say you stick to plain water and order a pizza, pasta and dessert for 2 to share, it'll be definitely less than $20 per person after taxes. 

La Nonna signature pizza


Only caution though - this lunch promotion is an open secret, so La Nonna is really quite packed for lunch, especially because they don't sit too many people on the inside. There are a couple of tables outside, but unless it's a cool day, I won't advise sitting outside. Good thing is that they accept reservations, even during lunch :] So do try to make reservations if you don't wanna wait! You can also access their website to make an online reservation - it is an instant reservation system, so it's akin to calling in if you can't call ;p

The pictures of the pizzas you see are both $19 before discount, which amounts to $9.95 after discount, before taxes. If you're unsure what to order (they have a few pages worth of pizza and pasta choices), you might want to try the La Nonna signature pizza. It's a tomato based pizza, topped with Mozzarella, Parmesan, Asparagus, Egg and Black truffle. Best thing is, they are really generous with their truffle and parmesan, and if you think you need more parmesan, just ask them for more parmesan - they will provide you with the freshly grated stuff, and not those packaged parmesan you get at plebeian places, heh.

My friends and I love salty food to bits, so the other pizza we ordered was the Caprino, which was also tomato based, but had mozzarella, goat's cheese, pancetta and rucola salad. In this pizza, the goat's cheese and rucola takes the limelight, as the goat's cheese they use is pretty mature, and tastes rather tart (or what Singaporeans might terms as 'sour'). Just a tip I picked up in Italy - you can combine an equal part of balsamic vinegar together with the olive oil (that they provide for every table), and use your fork to mix them together, then drizzle over your rucola. The sweetness of the balsamic vinaigrette goes perfectly with the rucola and goat's cheese :] This is not a pizza I'd recommend for anyone who doesn't like the taste of strong cheese. But if you are a lover of strong cheese - ORDER THIS!


Caprino pizza

We also ordered their Linguini ($19), which was served with crab meat in a tomato cream sauce and fresh basil, and again, they were really generous with the crab meat. I also loved the tomato cream sauce, which was a lovely orange color. On other occasions, I have ordered their Spaghetti ($19) and Capellini ($20), which were in mixed seafood cooked in aglio olio style and scallops in fresh tomato sauce respectively - I didn't like the spaghetti too much because I tend to prefer seafood in a cream-based sauce and I found the spaghetti a little dry (not enough olive oil used). The Capellini was perfect, as once again, they were very generous with the scallops. 

I've never ordered any of their secondi (main courses), so I'm not sure how those fare, but as for other pizzas, I have had their Diavola ($19), which is a tomato-based pizza with mozzarella and spicy italian calabrese salami. I found this pizza quite plain - because there just wasn't enough mozzarella, and overly oily, because the salami oozed too much oil after being baked. I had to use the paper towel to soak up the excess oil before I was willing to eat it, although my bf had no issues with the pizza. I did however, like the spiciness of the salami, which was an interesting change from the normal run-of-the-mill salami.  

And I've probably ordered La Nonna and Caprino like a couple of times after that first, and these are probably my two favorite pizzas out of the lot :]

So if it's lunch and you're thinking of pizza, don't order Pizza Hut or Dominoes or Sarpino's, give La Nonna a try and you won't be disappointed! It's cheaper too (after the discount)! FYI though, the pizzas are the thin-crust Italian type of pizzas, and not the American thick-crust pizzas. 


Details
La Nonna
Address: 26/26B Lorong Mambong
 Holland Village, Singapore 227685
Contact: +65 6468 1982
Opening hours: Everyday, 12-2.30pm, 6-10.30pm
Website: http://www.lanonna.sg/
Price: Pasta and Pizza starts at $19

They have another outlet at 76 Namly Place.

Tuesday, October 4, 2011

Pizzas in Singapore #1: Sole Pomodoro Pizzeria

When I think of pizza, I think of Pizza Hut and Domino's. I remember fondly the days when I would anticipate the birthday of a family member, not because of their birthday itself, but because I knew I would get to go to Pizza Hut. Back then, our family didn't eat out much and were not that well off, so pizza was a special treat and was only reserved for birthday celebrations. Fast forward to today, it's rather sad that my tastebuds have gone gourmet on me, and though these American-style pizzas do fine for a meal, I'd much rather spend that money and waste those calories on a true-blue Italian pizza. 

I guess you could say I underwent a pizza revelation when I was in Italy. As many would know, staples in Italy are pizza and pasta mostly, coupled with good wine and lots of olive oil. There, I had all sorts of pizzas, from any place imaginable - highly raved ones to those hole-in-the-walls, where you buy a slice or two of pizza just to fill your tummy when you are walking around the city. Some were good, some were not so good, and some made me realize how awesome pizza can be. The revelation came in Naples really. I’ve talked about it before, so I won’t go into great detail, but suffice to say, I never knew that pizza could be made so simply with just 3 ingredients – tomato, mozzarella and basil AND could taste so darn delicious. Having being brought up with the idea that pizzas with lots of toppings taste awesome, my first thought of having a pizza magherita was - how on earth I can stomach a pizza with just 3 ingredients? Anyway, in my mind, it was just 2 ingredients because basil is a herb and doesn't really qualify.

Well, you can. With ripe tomatoes you can make an awesome tomato paste, on which you break portions of buffalo mozzarella, which taste so rich and creamy that it's heaven in a bite. Not to mention the crust. Different parts of Italy serve different variations of pizza, but Naples is well-known for their thick crust and relatively thin pizza, and I dare say that nowhere in Italy is the Pizza Magherita better than that in Naples.

Pizza Magherita at Sole Pomodoro

Alright, long story aside, my point was that I started to appreciate good pizza, so when I came back from Italy, one of my first objectives was to recreate the Italian experience by having the best pizzas Singapore could offer. Suffice to say, I have been working through a list of pizzerias I've collated, and I've decided to start off with Sole Pomodoro, because it's still fresh in my mind and I can still remember how the pizza tasted. 

I went with my bff to Sole Pomodoro on a weekday afternoon, for a rather late lunch and lo and behold, besides ourselves, there was nobody in sight. That was awesome for us, because it meant that we could have our pizzas asap. We each ordered a pizza, I went for the basic Pizza Magherita (S$15.90) whereas my bff went for the Funghi (S$17.90), which was basically the magherita with mushroom toppings. We didn't go for the pasta, because both of us were there for the pizza really, but I can say that if their pasta used the same tomato sauce as the pizza, you can't go too wrong with that.

Since we were the only ones there, we chose a table close to the entrance of the kitchen, so that we were able to observe the chef. The main chef is Italian, but as you can see from the picture, his sous chefs are mostly Filipinos. The pizza was prepared very quickly - using dough that was resting under a cloth and within minutes, it was made into the usual disc-shape and tomato and mozzarella slathered onto it. The pizzas here are baked using a wood-fired oven, which is the brick thing you see in the background in the photograph. It probably takes about 5 minutes or less from when the pizza goes into the oven and to when it is taken out, ready for consumption.

I didn't get a nice photograph of the interior - but I love the vibrant colors used in the pizzeria - they have panels of orange tiles for the kitchen, which is an absolute delight against the bright blue furniture that they use for the chairs and tables as well as the place mats. Everything screams HAPPY :] I also loved how they attempted to go with a relaxed atmosphere, which is perfect with a pint of cold beer and delicious pizza. 

Having been to l'Operetta, I can safely say that both bff and I prefer Sole Pomodoro's tomato sauce, because it's richer and has a natural sweetness to it. Nevertheless, I found the crust overly thin, which perhaps suits the preferences of most Singaporeans who prefer thin-crusted pizza. I was hoping for a thicker pizza, one with a thick cornice and thin centre, but suffice to say, this hit pretty close. I read on Dr Leslie's blog that you can request a thicker crust, a Sole Pomodoro special - perhaps I'll ask for that the next time I head down! I also found that the pizza on the whole was slightly salty, but my bff didn't think so, so I guess to each his own! Of course, I've to add that for my pizza magherita, the mozzarella used wasn't the buffalo mozzarella - for that, you have to opt for the more expensive version which costs around $28 if I'm not wrong.


Mind you, my bff and I are rather huge eaters, so between the two of us, we managed to demolish almost an entire pizza each, leaving about a slice or two leftover. If you're a small eater, as are most girls here, you can probably share a pizza between the two of you, and at $15.90 for a more than decent Magherita pizza, I'd say it's real value for money. Alternatively, you can probably get the waitress to pack your remaining pizza - that's what we did with our remaining slice and it was nicely packaged in a foodsaver bag. What's even better is that they have lunch deals and daily specials for $15.90. As you can see, lunch is from 12-3pm, and you get a choice of 3 different set lunches - that's a main and a dessert for $15.90! Considering that Pizza Hut and Domino's pizza can cost more than $20 for a regular pizza, this pizza which is equivalent to a large pizza is definitely a steal!


Also, when I was there, I saw them packaging a number of pizzas for takeaway, so do call and ask for takeaway if you wish. They don't deliver! Like I mentioned earlier, the waitresses are also kind enough to pack up your pizza if you can't finish. And speaking from experience, the pizzas taste equally delicious, even when they're cold! :]

Oh, and just to forewarn you if you're heading down by car - parking's relatively easy to find, but getting there can be a bitch if you're coming down from the west side of Singapore because not only will you have to pass through an ERP gantry to get there, you have to do a U-turn near Bencoolen and traffic's a pain! But trust me, it's worth it! :D


Details

Sole Pomodoro Pizzeria 
Address: 12/21 Mackenzie Road #01-01, Singapore 228678
Contact: 68843671
Opening hours: Opens 12pm till 11pm daily, closed on Mondays.
Website: www.solepomodoro.com
Price: starts from $15.90 for a pizza magherita. See their menu here

Monday, June 6, 2011

Comfort food - Spaghetti Bolognese

I first heard of Murdoch's 365 challenge on Ellie’s blog, and I am super excited to be part of this challenge, where cooks from all over the world are cooking through Stéphane Reynaud’s 365 Good Reasons to Sit down to Eat. This is the first of a few recipes I’m trying - it was meant for 3 June, which incidentally was my birthday (I didn't realize it when I was picking recipes), and I also didn’t realize how busy I’d be with all the traveling and settling down I’d to do, so I'm really sorry that this is out of sync with the date it is supposed to be made on. Some comments about the book which I now have -  I’ll have to say that since this book is written by a 'western' author, some of the recipes on certain days do call for some ingredients which are slightly more exotic or harder to find in Singapore, or perhaps just a lot more expensive. Just another little gripe though - I'm someone who's really into details - and Reynaud's instructions tend to be a little of the vague side. He also tends to list ingredients like "onions" and "tomatoes" without specifying white or red onions, etc - this could be problematic for new cooks who are using the book. Nevertheless, the book is still great for dinner ideas, especially when you're running low on inspiration, because the dishes are really easy to whip up and require very minimal preparation and cooking time!

I chose this spaghetti recipe as my first attempt, because spaghetti bolognese is perhaps one of the first few one-pot dishes I made, and have continued to make many times. I don't usually follow a specific recipe when cooking spaghetti bolognese, but I was pleasantly surprised as to how similar my 'recipe' (or the lack of it) is to Reynaud's. 


Spaghetti Bolognese 
Serves 6 

Note: I have amended the ingredients instructions in the book slightly to suit my own recipe. For the original recipe, please refer to page 240 of Stéphane Reynaud’s 365 Good Reasons to Sit down to Eat

4 x 185 g beef steaks or chicken (or lean bacon strips)
6 tomatoes 
20 cherry tomatoes (optional)
4 onions 
100 g mushrooms 
1 tablespoon concentrated tomato paste 
2 tablespoons tomato sauce (or ketchup) 
1 bunch of basil, leaves picked (or dried basil)
500 g spaghetti 
Olive oil 
Salt and pepper, to taste

Method: 
  1. Dice the tomatoes. Halve the cherry tomatoes. Peel and slice the onions. Slice the mushrooms. 
  2. Sauté the meat in olive oil with the onions, allowing them to brown before adding the mushrooms. Once the mushrooms grey, add in the diced tomatoes, tomato paste and sauce. Cook for 10 minutes on medium-low heat. Add in the halved cherry tomatoes. 
  3. Cook the spaghetti in boiling water with some olive oil and salt added, for about 10 minutes. Drain the spaghetti and pour the Bolognese sauce over it. 
  4. Roughly slice the basil and scatter over the plate. Add in some olives if preferred. 

Janine's jots: 
  • General Comments: As usual, I added my own ingredients to the recipe - I substituted the fresh basil for dried ones because I didn't have fresh basil available, and I had to use up my mushrooms and lean bacon strips which were probably going to spoil. These substitutions might have altered the taste of the original recipe somewhat, but I believe what's important is the tomato base for the sauce! 
  • Taste: Make sure to use nice fresh tomatoes so that you get a nice sauce. I tend to add some sugar to sweeten if the tomato sauce is too tart. If you don’t have concentrated tomato paste or sauce, just use tomato puree that you can get from the supermarkets. I prefer using fresh tomatoes since there's no preservatives involved. Also, be sure to look for good concentrated tomato paste - I use passata di pomodoro (which is basically Italian for tomato paste) which I bought in Italy, which is awesome tasting. 
  • Modifications: Reynaud advises against using minced meat, because using steaks or chicken fillets and slicing them is a much tastier choice. I roughly quartered the recipe to make 2 servings - it was enough for 2 small eaters for dinner. 
  • Storage: The sauce stores well in the fridge for about 3 days, and freezes well as well. 
  • Would I make this again?: Definitely - I make this all the time when I run out of things to cook. This is also my ultimate easy to cook dish and is something I always turn to while traveling and when I have my own kitchen, because it calls for the simplest of seasonings and ingredients. 

If you haven't yet attempted a spaghetti bolognese dish or if you have been using those spaghetti sauce in a jar, do try this recipe out - I assure you it won't take up more than 30 minutes of your time to prepare and cook! If you already have tried spaghetti bolognese before, still do try this recipe out because it won't disappoint! If you're interested in what other dishes the other cooks are whipping up in their kitchen, do head down to Murdoch Books’ 365 Challenge Blog to have a look!

PS: I bought the cherry tomatoes from an organic market here in Sydney (which I will be writing about soon), and they tasted soooooo awesome. The sweetness and slight tartness that bursts into your mouth when you bite into it is unbelievable! If these already taste so good, I can't imagine how the heirloom tomatoes will taste like!

Friday, April 29, 2011

Focaccia #3: Pizza Napoletana (or Homemade Pizza with Everything on it!)

This post is long overdue. I had wanted this post to be the third installment of my Focaccia series (see focaccia genovese and the potato focaccia) and to tie up with my post on pizza in Naples, but somehow other baking got in the way and I didn’t particularly like the photos from this pizza-making since it was done in the evening for dinner and by the time the pizza was done, it was night and all the photos were taken with artificial light which I’ve grown to hate by now. Nevertheless, I decided to put this post up despite the horrible pictures, mainly because this recipe is really good and it should be shared. I’ve used Peter Reinhart’s pizza recipe for more than 10 times now, either for pizza or focaccia, and my family members and friends have nothing but good comments for it. My brothers have claimed that pizza to be my forte and I should just stick to it and not do anything else (a compliment and a snide remark both in one - brothers, tsk!), but of course I’m not listening. 

An interesting thing about pizza – no one actually knows the name of the first person to combine tomato, cheese together with the flat bread that was already widely available, but one very popular instance of a person doing that is of course Raffaele Esposito, who combined the pizza crust together with tomato sauce, mozzaerella cheese and basil in 1889 in honor of Queen Margherita’s visit and this pizza, of course, is now the famed Pizza alla Margherita in Naples and everywhere else in the world. Some food historians suggest that the word pizza derives from the old Italian word pizzicare, which I found really interesting because if you learn music – you’ll know that most of the directions are found in Italian, and for string instruments especially, there is the term pizzicato, which means, to pluck the string, instead of bowing. And these food historians suggest that pluck could mean how the pizza is plucked from the oven or how the ingredients are plucked and placed on the pizza. Another random fact was that while in Italy, I actually realized that a lot of the musical directions/terms I had learnt (such as più (more)) actually came in handy! 

Okay, I probably have mentioned this before, but I really do like Peter Reinhart’s books. I’ve read all of his books (although I just own one), and what I particularly like is the concise explanation that goes on before each recipe. After reading his books, I feel like I've accumulated this wealth of experience on bread-making and everything else related to it. What I don't like is that as with a lot of books, measurements are not provided in weight, so I've converted them below.  

***

Pizza Napoletana
Adapted from Peter Reinhart's The Bread Baker's Apprentice, page 207-212

285g  bread flour
6g      salt
2g      instant yeast
30g    olive oil 
195g  cold water

Method: 
  1. Stir together the flour, salt and instant yeast in a bowl. With a large spoon, stir in the oil and cold water until the flour is all absorbed. Using the spoon, work the dough into a smooth mass, making sure to alternate directions to develop the gluten further. Do this for about 5 minutes, or until the shaggy dough becomes smooth. 
  2. Sprinkle flour on your countertop and transfer the dough to the counter. Using a dough scraper, cut the dough into 6 equal pieces and shape them into balls. Be sure to flour your hands as well, so that the dough will not stick to your hands. Then, mist the dough generously with spray oil and store them into ziplock bags (with sufficient space to expand) or into a large container. 
  3. Store them in the refrigerator to rest the dough overnight. 
  4. On the day you plan to make the pizza, remove your desired number of dough balls from the refrigerator 2 hours before making the pizza. Dust the countertop with flour before placing the dough balls on top. Gently press the dough into flat disks of about 1-2 cm thick and 10-15 cm wide (to your preference) and cover the dough loosely with a tea towel and let rest for 2 hours
  5. Generously dust your sheet pan with semolina flour or cornmeal (or just flour). Flour your hands thoroughly. Lift the piece of dough and place it across your fists, gently stretching it by bouncing the dough by moving your fists up and down. Once the dough has expanded, you can begin tossing the dough (like how the prata man does it). If this method fails, you can use your rolling pin to stretch the dough out, although it won't be as effective (and fun) as the toss method. 
  6. When the dough is stretched to about 20-30 cm in diameter, lay it on the pan and lightly top it with tomato sauce and other toppings. 
  7. Place your rack in the lowest tier of your oven, and preheat your oven to your highest possible - the recommended temperature is 260 degrees (I used 210 degrees on mine). Place the pizza inside and bake for 10 minutes, or until the cheese caramelizes. 
  8. Remove from the oven and wait for 5 minutes before slicing and serving, to allow the cheese to set slightly. 
***

Tomato sauce
Loosely adapted from allrecipes here

170 ml   tomato paste
170 ml   warm water
15 g       grated Parmesan cheese
3 g         minced garlic
3 g         diced onion 
30 ml     honey 
1 tsp      salt, to taste
1 tsp      dried oregano
1 tsp      dried marjoram
1 tsp      dried basil
¼ tsp     ground black pepper
¼ tsp     cayenne pepper

Method:
  1. Combine the tomato paste and water. 
  2. Mix in the remaining ingredients. 
  3. Let the sauce sit for at least 30 minutes for the flavors to settle before spreading over the pizza dough. 
Notes:
  • If you've onion and garlic powder, do feel free to use them instead of using fresh ones. 
  • If you don't have honey, feel free to use a mixture of brown and white sugar, melted in some hot water. Do reduce the amount of warm water accordingly. 
  • I have more than doubled the herb amounts from the original recipe, because I like the taste of herbs. Do feel free to substitute the herbs as you wish with fresh ones or with just a single type of herb. The black pepper and cayenne pepper gives the sauce a little kick, so feel free to omit it as you wish. 
  • You will realize that this sauce is a little watered down, but this is perfectly fine because the sauce will thicken while baking to a perfect consistency. 
***

In pictures: 

Mix the water and oil into the flour and mix until you get a smooth dough. 
Do NOT do this - huge dough balls stuck together in a container is a big no-no!
Oops the separate dough balls have fused to become one after a day in the refrigerator. They even popped the lid off my container! This is why the instructions say to store them in separate ziplock bags! :/
This is step 4 - 2 hours before making the pizza, knead your pizza into a small disc and allow it to rest and warm up to room temperature. At the back you see my ingredients, which include onions, mushrooms, sausages, pork, ham, bacon and fresh cherry tomatoes (cannot be seen). Yes I know it's like the kitchen sink here. Less ingredients is more sometimes!
The same disc from above, after step 5. Yes, I know I need more work on my "tossing" method because the dough is all uneven. 
Here's another look at how uneven it is. DO NOT follow this bad example. This is taken in the rays on the setting sun. 
Here's pictures of more crusts - can you see the difference in thickness? The left is my "thin" crust (which is more of an in-between) while the one on the right is a thick crust pizza. Really horrible shapes, I know. 
The left shows the tomato sauce (beginnings on a normal pizza) and the right shows my focaccia variation - with some cheese and onion and thyme :]
A topped and ready to go pizza! It looks more pizza-like already!
In less than 15 minutes, it's DONE :] Sorry this photo's a little out-of-focus and YELLOW :/

Janine's jots: 
  • Taste: I've tried making the pizza on the day of making the dough itself, but I do find that the dough acquires a better taste after the overnight fermentation, so like Peter Reinhart, I highly recommend the overnight fermentation if you're not in a hurry! Also, it helps to shape and stretch the dough when it's cold especially in our humid weather because the dough is less sticky and more malleable. 
  • Texture: Just the right amount of elasticity and 'bite' you need from a pizza crust. 
  • Serving size: This is the halved recipe, and it serves a family of 5 voracious adults more than comfortably for dinner, plus some extra for breakfast the next day.  
  • Modifications: If you're making the pizza crust for consumption on that day, you'll have to double the amount of yeast so that the dough will be able to rise in the short amount of time. I also like to add a little bit of sugar (about 1 teaspoon worth) into my dough because I like how it adds to the complexity of taste in the crust - I usually make a plain focaccia using this dough and eat it with nothing but balsamic vinegar and olive oil because the salt and sugar in the crust makes it tasty enough without anything! The next time, I'd probably substitute a bit of the flour with wholemeal flour just to try out an alternative mentioned in the book. 
  • Storage: I have tried doing this before, and it works - you can keep the dough in the refrigerator for up to 3 days and the dough tastes as good. If you wish to freeze them, do store the balls separately in ziplock bags, oiling each properly, and they can be kept in the freezer for up to 3 months according to the book. I've only frozen my dough for about a few weeks before consumption, and I'd probably make the full batch and freeze the unused dough if not for the lack of space in the freezer!
  • Would I make this again? Definitely! And again, and again, and again!
  • Other comments: The dough's really versatile - for pizza itself, you can make the crust as thick or thin as you want it to be - I'm not sure if it's clear from my pictures, but I made both thin and thick crusted ones and both were well-received. This dough can also be used to make focaccia or any other rustic bread. Also, I prefer to make pizza dough by hand, so instructions below are for hand mixing but an electric mixer can be used as well. If you have a pizza peel and stone, please do use them, but I've modified my instructions below to using a sheet pan so that most home bakers can use this recipe too. I've not included any recipes for the topping because mine's just a mishmash of whatever I have in the fridge that day, so feel free to experiment! You can even make dessert pizzas!
***
I do hope that this entices someone to try this recipe out, because I honestly do think this is one of the better tasting crusts I've tried and I really like the fact that so little yeast is being used, and everything else is kinda natural. And this will also double up as my show of support for Jean's Aspiring Bakers #6: Say Cheese! (April 2011). I'm really sorry that I haven't been able to support the event as much as I'd like to, because I was really overcome with studying, but now that I'm free - I'll be sure to post more often! :]

Monday, March 7, 2011

Focaccia #2: Herbed tomato focaccia di patate

As promised, this is the second installment of my focaccia series. This time, I decided to use a recipe from Nancy Harmon Jenkin’s book, Flavors of Puglia. This is a rather old book, dating to 1997, but it is a tome of recipes for anyone wanting to attempt Pugliese recipes (Puglia is at the heel of the boot of Italy, if you get what I mean). Pugliese recipes are very much Mediterranean, considering that it’s so far south of Italy, and it is of no surprise that focaccia is a staple in their cuisine because it is said that focaccia came from the Etruscans, who were greatly influenced by the Greeks. A little bit more about the focaccia – it takes its name from the Roman phrase panis focacius which means a flat loaf of bread cooked under the ashes of a fire or upon a hearth. Of course, most of us bakers don’t have a hearth, so we’ll just have to make do with an oven. Also, if you compare recipes for pizza dough and focaccia, you’ll realize that they are largely similar, if not the same. The focaccia can be regarded as the predecessor of the modern pizza, in more ways than one. It was definitely invented before the pizza (which is essentially flatbread with toppings) and I remember being told that the focaccia will be the first thing into the hearth (in pizzerias or bakeries), to test if the heat of the oven was right for the pizzas. If the focaccia came out right, it was time to load in the pizzas!

I know most Singaporeans think of focaccia as rectangular, but it is made in other shapes – like a circle. I decided to attempt the focaccia pugliese, and since it is traditionally made in a round tray, I decided to follow suit as well. The focaccia pugliese is actually a focaccia di patate, or potato focaccia. It can be topped with slices of potato, but the defining characteristic, in my opinion, is the addition of a mashed potato into the dough. I tried looking up for more information about this focaccia on the Internet but couldn’t find much information about it.

Yummy round focaccia :]

Anyway, I didn’t exactly follow Jenkin’s recipe for toppings, because I wanted to use Peter Reinhart’s herb oil as well as incorporate some tomatoes into the focaccia, having ate onion-and-herb versions the past few days. Of course, I couldn’t settle on just one flavor, so it was herbed tomatoes on one side, and pine nuts with herb oil on the other side.

Potato focaccia

Ingredients
For the dough: 
1 large potato, about 150g
½ tsp   dried yeast
1 tsp    salt
60 ml   warm water
1 tbl     extra virgin olive oil
180 g   bread flour

For the herb oil:
½ cup olive oil
1 tbl garlic powder (or fresh chopped garlic is fine)
½ tbl sea salt
1 tsp paprika powder
½ tsp ground black pepper
5 tbls of your desired herb mix. I used:
1 tbl dried basil
1 tbl dried parsley
1 tbl dried oregano
1 tbl dried thyme
1 tbl dried rosemary

Method:
  1. Preparing the mashed potato. Peel the potato and place it in a large bowl with boiling water to cover it. Place the bowl in a microwave and put it on high for 3 minutes. This will soften the potato enough for it to be mashed. Do note that there will be splashing, so use a microwave cover if you have it. Drain the water from the potato and mash it with a fork/potato masher. Allow it to cool and set aside.
  2. Preparing the starter. Add the yeast into the warm water. Add 80g of the bread flour into the mixture and let it sit for 30 minutes.
  3. Making the dough. The mixture should have increased in size and be bubbling a little. Add in the remaining flour. Once incorporated, add in the mashed potato and salt. Add in the olive oil and mix everything well. Once everything comes together in a shaggy dough, you can either use your mixer to knead the dough for about 5-7 minutes or turn it out onto your counter and knead it manually for about 10 minutes, or until the windowpane test is achieved. This dough will be slightly wet because it is a high-hydration dough, so do be sure to flour the counter and oil your hands to ensure that the proportions remain roughly the same. Form the dough into a tight ball and let it rest in a well-oiled bowl for an hour, or until doubled.
  4. Preparing the herb oil. Warm the olive oil a little, to about 50 degrees, before adding in all the herbs and dried ingredients. Take it off heat and let it stand for 30 minutes before using.
  5. Getting ready for the second proof. Use your palm to gently press on the dough to deflate it. Press until the whole pan is covered. It does not matter if the pan is not completely covered because the dough will expand for a second time. Using your fingers, make slight indentations all over the dough. This will result in ‘dimples’ in the dough. Add the tomatoes cut-side down onto the dough, pressing it into the dough so that it adheres. Add the raw pine nuts as well. Next, add the herb oil onto the dough, making sure the surface is well covered. Let the dough rest for another 40 minutes, or until it increases to about 1.5 times its size.
  6. Baking the focaccia. Preheat the oven to 220 degree Celsius and bake for 15-20 minutes. The surface should turn golden brown. Let it cool before removing. 
Janine's jots: 
  • Taste: I didn't like the taste of the focaccia as much as I liked the others, mainly because I found the potato taste a little disconcerting in a bread. The potato taste is not overwhelming, but it is present if you're a discerning eater.
  • Texture: The crumb of the focaccia was tight, with the requisite holes and airiness. I found it less chewy than the normal focaccia. 
  • Storage: Because of the use of tomatoes in the focaccia, you have to store it in the fridge after the first day, otherwise the moisture in the tomatoes will attract mould. It tastes just as good after three days. 
  • Would I make this again? Having tried other focaccia recipes, this will not be my to-go-to focaccia recipe. However, if you're in search of a focaccia which has a more tender crumb, this will be it. 
  • Other comments: The herb oil was highly raved about on several websites and forums, but I didn't find it overly impressive. The sharpness of the paprika and black pepper overwhelmed the herbs a little. 

In pictures: 
Mash up your boiled potato. You can use any time of potato, but a Russet would be most mashable. 
This is step 3 where starter is added into the flour, together with the other ingredients before kneading.  
This is the size of my kneaded ball - note how small it is in comparison to the tray but don't worry! It'll expand to cover the entire tray! The "spots" are actually olive oil spots that I've spread onto the tray. Do oil the surface of the dough as well so that it doesn't dry out when proofing!
After the first proofing - I've flattened it and added my toppings. I like variety, so I've made two different flavours - one with herb and tomato, the other with more herbs and pine nuts :] Don't worry if the entire pan still isn't fully covered - you still have one last proofing before baking!
Oops sorry I was hungry so I ate a bit of the focaccia before I could muster the energy to take photos ;) The baked focaccia will shrink from the pan a little - that's normal!
Here's the only photo of the crumb that I remembered to take. The crumb of this focaccia is good - full of holes and it isn't 'heavy' or overly chewy. My siblings couldn't tell there was potato in it, but I could taste the mashed potato in it though!
Final cut-up shot of the focaccia. My surface is a little dry because I like my focaccia with more crusty bits than soft dimply bits, so I tend to use a little less oil than required. Do use the entire half cup of oil if you like it moist and soft. 

Am submitting this to Yeastspotting here :]

Friday, March 4, 2011

Focaccia #1: Focaccia Genovese

My best friend came over to my place to bake some time ago, during our mutual free day. She isn't one to bake bread, but she was very inspired by 제빵왕 김탁구 (King of Baking, Kim Tak Goo)! I'm sure from the name you can tell that it's related to baking - bread specifically. It's a typical Korean drama, with complicated sub-plots and vengeance and revenge and what not, but that's besides the point. The point is that, there is alot of baking done in the show! Here's a tiny clip of the father baking :)


Well, this is not exactly inaccurate, as the clip owner suggests, because breads do contain eggs. The only gripe I had was how fast the bread proofed and rose but well, it's a show after all right! 

Anyway, my friend wanted to bake a bread, so I was racking my brains as to which bread would be easy to do AND yummy to eat. I finally decided on focaccia, because both of us had an enjoyable time in Italy and focaccia is something that is pretty hard to go wrong on. Previously, I'd only used the no-knead recipe for focaccia breads (which yield damn tasty breads btw), but in this case, since my friend wanted to experience the feeling of making breads herself, the no-knead recipe was a no-go, because I'd have to put together the ingredients the night before and only do some brief kneading before putting the bread in the oven. My search brought me to Amiscell's blog, a native Italian living in Singapore. His blog isn't frequently updated nowadays, but do take a look at his archives if you're interested in Italian cooking! Like most Italians, he probably goes by the motto of fresh produce, cooked simply. That's what I totally love about Italian cuisine. How pasta and pizza and breads in Italy (oh not forgetting gelato!) can taste so good - just because the freshest and best quality ingredients are used. I once ate a tortellini dish in Modena, and it was "just" tortellini in broth, but I tell you, it was the one of the best, and by far the most memorable meal I had in Italy. The trattoria had no menu, and it was definitely family-run. The daughter came up to us, speaking to us in Italian. Luckily, I could understand little bits of Italian (I'm pretty good with Italian food names hehe - and French ones as well heh) and we managed to order ourselves a primo, a secondo with some contorno and dolce :] That's basically a first course of pasta (I had tortellini and I also tried their tagliatelle which was AWESOME), a second course of meat (I forgot what meat I had actually because the pasta was so excellent), contorno is basically side dishes of vegetables/salad to go with the secondo and dessert! Of course, there is the caffè served after the meal, to cleanse your palate. I'm sorry I don't have any pictures to go along with the description but you've to trust me on this - it was dee-li-cious!

OH and I totally forgot the most important part - while waiting for the meal, I had the most wonderful basket of bread, together with balsamic vinegar and olive oil. And lambrusco of course. The bread, consisted of what I think is a variation of focaccia - because there's probably a million variations of focaccia in Italy and it basically just refers to any flatbread. Modena is in the province where balsamic vinegar originated - Emilia-Romagna (since the Middle Ages!), and I tell you, it is seriously THE BEST balsamic vinegar you'll ever have, period. I've eaten at quite a number of Italian establishments in Singapore, and so far, no balsamic vinegar served here even comes close to beating the ones served in Modena. The aceto balsamico is served in tiny round-bottomed flasks, with cork-stoppers which have red wax seals on them. I've had the pleasure of trying those aged 12 years and 25 years (the premium types), and it is just phenomenal. It's totally unlike any type of vinegar with balsamic vinegar is actually sweet, but it has this sour bite that is not over the top, making the sweetness totally acceptable. It's quite a lousy description because you'll really only understand what I mean when you taste it!

Anyway, enough of my rambling - I do get quite passionate about my food adventures in Europe, and I had a number of them considering that I spent a year there - I decided to make focaccia genovese, which basically translates to Genoa focaccia, or focaccia of Genoa. Genoa is a province in Liguria, which is in Northwest Italy (I especially remember Genoa because it's Genova in Italian, and the Princess in Princess Diaries (played by Anne Hathaway) came from the Kingdom of Genovia - which is rather similar in spelling lol. Anyhow, focaccia genovese is really a staple of Ligurian cuisine - and wikipedia defines it as a flat bread of up to 2 cm, seasoned with olive oil and salt. So what we've attempted below is really an onion-and-thyme-topped homage to focaccia genovese :]

Love the burnt bits of onion :] I used dried thyme here btw.

I actually followed Amiscell's recipe to a T, and he has some lovely step-by-step pictures for those interested. You'll need to set aside about 4 hours of your time for baking this, out of which 1 hour will be active time - ie, time that you'll be kneading and shaping, the rest of the time is basically waiting for the yeast and flour to do its magic, and you can do anything else you want to do while waiting. Don't be put off by the many steps and the 4 times of proofing - it isn't too bad and my instructions below should be quite clear!


Focaccia Genovese
Makes enough for a 35cm by 28cm baking tray

Ingredients: 
For the bread: 
200 ml   water, at room temperature
20 g       extra virgin olive oil
7 g         salt
3 g         sugar
340 g     bread flour
7g          dry yeast


For the topping: 
Some olive oil mixed with some warm water (in 3:1 proportions)
Some sea salt
And anything else you desire - I used 1 tbl of dried thyme and half an onion. 

Method:
  1. Dissolve the yeast in water (about 20-30ml of the 200ml should suffice). 
  2. Mix the rest of the water, sugar, olive oil, salt and half the flour (170g) into a large mixing bowl. 
  3. Pour the yeast-water mixture into the dough and knead until it is fully incorporated.
  4. Add in the remaining flour, and continue kneading until the dough becomes tacky, and not excessively sticky. This should take about 10-20 minutes of hand kneading. 
  5. Place the dough in the bowl and cover it with a damp tea towel. Let the dough rest for about 15 minutes at room temperature. 
  6. Take the dough out of the bowl and stretch the dough slightly, so that you can do a letter fold. This is basically mentally dividing the dough in three and folding the two ends into the centre. This is your first horizontal fold. Turn your dough 90 degrees and do the same letter fold - this will be your vertical fold. Your dough should be about 30% the size of the tray you are baking it in. 
  7. Pour some olive oil onto a baking tray, making sure that it evenly coats the entire tray. Place your folded dough onto the tray, and make sure it is evenly coated with olive oil on both sides as well. Let the dough rest for a 2nd time, for about 45 minutes, or until it has doubled in size. 
  8. Using the heel of your hands, press the dough into the tray, flattening it until the whole tray is covered with the dough. Sprinkle some salt (preferably sea salt) onto the top to give the focaccia flavor. Let the dough rest for the 3rd time, for about 30 minutes. 
  9. Pour some more olive oil into a bowl, and add some water to it to mix. Using clean palms, dip your hands with the oil-water mixture, and massage the liquid onto the top of your focaccia to spread it uniformly. After this, using your fingers (8 fingers minus the thumbs) - make depressions in the focaccia from the top to the bottom. You can add more of the olive-water mixture so that it sinks into the depressions. The oil-coated depressions will form softer areas when baked, which juxtaposed nicely against the crispy crust. 
  10. At this point, add your favorite toppings to the focaccia. Here, I added sliced onions and dried thyme. 
  11. Let the focaccia rest for a 4th and final time - for about 60 minutes. The dough would have risen to about 1.5 times its height. It does not matter if it doesn't rise as much since this is a flatbread! 
  12. At about 30 minutes into the 4th proofing, preheat your oven at 220 degrees. 
  13. Place the dough into the oven and bake for 15 minutes, or until the focaccia is golden brown. 
  14. Remove from oven, and immediately remove the focaccia from the tray and onto a cooling rack to cool for 10 minutes before slicing. This is to make sure that the bottom of the focaccia does not turn soggy from the steam. Brush generously with the olive-oil mixture before serving. 

Janine's jots: 
  • The original recipe uses 3g of malt instead of sugar, but I don't think most Singaporean bakers will have malt lying around their kitchen, and sugar really is quite a fine substitute in my opinion. 
  • If you are not kneading by hand, you can still use this recipe using a mixer - the time used in step 4 for kneading will most likely be reduced by half. 
  • You can use light olive oil or extra virgin olive oil or plain normal olive oil - it's all fine but just remember that olive oil will have a stronger taste. Italians are quite liberal in their use of olive oil, so don't be stingy when pouring the olive oil onto the focaccia!
  • If you have a pizza stone, do use it instead to bake your focaccia because this will give a more evenly baked crust and bottom. 

In pictures:

This is the dough after the 2nd proofing. We've pressed it to cover the entire baking tray. Do try to use your hand to flatten it and don't stretch it because you want uniform thickness!
Do try to slice your onions thickly - 5mm would be great and remember to press them into the dough, otherwise they will fall off when baked! Also, the onions might look a lot, but it's only half an onion and once baked, it's actually not that much after all! A whole onion would have been perfect!

This is the completed focaccia! I've quite a bit of burnt onion because they weren't sliced thick enough. Also, I'm not a fan of too much olive oil, which explains why you see more golden brown bits as compared to the whitish bits, which are the depressions containing the olive-oil mixture.

Yet another gratuitous shot of the focaccia. Do note that the depressions you made in step 9 will result in the white parts you see above because there is more oil in the depressions. These parts, eaten together with the crusty parts - are just perfect!

This will be the first of my focaccia posts (I'll have at least 3 more focaccia posts with different recipes in each) and I've to admit after trying out a number of recipes, this is the second recipe I will go to if I want to eat focaccia genovese the traditional way. The first (and my favorite) recipe I will go to is Peter Reinhart's focaccia recipe, which I'll post soon. There is a longer waiting time for his recipe (overnight proofing in the fridge) - but it's worth it. 
Related Posts Plugin for WordPress, Blogger...