
Before I begin my long spiel, HAPPY 2012 everyone! And hurray for the long weekend ;p
This post is actually a timed post, because as I speak, I probably am having the time of my life shopping and eating, whilst taking a well-deserved break overseas. Anyway, Christmas weekend came and went rather quickly, and with work and all, I haven’t been taking nice photographs of what I’ve been baking recently. I actually wanted to post about the Christmas log I made this year, but I didn't have my camera with me when we had it for tea, so :(
I know I was contemplative the last post, but thinking back on that last Christmas log and eating my current one really makes me very very proud at how much I’ve progressed as a baker. In fact, I think I've come full circle nicely, because this Christmas log cake was probably the first proper cake I made myself, with a new recipe, with the untested oven and with my new mixer. Thinking back, it certainly was horrible and the people must have been lying through their teeth when they told me it was nice. I remember the dense layer at the bottom of the cake, and at that time, I didn’t know what it was caused by. Now, I know so much better, that the dense layer is caused by overmixing of the batter and deflation of the egg whites. I cringe when I think about those guests eating the cake with that dense layer.

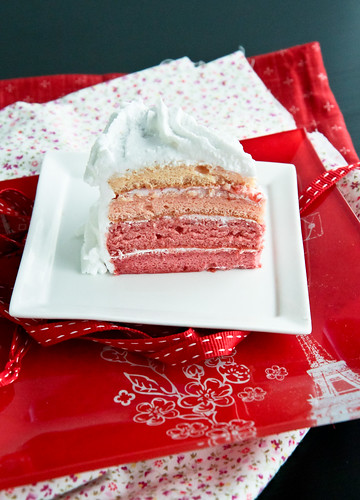
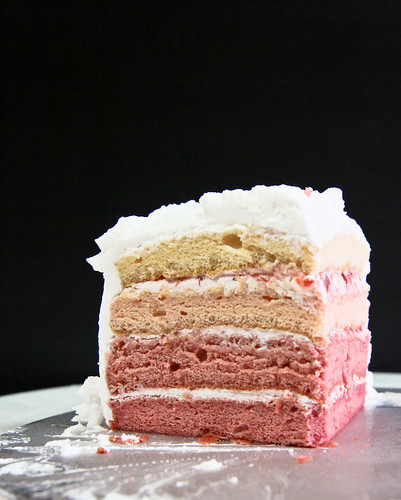
So anyway, since this year's log cake was made with my favorite sponge cake recipe and with equally delicious whipped cream and chocolate ganache, it was tons better than last year. My family, my harshest critics, enjoyed it immensely :] Since I don’t have a nice photograph of the Christmas log cake, I’ve decided to blog about my mother’s birthday cake instead. It’s made from the same cake base as the Christmas log cake and perhaps half of the cake recipes on this blog. I know I’ve blogged about this sponge cake time and time again, but it really is my favourite cake. This is not something I write about lightly, because if you could see the countless swiss rolls and sponge cakes that my dogs ate during the time I was experimenting with various recipes, you’d be alarmed.
This post is actually a timed post, because as I speak, I probably am having the time of my life shopping and eating, whilst taking a well-deserved break overseas. Anyway, Christmas weekend came and went rather quickly, and with work and all, I haven’t been taking nice photographs of what I’ve been baking recently. I actually wanted to post about the Christmas log I made this year, but I didn't have my camera with me when we had it for tea, so :(
I know I was contemplative the last post, but thinking back on that last Christmas log and eating my current one really makes me very very proud at how much I’ve progressed as a baker. In fact, I think I've come full circle nicely, because this Christmas log cake was probably the first proper cake I made myself, with a new recipe, with the untested oven and with my new mixer. Thinking back, it certainly was horrible and the people must have been lying through their teeth when they told me it was nice. I remember the dense layer at the bottom of the cake, and at that time, I didn’t know what it was caused by. Now, I know so much better, that the dense layer is caused by overmixing of the batter and deflation of the egg whites. I cringe when I think about those guests eating the cake with that dense layer.


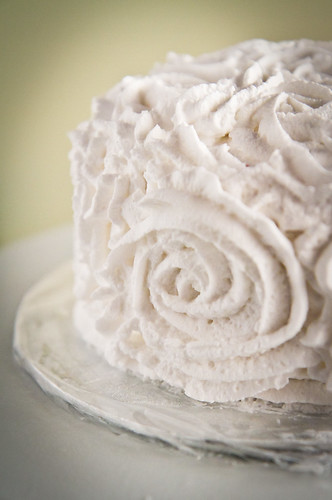
Here, I've slathered on whipped cream and jam in between the cake slices, as well as brushed each slice with sugar syrup. After that, I crumb coated the cake with a thin layer of whipped cream, then proceeded to decorate it. Be sure to refrigerate the cake for at least an hour after you're done because it allows the jam and alcohol laced syrup to meld into the layers. If you notice, I fiddled with 2 different designs for the cake. I initially wanted it to be covered with roses, but the roses didn't turn out too good because I doubt whipped cream is suitable. Buttercream would be far smoother and give better results. So I 'erased' the roses off and decided to go with simple ruffles at the side and a huge "50" on the top, because my mom turned half a century old!

Alright, so here’s the recipe again for those too lazy to refer to my older posts!
Strawberry Sponge Cake
 |
| Not sure why the cake looks greenish here :/ |
Components:
- 4 sponge cake layers
- Simple sugar syrup
- Stabilized whipped cream
- Strawberry jam (I used my strawberry-apple jam)
To make 1 layer of sponge cake:
2 large eggs
30g castor sugar
20g all-purpose flour
Strawberry powder (dried strawberries processed into powder form)
1 tsp red coloring (optional)
Method:
- Separate the egg whites from the yolks.
- In a bowl, whisk half of the sugar into the yolks. Sift in the flour and strawberry powder, stirring until you get a smooth paste. Add in the red coloring if using.
- In another bowl, whip up the egg whites until foamy, before adding the remaining half of sugar. Continue whipping until you get shiny, stiff peaks. Mix some of the egg whites into the yolk mixture to lighten it up before folding the remaining whipped egg whites into the yolk mixture.
- Pour into a lined baking tray and rap the tray against the counter to get rid of any air bubbles. Bake in a preheated oven at 180°C for 10 minutes.
- Leave the cake to cool in the tray for about 10 minutes before placing it on the cooling rack.
For the stabilized whipped cream,
Adapted from Rachael of La Fuji Mama
1 tsp gelatin
4 tsp cold water
250ml cold heavy whipping cream
30g icing sugar
1/2 tsp vanilla extract
- Put all the cold water in a small saucepan and sprinkle the gelatin over the surface. Let it stand for 5 minutes without stirring. Place the saucepan over low heat and stir constantly with a wooden spoon until the gelatin dissolves. Remove the saucepan from the heat and cool to room temperature.
- Combine the whipping cream, sifted icing sugar and vanilla extract. Beat the mixture for a minute before gradually pouring in the cooled gelatin mixture. Continue whipping the mixture at high speed until you get stiff peaks.
For the simple sugar syrup,
30g granulated sugar
60g water
1 tsp of your preferred alcohol, or vanilla extract
Combine the sugar and water in a small saucepan and heat the mixture. Stir until all the sugar has dissolved. Allow the mixture to cool a little before stirring in the vanilla extract (or alcohol - I used rum).

To assemble:
- If baking as sheets, cut out 6-inch circles from the cake sheets. You will be able to cut 2 6-inch circles from the 2 sheets and get quite a bit of excess cake.
- Brush the cooled sugar syrup on each layer. Be sure to brush on both sides of the cake.
- Spread a thin layer of jam on each layer of the cake, followed by a thin layer of whipped cream.
- Stack all the layers together and begin spreading whipped cream in a thin layer on the outside of the cake. This will be your crumb coat. Place the cake in the freezer for about 15 minutes before removing to decorate the cake. Alternatively, you can chill the cake for an hour until the crumb coat has set (i.e. the whipped cream is slightly stiffer) and proceed to decorate as desired.
Janine's jots:
- Note: To get the color gradient, substitute the all-purpose flour for strawberry powder, using a maximum of 15g all-purpose flour and 10g strawberry flour. Also use some red coloring for a more intense red color. For the first two layers, I didn't use any red coloring, merely using strawberry powder to get the red-ness. I made 4x of the batter above, then used my estimation to divide the batter into 4. This perhaps explains why the layers are not too even and the bottom 2 layers are actually almost the same color :/
- Taste & Texture: I absolutely adore this cake because it's so easy to make. My family loves it too. Just a tiny caveat - this cake is quite ‘spongy’ when it comes out of the oven and tastes pretty eggy without any addition of flavouring, but this is easily amended with the addition of vanilla extract or any other flavouring you desire.
- Serving size: This makes a 4 layered 6-inch cake, which serves a family of 5 perfectly for a heavy tea (about 1.5-2 slices per person depending on how large each slice is cut). My family is not a fan of icing or cream, hence the very thin layers of cream between the cakes and on the outside. If you love whipped cream, be sure to double the recipe and be generous!
- Modifications: You can choose to bake them as sheets, which will take about 10 minutes to bake up - if you touch the top, it’ll be slightly moist and may stick to your finger. So just test with a cake tester and if it comes out dry then the cake is done. You can also choose to bake them in round or rectangular pans and later slice them in half. That works as well. Just increase the baking time to about 20-30 minutes for an 8” round pan.
- Storage: The cake stores well in the fridge, covered. If you are serving the cake right away, you can choose to forgo the sugar syrup, but I highly recommend using it because it gives you a far moister cake. The syrup also ensures that your cake stays moist in the fridge!
- Would I make this again?: Definitely! You might actually realize that this recipe is almost identical to my strawberry shortcake posted a while back - with virtually the same components!

With that, I end 2011 with what I term “a blast” in my own books. As I usher in the New Year, I fervently hope that I will still be able to find time to blog and post recipes to share with you readers. And I’m hoping to come back with a few goodies from my trip to share with you, to celebrate my first year blogiversary with :] 2012 is the start of many new things for me, so here's to many wonderful things ahead!
20 comments:
Happy New Year to you too Janine! May u have another year with a blast! :))
蛋糕内层好美丽哦:)
新年快乐:)
Happy Belated Birthday greetings to your mom! The cake looks really spongy and soft, perfectly baked!
Happy New Year and wish you a wonderful 2012!
Like the effort put in to create the color gradient - it's so pleasing to the eye =) and yes, am looking forward to your blogiversary! Have a great 2012!
Happy Belated Birthday to your mom and Happy New Year :)
So sweet of u. Nice color combination.
Wow, beautiful.
Yay the recipe! I was looking forward to this! It looks beautiful :D
And HAPPY NEW YEAR!
WOW! What an amazing looking cake? 4 layers? THATS AWESOME!! :)
Hope your having a wonderful weekend! God bless!
yes, i remember this cake that you made for your mum. must be one of your favourite recipe!
Wow!!! This cake is sooo delicious looking. I hope your mom had a wonderful birthday!
Hi Janine, The cake looks lovely! I also love the cake stand that you have here- would you mind sharing where you got it from? Thanks!
hi CW, i bought this cake stand in Australia, so I'm not sure if you can find it here. But I recall seeing white cake stands over at Tangs!
It looks so pretty! It makes me want to bake it for my mum too. If I want to change flavours, like orange, what do I have to do?
pei shwen: thanks! you should try it - basically, you can just use orange zest in replacement of the strawberry powder. typically you should approximately 1tsp of orange zest (ie one orange) to about 4 eggs. because orange zest doesnt provide much color, you will have to add yellow/orange coloring to your cake.
Okay I'm so going to try this!
Sorry if you mentioned in the post, but I'm kinda lazy (and totally new at this) and it seems like I have to bake layer by layer...
Can I just bake all 4 layers at once? Do I have to bake longer, or just x4 of the ingredients and keep everything else the same? Thanks!
Hi Janine, beautiful cake. Sure your mom loved it. Where in Singapore do you get strawberry powder?
@dedicated docent: I'm afraid strawberry powder is not available in Singapore (or at least I don't recall seeing any being sold here). I bought mine from overseas.
Thanks for your prompt reply. I'm enjoying going thru your posts. Where does one find strawberry powder?
Radhika
Hi Radhika
Since I bought mine off the shelves in Australia, I have no idea where online you can get it. I can probably try Squire's kitchen because that's where I first heard of freeze-dried strawberry powder for macarons :)
Post a Comment