My blog has moved!

You should be automatically redirected in 6 seconds. If not, visit
http://www.unpastiche.com
and update your bookmarks.

Showing posts with label Cooking. Show all posts

Wednesday, July 27, 2011

Som Tam ส้มตำ, or Easy Thai Salad

I read CNNGo's list of the worl'd 50 most delicious foods with much joy and pride, mainly because a number of Asian delicacies, especially those of my home country and country of residence made it to that list. And although I might not agree with them on everything, I do agree that Massaman curry (their #1) is absolutely delicious, and so is som tam, which made it to #46 of the list.

And coincidentally, this is the same thing I'm going to attempt from Stephane Reynaud’s 365 Good Reasons to Sit down to Eat – the Easy Thai Salad. It’s rather ubiquitous here in Singapore and Malaysia, and is really easy to whip up considering that we would probably have most, if not all the ingredients in our kitchen. I remember when I was in Thailand, I would order the Thai Mango Salad or Papaya Salad (generally referred to as Som Tam (ส้มตำ)) as a starter each and every time because it really “wakes up your palate”, or what the Chinese call 开胃, literally 'opening your appetite'.

What I love about som tams in general is that they are slightly spicy, slightly sweet and slightly sour, with lots of crunch and and different textures, and this recipe fits the bill perfectly. I have to say that I was slightly doubtful given that this was an Asian recipe written by a non-Asian, but Reynaud got it right :] For this recipe, I omitted the prawns, scallions and vermicelli as I wanted the salad to accompany my meal which contained chicken, and I didn't want it to be overly filling. This recipe really is flexible, in fact, all that is constant is perhaps the "sauce" - you can do a fruit som tam if you wish! 

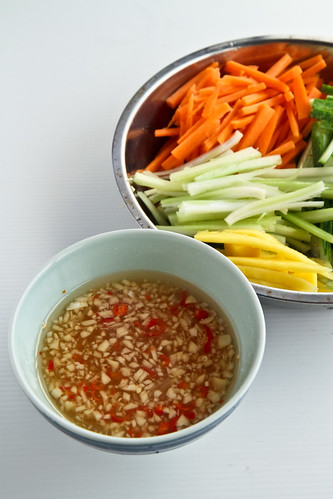
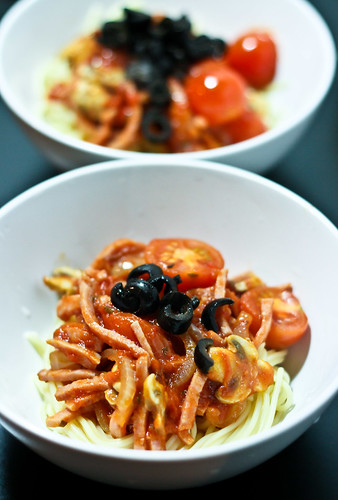
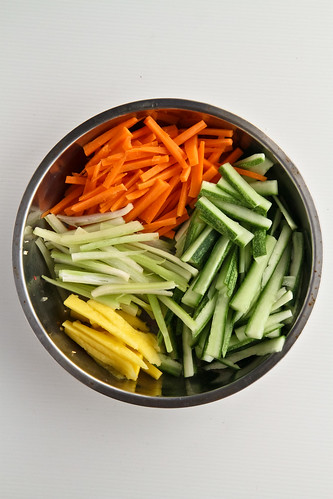
Components of the salad before mixing them together :]

As with my vacherin post, the recipe below is from the book, but do note my modifications below!

Easy Thai Salad

Ingredients: 
200g chicken breast fillet
2 carrots
2 bulb spring onions 
3 garlic cloves
1 celery stalk
1 bird’s eye chilli
300g rice vermicelli
1 tablespoon sugar
3 tbl fish sauce
3 tbl sunflower oil
1 tbl lemon juice
200g fresh-shelled prawns

Method:
  1. Chop the chicken breast into small cubes, cook it in boiling water for 5 minutes.
  2. Peel the carrots, shred them finely.
  3. Slice the spring onions and celery, peel and finely chop the garlic and chilli.
  4. Cook the vermicelli according to the instructions on the packet.
  5. Combine the sugar, fish sauce, sunflower oil, lemon juice, garlic and chilli.
  6. Mix all ingredients with the prawns. 


Janine's jots: 
  • General comments: As with most of Reynaud's recipes, his instructions are rather brief. Some changes I would have made were to shred the chicken breast instead of cubing them, and boiling them first, followed by the prawns, and finally the vermicelli. 
  • Taste: For a more authentic Thai meal, do use palm sugar instead of normal granulated sugar. Some additions I would suggest, which I added in my salad would be a couple of dried shrimp, as well as chopped peanuts as garnishing. If you have a mortar and pestle, do pound the garlic and chillies (I used more than 1) together to 'release' the flavors, and gradually add the others. Do use lime juice instead lemon juice if possible, and add a couple of tomatoes, green papayas and tamarind juice to the mix for a more "thai" flavor. 
  • Storage: This salad stores well in the fridge for 1-2 days only, because the vegetables tend to lose their crispness. Best to consume right after, once you've combined the paste together with the vegetables. 

A vegetarian Thai Salad (minus the fish sauce of course)

Well, there is a reason why som tam made it to the list, and seriously, besides fish sauce, most of the ingredients are really easily available, especially if you're located in Southeast Asia. If you're not, fret not - I bet the Asian grocer nearest you will definitely have fish sauce, as it's a commonly used condiment not only in Thai but in other cuisines as well. If you are trying to recreate what you've eaten in Thailand, do note the suggestions I have made. I didn't have the opportunity to use my mortar and pestle which is located back home in Malaysia, so I had to make do, but the salad still tasted good.  

If you're a cook and you have problems deciding what to cook everyday, I highly suggest buying Reynaud's book - (I'm not paid to say this) - I find that although this book is pitched to an audience of more experienced chef (for instance the preparation time for this salad stated 10 minutes but I took a lot longer than that just to chop my veggies) and his instructions are sometimes brief, looking at the recipes each day does give you inspiration to cook, and indeed, reasons for you to sit down to eat :] 

Saturday, June 11, 2011

[$20 Budget Meal] Mee Hoon Kuay (面粉馃)

Also known as Ban Mian (板面),  Mee Hoon Kuay (or Kueh) (面粉馃) can also be called handmade or hand-pulled noodles. Actually, there is a difference between ban mian and mee hoon kuay - ban mian is the Chinese version of fettucini (in my opinion) - ie, it is made with long and evenly cut strips of dough whereas mee hoon kuay has dough which is torn by hand, and is characterized by uneven shapes. Sadly though, in food courts and many stalls in Singapore, mee hoon kuay is actually machine-cut into squares. I prefer my mee hoon kuay hand torn, because I love the different textures (thick and thin) as well as the different sizes that comes with the manual 'pulling'. I also think that such dough tends to be more "QQ" (this means more elastic in Chinese lingo). 

As I have alluded to previously, I'm currently overseas in Australia for a long holiday, and it being winter here, makes me crave warm and soupy things. Mee hoon kuay was one of the first dishes that popped into my head - the other two being bak kut teh (肉骨茶) and tom yum goong. Having tried mee hoon kuay out from scratch, I'm definitely KIVing the other two :] 

Anyway, not to blow my mother's horn, but my mom is a really good cook, and one of the things that she makes which I absolutely love and will have over anything else outside, is her mee hoon kuay. I usually help here in the tearing of the dough and the general cooking of it, but I have never actually helped her in preparing the dough. So when I called her to ask for the recipe, she told me that there wasn't any recipe and basically just add enough water and some oil to make the flour elastic. And add an egg also. Like huh?! I've heard this often enough, when I was overseas and called my mom almost every other day to ask how to cook X or Y and she gave the most vague instructions! But I'd like to think that because of this, I've actually learnt how to cook by taste and smell, which is perhaps one of the most valuable lessons that any cook can learn :] So anyhow, since I really had no idea of how much water and flour, I decided to go hunting online for some measurements because for a novice, measurements are important! I found myself on Lydia's and Tintin's blogs, where they had prepared their own version of mee hoon kuay. My recipe below is an amalgamation of their recipes and what I'm used to - minced meat and mushroom precooked together, to be added into the soup later, fried anchovies on the side, lots of chili and fried shallots. 

Believe it or not, this was taken with the iPhone. Hate that the sides are a little cut off and the perspective's a little off :/ I was in a hurry to eat it ;p


Mee Hoon Kueh (面粉馃) 
Serves 2 for a meal

For the noodles: 
1 cup all purpose flour
1 egg
Pinch of salt
½ tbl oil (I used sunflower oil)
2 tbl water

For the soup base: 
1.5 litre water
150g anchovies 
Some shallot oil
Salt and pepper, to taste

For the dipping sauce: 
2 bird eye chilies, chopped
1 clove garlic, minced
1 tbl soy sauce

Additional ingredients: 
6 stalks of Choy Sum (or any Asian greens, washed and chopped)
4 fishballs 
2 eggs 
Minced meat and mushroom (about 150g of minced meat and 50-100g of shitake mushrooms)


Additional garnishing: 

Ikan bilis (or anchovies, about 50g) 
Some stalks of spring onion (also known as shallots)
Some fried shallots (small onions)

Method: 
  1. Measure out a cup of flour into a large mixing bowl. Add in a pinch of salt. Make a hole in the centre of the flour, and crack the egg into it. Pour in also the oil and water. Combine the mixture until a rough dough comes together. Start kneading the dough for about 20 minutes (if doing by hand), until you achieve a smooth elastic dough. Cover the dough and let it rest for at least an hour before pulling into pieces. 
  2. After washing the ikan bilis, boil 150g in 1.5 litres of water. Bring to a boil before letting it to simmer for at least half an hour. Season the stock to taste with salt and pepper. 
  3. For the remaining ikan bilis, pat dry after washing and place into a microwave-safe bowl. Place it into the microwave for about 3 minutes on high. The ikan bilis should turn crispy, just like deep fried ones. (Note: there is no need to add oil!)
  4. For the dipping sauce, combine the chilies and garlic in the soy sauce and place in a sauce plate. 
  5. For the minced meat and mushrooms, soak the dried mushrooms in warm water for at least an hour to soften. Slice mushrooms lengthwise into 1-cm wide strips. In a pan (or wok), saute some minced garlic until slightly brown before adding the minced meat. Fry until meat turns light brown and add in the mushroom slices. Cook until softened, before adding light and dark soy sauce. To thicken the sauce, add in some cornstarch dissolved in some water. 
  6. For the noodle dough, using a rolling pin, roll the dough into approximately 3mm thick. To make it more manageable, divide the dough into smaller sizes (about A4 size). Make sure that the stock is boiling before beginning to tear the dough into smaller bite-size pieces. Immediately throw these pieces into the boiling stock. 
  7. Once you have torn all the dough, add in the fishballs and vegetables of choice. Depending on how you like your egg (runny yolk or fully cooked), crack in the egg after the vegetables have been cooked. 
  8. To serve, ladle the cooked dough, fishballs, egg and vegetables and stock into a soup bowl. To garnish, add a few spoonfuls of the minced meat and mushroom, microwaved ikan bilis, some fried shallots and spring onions. Dip into dipping sauce and enjoy :]

Janine's jots: 
  • Notes: If you're doing the tearing of the dough yourself, make sure you work quickly, so that the first few pieces of dough don't cook too long and turn out mushy. What works for me is to make sure that the initial batch of dough is slightly thicker than the later batches to ensure that they take longer to cook. Alternatively, you can tear the dough first and place them on a plate (make sure they are placed apart, otherwise they will stick). 
  • Taste: Fantastic. There really isn't much I'd change in this recipe, except perhaps use more ikan bilis in the stock. 
  • Texture: The mee hoon kuay is sufficiently Q and elastic, and is heavenly, when eaten with the crisp ikan bilis, soft springy fishball accompanied with the sharpness of the chili. 
  • Serving size: I found it pretty manageable to cook the 2-person portion in a large pan. The amounts above are more than sufficient to cook a meal for 2 for dinner. 
  • Modifications: None. I love it! Btw, for ban mian, all you have to do is use a knife to cut the dough into long strips instead of tearing the dough. It's that simple. There's no need to flour the dough if you are going to cook it immediately in the stock. 
  • Storage: The cooked mee hoon kuay does not keep well in the fridge at all. You must consume it within an hour of cooking otherwise it'll become soft and mushy. 
  • Would I make this again?: Definitely!!! 


A little close up of the mee hoon kuay :D
These are the only photos I have now, because unluckily, I dropped my camera on the floor yesterday and the lens broke into two. Yes, it broke. One end got shattered so badly and the other end got stuck to the body. Thankfully, I managed to get it unstuck, and the camera body was unharmed. The sad thing is that I've now lost a lens and only have my wide angle lens left :( I was really upset for the whole day because I really liked those lens and I was planning for all these fine-dining places in Sydney and the UWA is really slow and has a large minimum aperture, which makes it a bad choice especially in all those restaurants. Boo :'( I foresee many photos being taken with my trusty iPhone for the next few posts as well. 

On a happier note, this post will also be killing two birds with one stone because it's my third entry for the Muhibbah Malaysia Monday event hosted by Shaz of Test With Skewer and Suresh of 3 Hungry Tummies. AND, after much much procrastination, I am finally participating in the $20 Budget Meal event that has been hosted by Ellena for the past few months. This month's theme is Noodle, and it has to be a one-pot dish cooked for at least 2 people. Since I'm in Australia now, I'll be using Australian dollar for the calculations below. 

Total cost for this dish is about A$7.06, breakdown as follows: 
- Flour: $0.20
- Ikan Bilis: $1.50
- Minced Meat: $2 (I used minced pork)
- Dried Mushrooms: $1
- Choy Sum: $1
- 3 eggs: $0.36
- Spring onion: $0.30
- Fishballs: $0.70

This makes for a truly cheap and budget meal because eating out in Sydney (where I'm at now), is not cheap at all. The cheapest available meals tend to be Asian food, and even that will cost you at least $8 for lunch and $10 for dinner, per person. If you want to dine in proper restaurants, expect to set yourself back by at least $20 for just the main course. With less than A$8, I have managed to cook an extremely satisfying meal for 2, with homemade and healthy ingredients (ie, homemade stock and no MSG!). Therefore, for those currently living overseas now (and if you happen to be craving mee hoon kuay), please don't hesitate to head down to your Asian supermarket to buy the ingredients. The only ingredient that might be slightly harder to find is ikan bilis. Make sure to call it anchovies or jiang yu zai (江鱼仔) to make sure that the shopkeeper understands what you want. And one final note, making the dough is also not as hard as it seems ;] Do try this out!

Monday, June 6, 2011

Comfort food - Spaghetti Bolognese

I first heard of Murdoch's 365 challenge on Ellie’s blog, and I am super excited to be part of this challenge, where cooks from all over the world are cooking through Stéphane Reynaud’s 365 Good Reasons to Sit down to Eat. This is the first of a few recipes I’m trying - it was meant for 3 June, which incidentally was my birthday (I didn't realize it when I was picking recipes), and I also didn’t realize how busy I’d be with all the traveling and settling down I’d to do, so I'm really sorry that this is out of sync with the date it is supposed to be made on. Some comments about the book which I now have -  I’ll have to say that since this book is written by a 'western' author, some of the recipes on certain days do call for some ingredients which are slightly more exotic or harder to find in Singapore, or perhaps just a lot more expensive. Just another little gripe though - I'm someone who's really into details - and Reynaud's instructions tend to be a little of the vague side. He also tends to list ingredients like "onions" and "tomatoes" without specifying white or red onions, etc - this could be problematic for new cooks who are using the book. Nevertheless, the book is still great for dinner ideas, especially when you're running low on inspiration, because the dishes are really easy to whip up and require very minimal preparation and cooking time!

I chose this spaghetti recipe as my first attempt, because spaghetti bolognese is perhaps one of the first few one-pot dishes I made, and have continued to make many times. I don't usually follow a specific recipe when cooking spaghetti bolognese, but I was pleasantly surprised as to how similar my 'recipe' (or the lack of it) is to Reynaud's. 


Spaghetti Bolognese 
Serves 6 

Note: I have amended the ingredients instructions in the book slightly to suit my own recipe. For the original recipe, please refer to page 240 of Stéphane Reynaud’s 365 Good Reasons to Sit down to Eat

4 x 185 g beef steaks or chicken (or lean bacon strips)
6 tomatoes 
20 cherry tomatoes (optional)
4 onions 
100 g mushrooms 
1 tablespoon concentrated tomato paste 
2 tablespoons tomato sauce (or ketchup) 
1 bunch of basil, leaves picked (or dried basil)
500 g spaghetti 
Olive oil 
Salt and pepper, to taste

Method: 
  1. Dice the tomatoes. Halve the cherry tomatoes. Peel and slice the onions. Slice the mushrooms. 
  2. Sauté the meat in olive oil with the onions, allowing them to brown before adding the mushrooms. Once the mushrooms grey, add in the diced tomatoes, tomato paste and sauce. Cook for 10 minutes on medium-low heat. Add in the halved cherry tomatoes. 
  3. Cook the spaghetti in boiling water with some olive oil and salt added, for about 10 minutes. Drain the spaghetti and pour the Bolognese sauce over it. 
  4. Roughly slice the basil and scatter over the plate. Add in some olives if preferred. 

Janine's jots: 
  • General Comments: As usual, I added my own ingredients to the recipe - I substituted the fresh basil for dried ones because I didn't have fresh basil available, and I had to use up my mushrooms and lean bacon strips which were probably going to spoil. These substitutions might have altered the taste of the original recipe somewhat, but I believe what's important is the tomato base for the sauce! 
  • Taste: Make sure to use nice fresh tomatoes so that you get a nice sauce. I tend to add some sugar to sweeten if the tomato sauce is too tart. If you don’t have concentrated tomato paste or sauce, just use tomato puree that you can get from the supermarkets. I prefer using fresh tomatoes since there's no preservatives involved. Also, be sure to look for good concentrated tomato paste - I use passata di pomodoro (which is basically Italian for tomato paste) which I bought in Italy, which is awesome tasting. 
  • Modifications: Reynaud advises against using minced meat, because using steaks or chicken fillets and slicing them is a much tastier choice. I roughly quartered the recipe to make 2 servings - it was enough for 2 small eaters for dinner. 
  • Storage: The sauce stores well in the fridge for about 3 days, and freezes well as well. 
  • Would I make this again?: Definitely - I make this all the time when I run out of things to cook. This is also my ultimate easy to cook dish and is something I always turn to while traveling and when I have my own kitchen, because it calls for the simplest of seasonings and ingredients. 

If you haven't yet attempted a spaghetti bolognese dish or if you have been using those spaghetti sauce in a jar, do try this recipe out - I assure you it won't take up more than 30 minutes of your time to prepare and cook! If you already have tried spaghetti bolognese before, still do try this recipe out because it won't disappoint! If you're interested in what other dishes the other cooks are whipping up in their kitchen, do head down to Murdoch Books’ 365 Challenge Blog to have a look!

PS: I bought the cherry tomatoes from an organic market here in Sydney (which I will be writing about soon), and they tasted soooooo awesome. The sweetness and slight tartness that bursts into your mouth when you bite into it is unbelievable! If these already taste so good, I can't imagine how the heirloom tomatoes will taste like!

Saturday, February 12, 2011

Valentine's Day Roundup

As Valentine's Day rounds the corner, the blogosphere is inundated, really, with posts about Valentine food and gift ideas. I like looking at "food porn", plus I do like the inspiration which comes to my mind when looking at these imaginative and creative food creations, so I decided to do my very first Valentine's Day Food Roundup for this blog =)

These are a few ideas, food ones of course, for you to make for the coming Valentine's Day. Of course, you don't really have to make it on 14 February itself, because love between two people should be celebrated every day, all year round. But if there's a special day that the world set aside just for celebrating love, jump in and celebrate! I'm not one for a restaurant meal on Valentine's, because all the hype results in superly inflated prices everywhere. A few days again, the telly was just telling me that a romantic dinner for 2 on the Singapore Flyer is in the region $300-$400. Like what?!! Well, maybe because I'm still a student and also because I'm particularly stingy, but $400 for a meal just seems over the top, especially if it's not a hatted meal. 

Onto the pictures - I claim no ownership for any of the pictures or ideas - all pictures have been linked to their respective blogs and recipe pages, so click on! 

I'll be doing a roundup of what I have been doing at home (all heart-related) at a later date, because I'm just too lazy to take out my CF card to upload the photographs for the time being. Also, I know that all the pictures below are "heart" related, which is cliched, but I really do like hearts (and butterflies) and what better time than Valentine's to have heart-shaped food? =)

Surprise your loved one with a hearty breakfast (pun-intended):
French toast perhaps? 


Or some crepes if you are so inclined?
Mmmm chocolate pancakes!
Sweet Potato pancakes


Or some red velvet pancakes?

And perhaps for lunch, what about some heart-shaped pasta? =)
Heart ravioli?

A simple pasta, shaped in a heart

A heart-shaped pizza
Heart-shaped pizza AND heart-shaped pepperoni?


And for tea, here's a smorgasbord of ideas!


Hot cocoa with a pink hearted marshmallow?

Churros
Some jelly pops for you?
YUMMO donuts!

Sweet heart pies
An apple hand pie perhaps?
Fruit pizza decorated with fresh fruit? 
Simple puff pastry hearts!


And onto my favorite parts - dessert!!!
Red velvet cupcakes - the recipe is similar to the one I use
Or a simple chocolate cupcake with heart-shaped sprinkles?
I love this two-in-one red velvet cake idea
Gosh - it's a cake within a cake!

I like the two-tone frosting here :)
Perhaps give a hint with your Valentine ring cupcakes?
I'm pretty sure this cupcake flower bouquet will pretty much trump any bouquet if your guy bought it for you!

If you're really short of time, why not just dip some strawberries into chocolate - just be different :)
Give strawberry roses instead of roses


Some ladybug-berries maybe?
And who can forget cookies?

A vanilla version here
A chocolate version here
Conversation heart cookies by Annie's Eats - she has really good tutorials on icing and I follow her sugar cookies recipe for any cookie I want to ice!

NOT forgetting my craze at the moment - macarons!
Conversation heart macarons are so dear :)
Be more literal with heart-shaped macarons perhaps? Btw, do check out Steph's blog - she has really creative ideas and wonderful photographs to match :)

For those who love flowers and cupcakes, why not this? 
Give flowers AND cupcakes at the same time!
Or cakes disguised as chocolate truffles

Finally, a little crafting to end the post
Use felt to make an envelope to keep a note for your loved one

There's tons of ideas on the internet to give you inspiration, so have a wonderful Valentine's! If you are without a valentine of the opposite sex, it's no time for consternation - use the opportunity to spend more time with your family, or your besties! They too deserve (and enjoy) love from you!

PS: I've not done any round up from local blogs because I believe most of them will be entered into Aspiring Bakers #4 and that round up will be done by Ellena at the end of the month!

Tuesday, January 11, 2011

Applesauce - a healthier substitute

For a while during my december holidays, I toyed with the idea of going on a low-carb diet. But as with most of my ideas, it went down the drain when I realized that I had to forgo a few of my most favorite foods - bread, pastries and cakes! So I embarked on trying to substitute one of my meals with a high protein, low carb alternative and looked towards healthier alternatives for my baking. One of the things that popped up the most was the substitution of applesauce for any oil in a recipe. I saw this substitution a lot when I was looking at muffin recipes, but it can be used in other types of bakes as well. 

Since then, I bookmarked recipes for making applesauce but did not try it because I was attempting other more interesting recipes. It was only when I was reading Nick Malgieri's book and was entertaining a craving for oatmeal cookies that I decided to finally to try out making my own applesauce. 


For the uninitiated, why can we substitute applesauce for oils in a recipe? 
Fats add richness and texture. The primary function of fats in a recipe is to coat the proteins in the flour, thereby preventing them from mixing with the liquid ingredients and forming gluten, which would result in a tough texture. Applesauce is good substitute, because it is high in pectin, and pectin can also coat the protein, inhibiting the development of gluten and thus keeping the baked good tender and moist. However, applesauce has water, which is a liquid which can contribute to gluten formation. Also, applesauce is more moist than oil, which might result in a more liquid batter. One method to avoid gluten formation is to mix the liquid ingredients and sugar first, and the other dry ingredients separately before combining them together gently and as little as possible. This is because gluten begins to form as soon as flour comes into contact with a liquid and gets more active with stirring.

General rules of thumb
  • Tenderness, moisture and flavor changes when substitutions are made. Because of its moistness, applesauce substitutions work best for cakey recipes - this includes cakes, muffins, brownies, quickbreads, chewy cookies. 
  • 
Oils in a recipe can include butter, or canola oil or shortening. Any butterfat in a recipe can be substituted. Generally, 1 cup of oil can be substituted with 1 cup of unsweetened applesauce. It is generally recommended to first substitute half of the oil in the recipe with applesauce, and slowly increasing the ratio until you are satisfied with the result.


You can completely substitute the oil, but 1 to 2 tablespoons of oil in a recipe is ideal, as it will enhance the recipe's flavour. Note that by substituting half a cup of oil with applesauce, you are already reducing calories in the recipe by 1600 calories!


  • If your applesauce is sweetened, reduce sugar in the recipe accordingly. 
  • You can also use other types of purees: pears, plums, pumpkin, banana or squash as substitutes. 
  • Since applesauce is acidic, add about 1/4 teaspoon of baking soda to smooth its flavour. 
  • Note that applesauce substitutions will result in a moister and softer texture, and is NOT suitable if you want a crisp texture (crispy cookies, for example). 
  • Do not overmix or overbake the cookies because low-fat batters tend to be dry and are prone to becoming tough and dense if overbaked. To prevent this, reduce oven temperatures by about 5°C and check the product for doneness a few minutes before the end of the usual baking time.

Applesauce
Ingredients
Adapted from Nick Malgieri's Perfect Light Desserts 
3          apples (I used a mixture of Delicious, Fuji and Granny Smith)
30 ml   water

For a more flavorful applesauce, add up to 30g of sugar or 1 tsp of lemon juice or a dash of ground cinnamon or all of the three. 

Method:
  1. Peel, halve core and chop apples. 
  2. Place them in a medium saucepan with the water and cook over medium heat until the mixture comes to a boil. 
  3. Lower the heat and allow the apples to simmer in their juices for about 20 minutes, stirring occasionally so that the apples do not scorch. 
  4. If the apples become very dry before they have disintegrated, add 2 to 3 tablespoons of water and continue cooking until the apples turn into a chunky puree. 
  5. Use a whisk or potato masher to break up any large chunks. You can also use the back of your fork or spoon to do the same. 
  6. Remove from heat and let applesauce cool before using it. 

Golden Delicious, Fuji Apple, Granny Smith (From L-R)
Peel, halve and core the apples. Chop them into tiny pieces.
Add 30 ml of water to the apples and bring it to a boil before allowing it to simmer. 
The result after a 30 minute simmer - if you are fine with this texture, then there is no need to mash it up! 

Janine's Jots: 
  • This recipe is for unsweetened applesauce - you can add up to 1/4 cup (~50g) white or brown sugar if you want a sweetened version. Unsweetened applesauce is somewhat of a misnomer because it has the sweetness of the apples - you can smell it while it's cooking! Don't follow any recipes strictly, instead, slowly add sugar to the mixture and taste it until the sweetness suits your preference 
  • You can also cook this in your slow cooker if you like - about 2-3 hours will give you the same result.
  • For a more complex version, check out Elise's recipe here.
  • I mixed the types of apples I used to increase the complexity of taste in the applesauce. Using the same type of apples is fine.
References: here and here

Comments: I'll update with Nick's oatmeal recipe as soon as I try it out! Right now I'm having fun eating the applesauce and using it in my apple pies as extra filling :)
Related Posts Plugin for WordPress, Blogger...