My blog has moved!

You should be automatically redirected in 6 seconds. If not, visit
http://www.unpastiche.com
and update your bookmarks.

Showing posts with label Vanilla. Show all posts

Saturday, July 21, 2012

Vanilla Beans and Vanilla Sugar...and the Great Ocean Road

I can finally tick off the Great Ocean Road from my 'places to visit' list. It's sort of a half-tick, because I didn't exactly manage to visit all the sights that I had wanted to visit, and we only reached Port Campbell before doing a U-turn, because reality had to butt its ugly head in and I had to rush to Melbourne CBD to get some urgent documents couriered back to Singapore. Sigh. The fates were just against me that week. What happened earlier was that the car rental company had upgraded us to this huge MPV (a Toyota Kluger), and this was not a welcome upgrade because the height of the car from the ground coupled with the winding roads made me carsick :/  


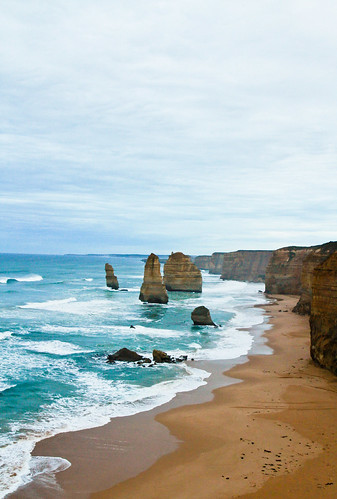
That's a photo of the famed Twelve Apostles along GOR - I think two of the Apostles are missing from the above photo because of the vantage point I was at, and in any case, there was never Twelve Apostles to begin with (did you know that?) The photo, on greater inspection, is rather blurry, but I would like to blame the horrendously cold weather for my shaking hands - I was crazy and decided to visit the Twelve Apostles at sunrise, so it was 6am, freakingly cold and windy (it was 10 deg and I was severely underdressed). 

The Great Ocean Road is indeed breathtaking, and I would definitely revisit, although this time in Spring and preferably in a convertible ;) I'll be writing more in a Travel Tuesday entry, because I've lots more to say about the Great Ocean Road. Suffice to say that it's worth spending more than two days leisurely driving along the GOR and I would definitely recommend staying in Apollo Bay - the accommodations I stayed in were not only cheap but one of the best I've stayed in so far!

***

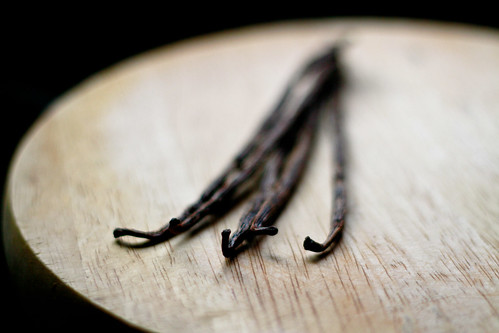
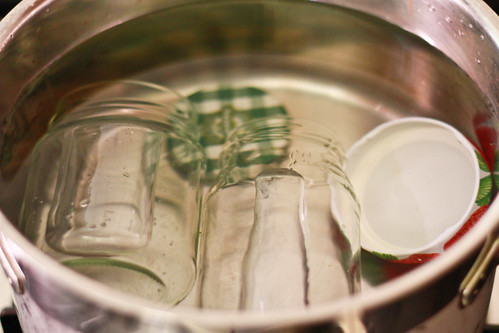
I also wanted to post a short post on some vanilla beans I've received in the mail some time back. I've been waiting for the vanilla extract to 'mature' before I post about the beans :] As you might know, vanilla beans cost a bomb (in Singapore or Malaysia) - I've seen them retailing at about S$5 per bean? Naturally, I was dissatisfied with the prices here and I was pleasantly surprised when I found that there was a cheap source of vanilla beans online! Java Vanilla (you can check them out here or here) is a vanilla plantation in West Java selling its own organic vanilla beans and other vanilla products! (Do note that I'm not too sure about how the organic label works in Indonesia so take that with a pinch of salt). Prices are also pretty reasonable - my pack of 'gourmet java vanilla bean' costs US$30 (S$38/RM95) per 100g pack, inclusive of a trackable postage (to either Singapore or Malaysia). The only drawback is perhaps the fact that you have to have a Paypal account to send the money over. 


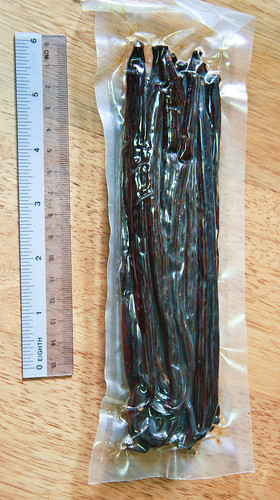
What I liked about Java Vanilla is the fact that they ship really quickly - I got my beans about 4 days after I received the tracking number Another plus was the fact that the vanilla beans were properly vacuumed sealed, which meant that the vanilla scent and beans would last longer. I have previously  received vanilla beans simply put in a plastic bag in an envelope to be shipped across the world from some eBay sellers. The vanilla aroma probably disappeared halfway around the world :/ And to think that I paid much more per bean for those :/

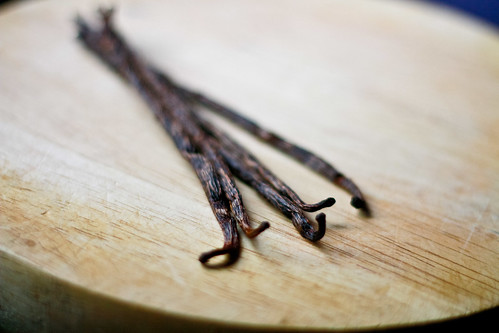
If you check their website, they have a few types of vanilla beans available - the 'luxury' bean which is about 19cm or longer, the 'gourmet' which is about 18cm (this is the one I got) and the 'premium' which is about 16cm. Because the beans are packed based on weight, you will get varying amounts of beans depending on the type you buy. I got about 30 beans for my 'gourmet' pack. 

I also did my research prior to buying these beans, because honestly, I was quite doubtful about vanilla beans from Indonesia, but I must say that I was pleasantly surprised. The beans are perhaps one of the oiliest ones I've encountered, but the aroma is fantastic! Ramada, the contact person for Java Vanilla, was really patient with all my queries about the vanilla beans. I was informed that the vanilla beans are the same variety as the ones in Madagascar (Planofilia), and that they use the same curing technique as in Madagascar. However, these retail in the international market as "Bourbon Java Vanilla". I happen to have the Tahitian, Indian and Madagascar vanilla beans in my pantry, and I must say that these Indonesian beans really do resemble the Madagascar ones in aroma (but not in terms of oiliness). There are slight differences though, which I am not able to exactly pinpoint - the Indonesian beans smell a little more pungent(?) but I know for a fact that this pungency will translate very well in custards and other batters. 

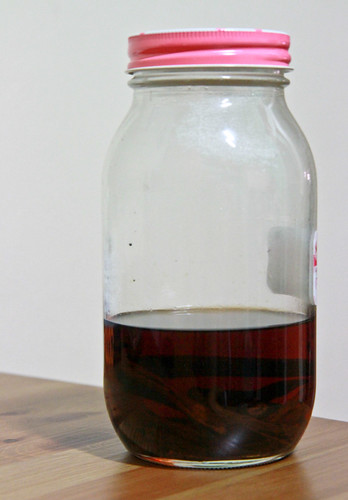
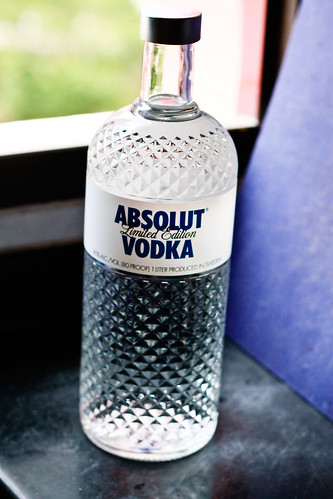
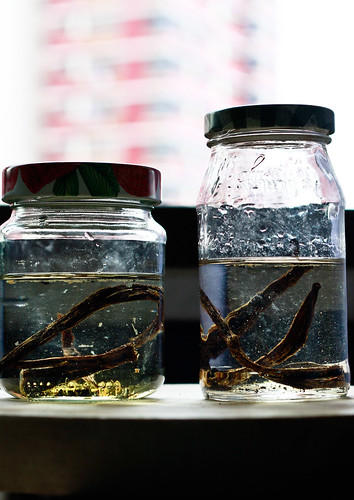
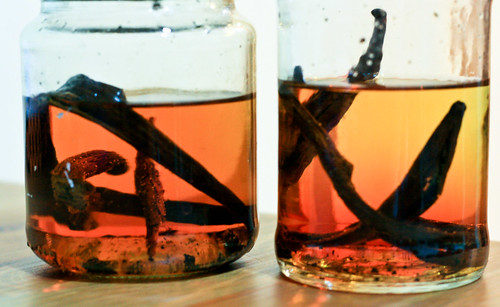
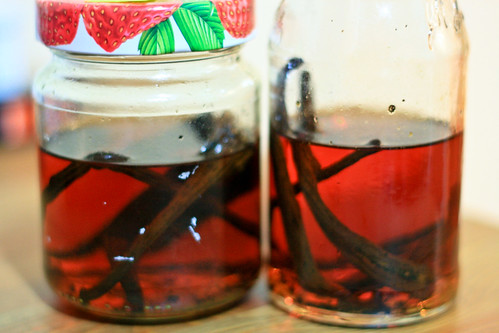
So, what did I do with my vanilla beans? I made more homemade vanilla extract with them, and after the vodka turned a deep dark shade of brown, I took out some of the vanilla beans to make vanilla sugar! :] (I was inspired by a post I saw on Java Vanilla's webpage on vanilla powder, which was simply vanilla pods ground into powder.)

Typically, homemade vanilla sugar can be made by simply placing a vanilla pod in a jar of sugar and letting it sit for about a week. The sugar will smell fantastic by then. But I wanted to go a step further and extract more vanilla goodness from the pod (to make it worth its value), so what I did was to re-use the beans I had used for the vanilla extract. I placed about 10 vanilla beans in 500g of granulated sugar, and gave it a few blitzes in my food processor. My food processor is rather blunt, so there's still a lot of 'fibre' from the beans left ungrounded (as you can see from the photos). A commercial blender would definitely be able to make full use of the entire vanilla bean by blitzing the pod into smithereens but I had to use a fine sieve to sieve out the fibre. And after doing that, what you have left is DELICIOUS vanilla sugar! 


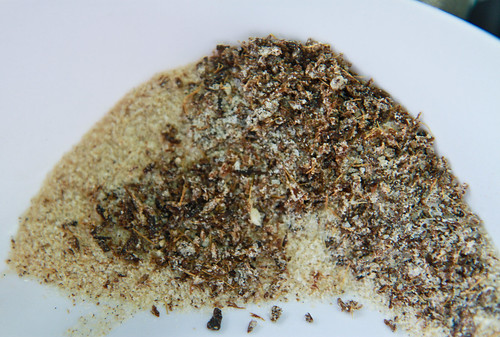
The sugar I used was originally white and refined, so you can see how much vanilla-ness I managed to extract from a single bean, judging from the brownness and spottiness of my homemade vanilla sugar :D There are still some fibers left in the vanilla sugar, so the sugar needs another round of sieving when it is slightly drier - the sugar turned a little wet because of the vodka from the vanilla beans and from the blunt processor. 

It took me no longer than 10 minutes to take the vanilla beans out of the vanilla extract, place it into the food processor with the sugar, blitz and sieve it. It's that easy, and now that I have 500g worth of it, I no longer have to waste money buying vanilla sugar from anyone and I am saved the trouble of having to take out a single vanilla pod, slice it into two and remove the 'caviar' whenever the recipe calls for it because I can simply replace some of the sugar with my vanilla sugar! :]

There's no recipe for this, but just a simple ratio of 10 beans to 500g of sugar. You can definitely use more or less vanilla beans if desired. 

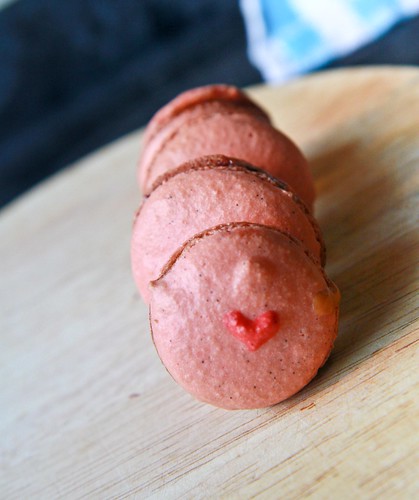
Here's a tiny sneak peak of where some of the vanilla sugar went to - vanilla sugar cookies!


If any of you are interested in trying out the vanilla beans, be sure to check out Java Vanilla (or email Ramada directly at his email address - their beans are pretty darn decent and at $1 per bean, it's really value for money! For those of you not willing to shell out S$37/RM95 for a entire pack of beans (it's not that much for an investment but well), I'm more than willing to mail a bean or two to you, just drop me an email :]

Disclaimer: This 'promotion' was not warranted for by Ramada/Java Vanilla, but I was very impressed with their service and their products - hence this post. I did however, receive a small pack of complimentary beans for my order, but all thoughts and content above remain my own. 

Friday, March 25, 2011

Three months on + a fragrant [vanilla bean] giveaway!

Boy I finally got a breather after a few weeks of intense reports, assignments, presentations and what-nots. Finally managed to indulge in some baking after having churned out more than 10,000 worth of words, and I only have one last report left to do before it's time for the long-awaited exams! It's long awaited because I've 2 full months of holidaying waiting for me after that =D I just took 3 jabs today, 2 on my arms and another on my butt, in preparation for Cambodia, where I'll spend 3 weeks doing some volunteer work. Though my arms are all achy now, it makes me happy to know that I'm this much closer to getting there!

Anyway, I know that people usually only do posts like this after reaching milestones like the 100th post or the first year anniversary, but I wanted to write a little something after having a food-related blog for 3 months, since it's my blog anyway. I've always wanted to have a food-related blog, but I never was able to find the time or patience to blog consistently. However, after living aboard and being exposed to different food cultures and coming back with the ability to cook and bake, I found the need to keep a recipe book (which I do keep - a spiralbound notebook where I jot down my ideas and recipes) and because I wanted to improve my photography skills, a blog seemed like an apt solution. Besides, I used to spend a copious amount of time online previously, tending to customers for my now-defunct online business, and when I came back, I didn't want to continue, because I knew that I’d be busy with school - I'm in my final year after all, and I wanted to pursue my new dream – that of a baker. So I pushed the dream of being a businesswoman back, and brought the baker dream to the fore. [Perhaps one day, I can kill two birds with one stone and be a baker-businesswoman] So anyway, I had too much time on my hands - I would spend time surfing the net aimlessly, and admiring other peoples' photography and writing, whilst thinking, if only I could photograph/write like that. And why not? So this blog was born on Christmas Day, after a week of waffling about and thinking whether I should or should not start a blog. I almost didn't start, because the first words were just so very hard to write. I had to write and edit and delete countless of times before I thought the post was ready to see the world. The pictures were of course, another pain in the ass.

But I’m glad that I’ve been blogging consistently for 3 months, proving that I'm not what my parents call hangat hangat tahi ayam. Malaysians will probably know what it means - literally meaning for as long as the chicken shit is hot (which is not very long) or in proper English, a short-lived pursuit. Not only have I made new virtual friends, having a blog makes me want to challenge myself continually, to not stick to the recipes I’m used to, but to venture out and try new recipes. The fact that I visit other blogs rather frequently (on a daily basis actually) helps too! And most importantly, I'm fulfilling my three main aims for the blog - to hone my baking/cooking skills, to improve on my photography skills, and to keep a digital record of recipes I've attempted (especially my mom's passed-down ones).

I'm giving away these Madagascar Vanilla Beans :)

To congratulate myself on passing the 3-month mark, and to thank you for supporting me on this journey, my dear blogger friends and readers, I figured a vanilla bean giveaway would be apt. If you recall, I bought a number of Madagascar vanilla beans last year, to make some homemade vanilla extract and for use in my recipes. Well, thing is, I bought close to a hundred beans, because they were cheaper in bulk. I was just using my vanilla bean the other day and when I saw how many I had left, I thought, I’d better give some away in case they deteriorate in quality =X (I assure you that they still smell as fragrant as before!) I've to admit that I'm not too sure if these are the top grade vanilla beans, because I know that there's grade A and it wasn't stated if these were or not. However, grade A or not, these are pretty decent beans! Just leave one bean out in the open and the vanilla fragrance will permeate the room in a few minutes! You don't even have to slice it open! An inch of vanilla bean is equivalent to one teaspoon of vanilla extract, and trust me, this will be the best substitute you’ll ever use in your baking because the difference in depth of fragrance and taste you get is phenomenal! 

So to start one of you off on your vanilla bean journey, I’ve decided to give 5 vanilla beans away to one lucky winner. Hopefully, these five vanilla beans will provide you with a springboard into using vanilla beans in your recipes. You’ll be able to attempt at least 5 recipes requiring vanilla beans – think of crème patisserie or vanilla bean cookies or vanilla bean pound cake or even vanilla ice cream - the possibilities are endless really! If you're particularly courageous, you can try Adriano Zumbo's V8 cake here - it's vanilla paradise for any vanilla lovers :] If you don't win this giveaway, don't worry because I have a few ideas up my sleeve and I just might have another giveaway sooner than you think :] Also, you can get the vanilla pods from local baking supply stores at about S$6 for 2 thereabouts. Or psssst if you'd like to help me cut down on my supply of vanilla beans, I'd be more than happy to sell some to you at the price I got them for. Just drop me an email here!

All you have to do to enter the giveaway is drop me a comment with your email address and name, and tell me what item you will make with the vanilla bean if you win it and you’ll stand a chance of winning :] I would love it if you actually did bake that particular something after winning the beans and shared it with me. Or it could be anything else you baked with the vanilla bean. I'd love to include you (and your recipe) in my series on vanilla-related posts (coming soon!) on the blog! This giveaway to both Singapore and Malaysia residents, and will close on 3 April at 3pm, and I'll choose a winner using a random number generator after that :]

In the meantime, happy baking everyone!

Monday, February 28, 2011

A little update on my homemade vanilla extract

Time really flies, it really does.

I first started making own homemade vanilla extract when I started the blog, and now, my blog is already 2 months old! I still remember thinking, gosh, it'll take ages for the vanilla extract to start smelling like a real vanilla extract. Fast forward to today, 28 February - my vanilla extract is 2 months (+2 days) old and is ready to be used! And I've to say that minus the vodka hit that I got from first opening the bottle, the extract smells exactly like Tahitian one I have :)

Here's how my baby looked last month (at 4 weeks old):

Here's how my baby now: 

And yes, I've upgraded it to a larger jar (which is $2 from Daiso), so that I can submerge the vanilla beans with ease and add more vodka when needed. Although the color difference isn't too great from one to two months, the flavor really does intensify - I occasionally open the jar up to smell the vanilla extract and it really smells better and better! Whoever said that vanilla was like wine was right on the money! It really is better with age - it becomes more mature, and there is more depth to the smell. Taste-wise, I can't tell yet because I haven't tried it in my baking, because I intend to age it for a little while more, AND finish using my existing bottle of vanilla extract before I strain this extract (to get rid of the fibres from the pod) and start using it :]

I might even do a giveaway when this vanilla extract is mature enough (in my opinion), so do stay tuned!  If you want to make your own homemade vanilla extract, all you need is a jar, a knife, some strong alcohol, and some vanilla beans! And lots of patience of course! It really is that simple!

Tuesday, February 15, 2011

Pink Vanilla Bean Macarons, for Valentine's

I've been thinking about macarons all week along, after my successful attempt with David's macaron recipe here for my cousins on Chinese New Year. I knew I wanted something pink, for Valentine's, and something heart-shaped, so the only thing left was to decide on the flavor of the shell and the filling! I hemmed and hawed, and finally decided on using my vanilla beans (so that I can put the pod into my vanilla extract jar here) in the shell for a vanilla flavor, and a salted caramel buttercream. 

You might notice that in some of the photos, my macarons look as if they have a black, chocolatey filling - well, that's because my salted caramel buttercream was a flop! Although I managed to make a nice salted caramel, I failed making the actual buttercream because I just couldn't get my butter to whip properly. So I used just the salted caramel in some macarons, while using a chocolate mint ganache in others. 

Oops there's extra caramel on the top of the shell!

I'd also like to apologize because I don't have any photos of the macaron-making process and I know how important these are when you are new to making something. Trust me, I've looked at tens (maybe even hundreds! And I'm not exaggerating) of blogposts on how to make this elusive little cookie and looked at many more videos. I've been thinking of writing a post compiling all these tips I've garnered (with the right attributions of course), plus what I myself have learnt, but I just haven't got the time! Plus the fact that I did start on it but my computer gave up on me, swallowing that post up with it, has made me balk a little at re-starting.

Anyway, I was in a real hurry to complete the macarons to give to my friends - I only had about 3 hours to spare, and thankfully, I took 2 hours from start to end (from measuring and sieving the ingredients to finally filling them up with ganache and photographing them)! Hence even the 'end product' photos are quite gross. The amateur photographer in me was practically cringing at the bad exposure and shadows in almost ALL the photos :/ 

Okay, onto the macaron recipe I've used. I won't be sharing the salted caramel buttercream recipe I've used because it was a failure. 

Janine's jots: I've halved the original recipe, which apparently is the same one Canele uses for its macarons. For the life of me, I can't remember where I got this recipe from, but I think I've adapted and edited it sufficiently to call it my own :) The macarons are quite good, and not as sweet as other recipes that I've tried previously. For my next try, I'll try to decrease the icing sugar a little more and increase the ground almond portion.
Vanilla Bean Macaron
Makes approximately 40 shells, or 20 macarons

Special equipment needed: 
Baking paper to line your baking tray
Spatula 
Piping bag with large round tip

Ingredients for the shell: 
50 g almond meal
90 g icing sugar
44 g egg whites
12 g castor sugar 
Seeds from 1 vanilla pod
2-3 drops of red food coloring


Method: 
  1. Weigh the almond meal and icing sugar and sieve them together. If you have a food processor, place both ingredients inside and pulse it a few times to combine. 
  2. Split the vanilla pod in half, and remove the tiny black seeds from the pod, adding it into your almond-sugar mixture. 
  3. Beat the egg whites with your mixer, starting at low speed until it froths and switching to high speed. Once the egg whites start to 'whiten' (the soft peak stage), add in your castor sugar gradually, mixing until stiff peaks are reached.
  4. Using a spatula, start folding your almond-sugar mixture into the stiff meringue. Once it is semi-incorporated, add in 2-3 drops of food coloring and continue folding until everything is fully incorporated. Do not mix the batter because this will break down the air inside the meringue which enables you to get your feet!
  5. The resultant mixture should be shiny, and what people describe as "flowing like lava". My own gauge is that the mixture should be the viscosity of a thick exfoliating facial scrub (those facial washes with beads in them), and if you fold over a trail on the surface of the batter, it should take longer than 30 seconds to disappear. 
  6. Using the spatula again, scoop the mixture into a prepared piping bag and start piping your shells onto your baking sheet. You should try to pipe uniformly, so that the shells bake evenly. My shells are about 1.5 inch in diameter, on average.
  7. Once you are done piping, gently rap your baking sheets in order to remove any extra air bubbles in the shells. 
  8. Here's the important bit - leave the macarons at room temperature for 30 minutes until a skin is formed. This means that when you touch the surface of the shell, it should not stick to your finger and there really is a 'skin' that is formed. What I do to speed up the process is to blow my stand fan directly at the trays so that the top of the shells will dry, inducing the skin to be formed. 
  9. In the meantime, start making the filling of your macaron. After 20 minutes, you should start to preheat your oven to 150 degrees.
  10. The macarons should be baked using the middle rack, so only one tray of macarons in the oven at any single time please! At about 3 minutes, the shells should have rose and the feet formed already. What I do to reduce the steam and humidity in the oven is to open the oven a little at the 6th minute, placing a chopstick in between the gap; then removing the chopstick after 30 seconds. You can also rotate your tray if you see that one side of your tray is baking faster than the other. I repeat the chopstick process at the 10th minute. 
  11. The macarons take about 12 -15 minutes to be done, depending on your oven. Remove them from the oven, and leave them to cool on the tray for 5-10 minutes before lifting them up from the baking paper to cool on a wire rack. 
  12. Fill them with your desired filling once the shells are cooled (about 20-30 minutes) and pair similar-sized shells together. 
  13. And there you have it - a French macaron =D
Here's a few more photos for posterity's sake :]
As you can tell from the shadows, this was taken as the sun was setting! I was in a hurry to get these done for the party in the evening! And as you can see, the shells are not very smooth - because I didn't ground my almond meal fine enough, and the batter could have been mixed just a little more!
Oooh lovely feet (but oh so horrible shadows). The bumps that you see are actually the hearts I added onto the shells. I kept some meringue and made it a deeper pink, and used a chopstick to draw the heart onto the shell. The hearts rose while baking too :) And yes, my shells are not exactly uniform in size =X

And I'm submitting this to Aspiring Bakers #4: Love is in the Air (Feb 2011)! I also made some heart-shaped macarons, as you can see here, but they kinda were packed for my friends before I remembered to take a photo of them :/

ETA: I've finally plucked up the courage to submit this post to Mactweets Mac Attack Challenge #16 here. Mactweets was started by Jamie and Deeba, both of whom have wonderfully written blogs, and they hold a monthly macaron challenge with a theme. Hopefully this will be the start of many challenges that I'll be joining! :)

Sunday, January 9, 2011

My Vanilla Project - Homemade vanilla extract

Vanilla has a hand in everything – ice cream, cookies, pies, cakes and even kuehs! For a long while, I was only acquainted with vanilla essence, which my mom used in her baking. My then non-inquisitive mind never did ponder about where this vanilla thing came from, until my jaunt overseas and I found out there were more expensive things called vanilla extracts and vanilla beans! Now that I’ve been exposed to vanilla extract, I doubt I can ever go back to vanilla essences – essences in our part of the world are but the poor and (fake) cousin of extracts – it is usually made of synthetic vanilla. I know that in other parts of the world, essences are a more concentrated form of extracts, but not here in Asia. Good vanilla extract is awesome – just a tiny bit is enough to elevate your baking to the next level – there is a subtle sweetness about vanilla that makes your bakes so much so aromatic.

There are many brands of vanilla extracts, but one of the more famous ones would be the Nielsen-Massey brand of vanilla extracts– which I’ve seen recommended by many sources. The good thing is that it’s available in Singapore, the bad news is that it’s rather costly (about S$20+ if I’m not wrong) as compared to the cheaper alternatives. The vanilla extract that I’m using is from Queen’s, which is somewhat of a house brand in Australia, but I find that it suits my needs for the moment.

As curious as I am with new things, I started on a research of vanilla and other related things which I’ve summarized below. I find Wikipedia useful in this area, and a simple google search will yield most informative results. 

Madagascar Vanilla Beans :)
History of vanilla
The first people to use and cultivate the vanilla bean were the Totonac Indians of Mexico – they used it in rituals, in medicine and as a perfume; but curiously, not as flavoring. When the Indians were conquered by the Aztecs in the 15th century, the secret of the vanilla bean was passed to the Aztecs, who mixed it with their chocolate to make their drink chocolatl. Following that, when the Aztecs were defeated by the Spaniard Hernando Cortez in the 16th century, he returned to Spain with vanilla and cacao, which was enjoyed only by the rich for a long time. Then in 1602, Hugh Morgan, an apothecary to Queen Elizabeth I, suggested that vanilla could be used as a flavoring by itself, and since then, the vanilla bean has been used in baking, perfume manufacture and aromatherapy.

Nowadays, most of the production and cultivation of vanilla is in Madagascar and Indonesia. Mexico, where it originally came from, only produces a small percentage of vanilla now. Another major producer is Tahiti. Vanilla beans are mainly cultivated in tropical areas – places such as Costa Rica, India, Uganda and Jamaica produce them in limited quantities.


What is it?
Vanilla beans are the dried and cured fruit from the Vanilla orchid Vanilla planifolia, a plant native to Mexico. It is the only orchid that is able to bear fruit. It is both a spice and an aromatic, and ranks second only to saffron in terms of price. Why is this so? This is because these flowers usually bloom just for a day and can only be pollinated by the Melipona bee which is native to Mexico. If the flowers are not pollinated, they wither and no beans are produced. Although it is now possible to cultivate and pollinate the flower manually, the flowers still only bloom once and the entire process is manual, including the harvesting and curing – so essentially we are paying for the high labour cost and time expended.

Characteristics of vanilla pods differ based on where and when they are cultivated. For example, Bourbon beans, which are found in Madagascar and the Bourbon Islands, have the thinnest pods of the three varieties, and are described as having a creamy and sweet flavour, with vanillin overtones. Mexican beans are similar to Bourbon beans, but have a more mellow and woody fragrance. Tahitian vanilla beans, on the other hand, come from a completely different plant variety, called vanilla tahitensis. These beans have little vanillin content, but have a fruity aroma which many favour as well.

I’ve used the terms vanilla beans and vanilla pods exchangeably, although strictly speaking, the vanilla bean refers to the pod and seeds. What we are using are the seeds contained within the pod. Each pod has an average of sixty thousand seeds! 


How long do the beans remain fresh?
They should remain moist for at least a year. If they dry out, add half a potato in a jar with them to soften them for use. You can also place them in warm water before use to soften them. If you find white substance appearing on your vanilla bean, do not panic – it might not be mold – it might be the vanillin crystals which provide the vanilla bean with its intrinsic flavor. To determine whether it is mold or the crystals, just touch your finger to the bean – if it is the vanillin crystals, they will disappear after you touch them.

How should I store it?
Vanilla beans should be stored in a closed container in a cool, dry and dark place. They should not be stored in the fridge or freezer because this will dry them out. If stored in an airtight container, open the container once in a week to allow air to circulate. 

How to…
Open the vanilla pod
If you are afraid of a mess, place a parchment paper below the bean such that the seeds fall on the paper instead of on your chopping board. I use a plastic cutting board, so that any stain left by the seeds/pod is easy to wash off. I use a small paring knife which helps me better control the ‘slice’.

Lay your vanilla pod on the paper (or board) and flatten them by pressing on them from top to bottom – I find that this helps in slicing the pod open. If the beans are too dry or hard, you might consider steaming them for a while. Another thing I found useful was to snip off the top end of the vanilla bean before slicing them - there are very few seeds on the extreme ends, so don’t be afraid that you are losing precious seeds! Also, leaving the other end of the bean intact helps keep the sliced open parts remain open-side up.

Scrape out the seeds
Once the pod is sliced open, you can either steep the whole bean in liquid (to impart flavor to the liquid), or scrape out the beans. Most recipes require you to scrape out the seeds so that you can add them to the batter. Using the same paring knife, flip the knife to use the blunt edge and start from the end which you did not snip off. Gently scrape the inside of the pod downwards and with slight pressure. Do not exert too much pressure because you might scrape the ‘bark’ of the pod as well. Each seed is tiny, and black, and is smaller than a needle head. All the seeds will clump together – very much like caviar. I do my scrape in sections – I scrape as much as possible from the top portion, before moving on to the other sections, all the while moving in a downward motion. Once you think you have removed all the seeds possible, do not discard the pod! This pod may still contain tiny black seeds which you can’t see, and better still – the pod itself is able to impart fragrance, aroma and flavor to other things. 


PS: I haven't been able to get photos of me opening the pod and scraping out the seeds because I can't do that one-handedly and take photos :/ So that'll have to wait until I get myself a tripod!

Recipes:
To make a vanilla something, you can either use the whole pod, or just the seeds. Here's a list of Vanilla DIY projects: 

For example, for Vanilla sugar, you do not need to use fresh new pods. Basically, after you have sliced the pod into half and deseeded it, use that very same pod (making sure it is clean and dry), and bury it into your jar or wherever you store your sugar. The pod will impart the vanilla flavor to your sugar. To make full use of your pod, you can run your fingers through the pod (while it is in the jar of sugar), using the sugar crystals to rub against the inside of the pod to tease out all the remaining seeds. Store the pod and sugar in an airtight container and after a short while (you can smell the difference a day later, but putting the bean in the sugar for a longer time will give you a more intense vanilla sugar), you will have your own homemade vanilla sugar!

Vanilla salt: same as for vanilla sugar, just that you place the pod in a jar of salt.

There are a few other vanilla recipes I found here – vanilla vinegar, vanilla coffee; but those aren’t my cup of tea. The main reason why I bought the vanilla beans were because I wanted to make my own vanilla ice cream (more on that next time) and because I wanted to make my own vanilla extract!

**
I saw a few versions of the recipe online, and I decided to do a mini experiment – one jar of vanilla extract would have the pods split, with the seeds intact, and the other would have the pods sliced and seeds scraped. There was another version which recommended cutting the pods into a few pieces, which on hindsight I think will help in releasing the pod’s fragrance more quickly. Legally, vanilla extract has to contain alcohol which is at least 35% proof, and it’s best to use flavorless alcohol – so vodka is a good choice here. Here’s the recipe I adapted and used:

Vanilla extract
Items required:
  • Clean, sterilized jars or bottles
  • Small paring knife
  • Wooden cutting board with parchment paper OR plastic cutting board
  • Alcohol (I used 40% Absolut Vodka, which is the cheapest Vodka available locally. Some recipes use rum, but I find that using vodka more preferable since it gives the vanilla a chance to shine)
Method:
  1. Pour a cup (or 240ml) of vodka into the sterilized or clean glass jar.
  2. Slice each vanilla bean lengthwise, split them in half while leaving one end connected.
  3. If you want to hasten the process, scrape out the seeds and put them into the jar together with the pods. Alternatively, use more vanilla beans per volume of vodka.
  4. Make sure the vanilla bean is completely covered with vodka and store in a dark cool, place.
  5. Shake the jar once in a while, otherwise you will find the dark brown color concentrated on the bottom of the jar.
  6. After 8 weeks, your homemade vanilla extract will be ready for use!

In pictures
Sterilize your glass jars by submerging them in water and heating it to boiling point. Remove from water and let it dry before using. 
I used Absolut Vodka since it was the cheapest available but you can use any flavorless alcohol with at least 35% alcohol. 
Put the split vanilla beans into the jar and submerge with vodka.

After 2 days - the colorless liquid has already turned brownish.

I love the gradient here! Note that the jar on the right, has a lighter color than the one on the left - I suspect it is because the beans were merely split and not scraped out.
12 days have passed since I first started, and the color of the extract is deepening very nicely!

Janine’s Jots:
  • The ratio that most recipes use is 80ml for every vanilla bean, but you can reduce or increase this based on your preference. I put in 150ml of vodka for 2 split vanilla beans.
  • You can replenish your extract by refilling it with more liquor, and leaving it to stand for a while before using. Also, after using a fresh bean in a recipe – for example, after scraping the seeds for a vanilla cookie, just place the empty pod into your jar. If the pod were steeped in milk or cream previously, just rinse off and dry it before placing it into the jar of extract you have going. If you continue replenishing your extract in this manner, your extract will last forever! Another tip is to remove the older beans after a while (say after a year) because they would have ‘run out’ of fragrance by then – this frees up more space for newer beans.
  • If you want clean vanilla extract, be sure to use a fine sieve because otherwise you will get seeds in the extract.
  • If you wish to use your extract before you reach the 8-week mark, check the flavor by putting a few drops into some milk. Drinking the extract itself is not advisable because the alcohol will overwhelm the vanilla taste whereas milk provides a good base of the flavors to develop.
  • Also if you wish to replace vanilla beans in a recipe with extract, the rule of thumb is to replace a 2-inch piece of bean with 1 teaspoon of extract (tip from Rose Levy Beranbaum's book).
So far, only 2 weeks have passed since I first started, and my conclusion from my mini experiment thus far is if you want a vanilla extract quickly, it'll be most effective to split the bean, and to scrape out the seeds as well. On the same basis, cutting the bean into pieces would also hasten the process. However, I'm not sure whether things will be different at the end of 8 weeks, so I'll definitely keep track of the progress of my extracts and let you know if there is any difference to scraping out the seeds or not! :)

Related Posts Plugin for WordPress, Blogger...