My blog has moved!

You should be automatically redirected in 6 seconds. If not, visit
http://www.unpastiche.com
and update your bookmarks.

Showing posts with label Gluten-free. Show all posts

Thursday, April 12, 2012

[Thursday's Trio] Absolutely Delicious Gluten-free Chocolate Chip Cookies

Finally the third instalment of Thursday's Trio! As you might have discovered, I find it rather hard to stick to a schedule - as you might or might not have realized, I have not done my Travel Tuesdays for a long long time (the last one was about Phnom Penh in June 2011) and neither have I completed my A to Z of Australia series either. In fact, I'm only at the letter E (for Eveleigh Markets), and since starting the series, I've been to Australia at least three other times. Oops.

In any case, I'm trying hard to make Thursday's Trio a monthly thing because I've gotten feedback that it's really helpful for some of you and I love reading up and researching on such things anyway. I previously talked about buckwheat and sorghum and today, I touch on millet.


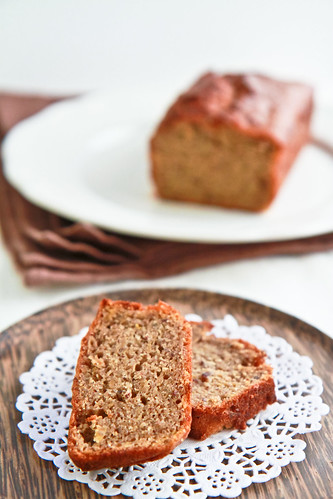
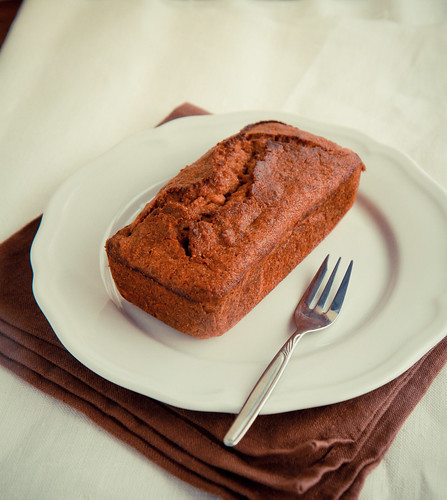
Millet is often associated with bird seed, because well, it is part of bird food. It is tiny in size, and can vary in color, from white to gray to yellow to red. Technically, millet is a  a seed and not a grain.There are many varieties of millet, the most popular being finger millet and pearl millet. In fact, teff is actually a type of millet as well – Ehtiopian millet. If I'm not wrong, the yellow colored millet grains that we see in supermarkets and organic food stores in Singapore and Malaysia are pearl millets.

Similar to sorghum, millet is a staple in some parts of Asia (it apparently originates from China) and Africa, and it is very drought-resistant. Added to that is its short growing season – it can develop from a seed into a ready-to-harvest plant in less than 70 days! I guess this is yet another reason why it is grown in lands with low fertility and dense population.


Three interesting facts about millet
  1. Did you know that millet is even mentioned in the Bible as an ingredient for unleavened bread! (See Ezekiel 4:9)
  2. Remember the 5th most important crop sorghum? Well, millet is the 6th most important grain crop and it is actually related to sorghum!
  3. Millet is a good source of magnesium and phytochemicals, which helps lower high blood pressure and reduce heart attack and cancer risk. Studies have also shown that the insoluble fibre in millet also helps women avoid gallstones and protects against breast cancer! I personally enjoy millet because it is non-glutinous and is not acid forming, which helps with my digestion and gastritis.
Three ways of using millet
  1. Think of millet as similar to rice, and you can imagine just how many ways you can use it. It can be used as a flour, a grain, puffs or even flakes!
  2. You can also eat millet ‘fried rice’ – it tastes exactly like rice, just that it’s ‘shorter grained’. Cook millet as you would rice and you're set! Or cook it with more water and you can eat it as a porridge - sweet or savoury it's all up to you!
  3. Use whole millet to add an extra crunch to your muffins (think of it as large poppy seeds), bread, pancakes and even cookie recipes. I like it in my granola :]
Three interesting recipes I’ve bookmarked from blogs
  1. Tartlette's Strawberry Jelly Roll Cake (with rice and millet flour only)

How to store millet?
As with other grains/seeds, millet can last for quite a long time (two years) if properly stored. The whole seeds can be kept together with your rice or in a closed container in a cool dry place. The flour becomes rancid very rapidly after it is ground, therefore, do place the flour in the refrigerator, especially in our warm, humid environment.    

  
So as you can tell from the photographs, I'm featuring millet in my chocolate chip cookies today! I actually made a millet-only pancake, but I didn't exactly enjoy it, so I thought these chocolate chip cookies would be more convincing for those just starting to explore millet. If you notice, millet is seldom used alone (unless you're cooking the whole seed) and really tastes best when combined with a mixture of starches and flours.

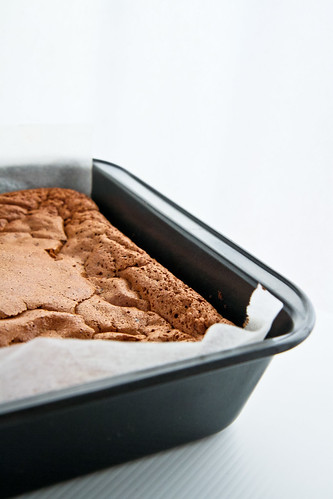
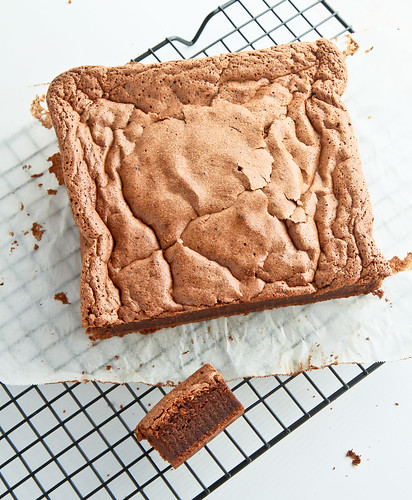
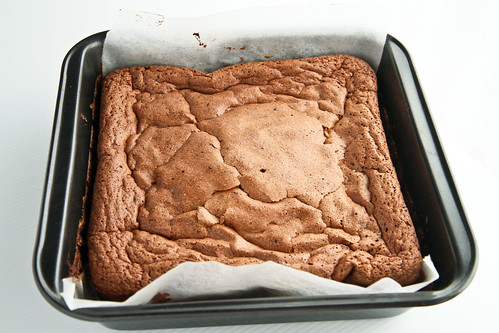
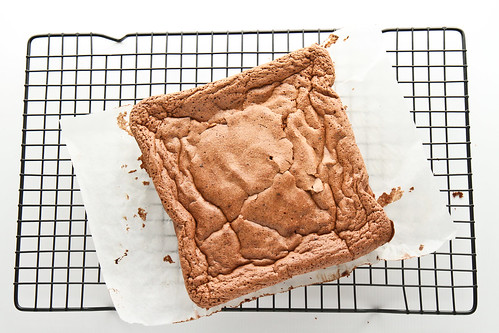
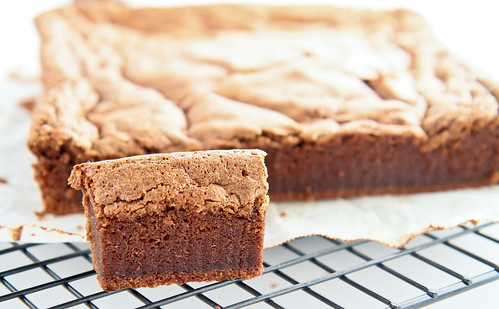
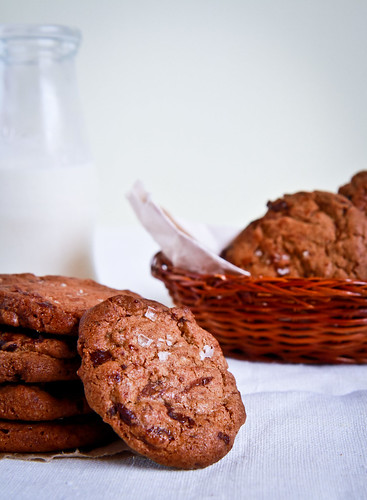
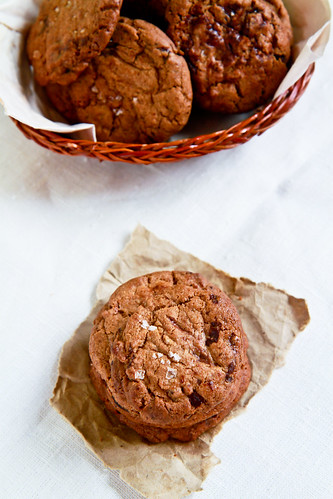
I'm calling these the 36-hour chocolate chip cookies because making these cookies take at least 36 hours! After making the cookie dough, you have to allow the dough to rest in the fridge for at least 36 hours (find out why here) before taking it out to bake into morsels of heaven :]

I actually baked both the normal wheat version and gluten-free version at the same time, and conducted a tiny experiment. Those cookies which were baked a day after making the dough (ie, less than 24 hours) did not taste as chocolatey as those which were baked at least 36 hours later. As for the gluten-free and wheat versions, most tasters could NOT even tell the difference! And mind you, I gave the cookies to friends, relatives and colleagues! Some actually said that the gluten-free version was crispier and far more tasty than the wheat! I personally think so as well! So there you have it - baking gluten-free does not necessarily mean compromising on taste and texture - as long as you get your proportions right, it'll taste as good or even better than normal!

The recipe below is actually a halved version of the usual, do feel free to double the amounts - I tried out this recipe 3 times, making variations each time and I find myself liking this combination of flour and sugar the best. Do check out more detailed notes below.

36-hour Gluten-free Chocolate Chip Cookies
Adapted from David Leite's Ultimate Chocolate Chip Cookies (also known as the NY Times cookies) and sighted at Tartlette who adapted it from Shauna

50g sorghum flour
40g tapioca starch
30g white rice flour
50g millet flour
30g glutinous rice flour
15g buckwheat flour
15g hazelnut flour
10g cornstarch
(240g of flour in total)

2 teaspoons flaxseed, ground
2 teaspoons water
1 teaspoon cocoa powder
(OR 1 teaspoon xanthan gum)

¾ tsp baking soda
1 tsp baking powder (make sure it does not contain wheat)
¾ tsp sea salt

140g butter
110g brown sugar
90g white sugar
30g egg (about ½ an egg )
1 tsp vanilla extract
130g chopped chocolate (semisweet, or about 60-70%)

Sea salt, to taste

Method:
  1. In a small bowl, combine the ground flaxseed and cocoa powder together with the water and set aside.
  2. In a separate large bowl, whisk all the flours and starches together with the baking soda, baking powder and sea salt. Whisk in xanthan gum if not using the ground flaxeed combination.
  3. In the bowl of an electric mixer fitted with the paddle attachment, beat together the butter, brown sugar and white sugar on medium speed for 2 minutes until light and fluffy. Add in the egg and vanilla extract and beat until well incorporated. Beat for at least 1 minute. By now, the flaxseed-water mixture should be quite gelatinous - add it into the mixture and beat until incorporated.
  4. Add in the flour mixture into the batter in 2 batches, making sure that all the flour is incorporated before adding the next batch.
  5. Add in the chopped chocolate (and nuts if you desire) and mix briefly to incorporate.
  6. Then, scoop your preferred size of dough balls before placing into an airtight container to refrigerate for at least 36 hours. Alternatively, you can weigh your dough balls (my large ones were about 35g and small ones about 12g) OR you can refrigerate the dough and scoop them right before baking.
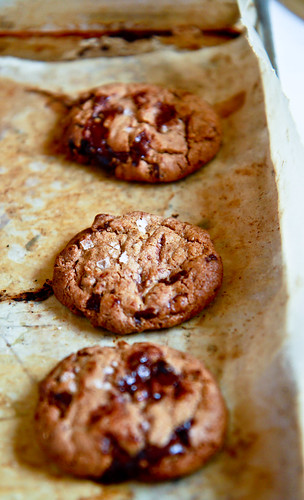
  7. When ready to bake, preheat the oven to 170°C and position a rack in the middle of the oven and line the baking sheets with parchment paper or a non-stick liner. Arrange the large dough balls about 3 finger spaces apart and sprinkle the tops with sea salt.
  8. Bake the cookies for about 15 minutes, or until they are golden brown and the sides are set. Allow the cookies to cool for at least 15 minutes before transferring to cooling racks.
Janine's jots: 
  • Note: If you want crispy cookies, do make the cookies small (about 10-15g) and remove them from the fridge at least 15 minutes before baking to allow them to soften slightly. Flatten them before baking and you will get nice crispy cookies, reminiscent of Famous Amos (I didn't say this - my brother did). Bake those cookies for 15-20 minutes - not only the sides but the centre of the cookie should be almost set before removing them from the oven. Conversely, if you prefer the thick chewy cookies a la Subway, portion large cookies (at least 35g in weight or an ice-cream scoop size) and bake them the moment you remove them from the fridge. The dough ball will gradually soften in the oven and remain thick. Once the sides have set (but the centre is still soft), remove them from the oven. They should take about 15 minutes or so.
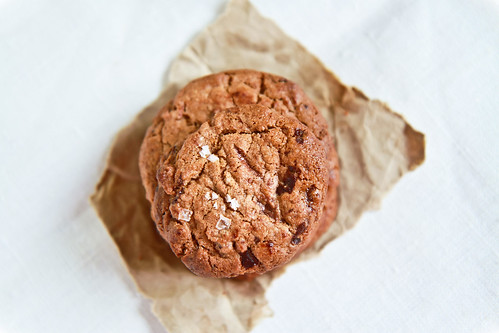
  • Taste: Absolutely delicious. As stated above, I found the gluten-free cookies far more complex in taste than the normal ones - I could vaguely make out the taste of millet and hazelnut, which complemented the chocolate really well, without any addition of chopped nuts. This is definitely THE COOKIE to make when you want to introduce different flours into your diet and if you want to fool unsuspecting victims because they won't know that they're not eating gluten-free products!
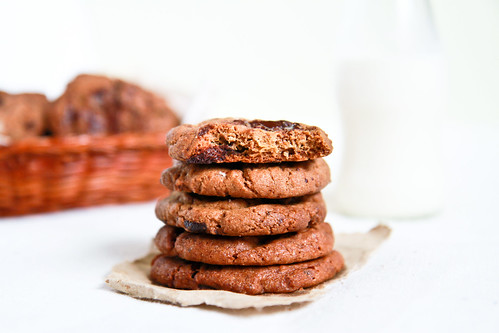
  • Texture: I made a batch using xanthan gum and another without, and I found myself preferring the texture of the one without because the after-taste is less 'slimey'. Then again, that batch had more tapioca starch in it, so that could be one of the factors as well! In any case, this cookie dough is extremely versatile and can be used to make crispy OR chewy cookies - just vary the baking times and baking method :]
  • Serving size: Depending on size, the recipe above can make at least 3-4 trays of cookies. I made at least 100 small cookies with a single batch.
  • Modifications: For those who might be allergic to nuts as well, simply substitute the hazelnut powder for arrowroot starch or any other type of flour. Also, as indicated in the recipe, flaxseed can be replaced by xanthan gum and it is actually a substitute for egg as well. Feel free to increase the flaxseed amounts to 1 tablespoon to replace the egg in the recipe. The cocoa powder is added to mask the taste of flaxseed because sometimes ground flaxseed can taste nasty.
  • Storage: Store the unbaked cookie dough in the fridge for a maximum of 3 days before baking. Store in the freezer for up to 2 weeks although I wouldn't recommend this if you have egg in the dough. For baked cookies, store in airtight containers and they'll last really long! Don't store the chewy and crispy ones together though, because the crispy cookies will turn soft.
  • Would I make this again?: DEFINITELY YES!!


And finally, please note that I don't profess to be a gluten-free expert, although I have read up quite a bit on it. Most of my recipes do have gluten because I don't need to eat gluten-free, although I find it interesting as an alternative diet. Should you be a coeliac sufferer or are gluten-sensitive, please do be aware of some common pitfalls below:

Important notes for gluten-free baking in your kitchen
  • Do make sure that all the flours you use are certified gluten-free, or it is stated on the label that the flour product is processed in a mill which does not process other types of gluten flour. To be safe, you can opt for Bob Red Mills' which is gluten free or some types of flours sold in organic food stores.
  • Do make sure that the baking powder you use is gluten-free as well because some, if not most, baking powders contain wheat as one of the ingredients. You can buy a gluten-free baking powder OR you can simply make it yourself by using mixing baking soda, cream of tartar and arrowroot starch. 
  • Another source of gluten is in the chocolates. Make sure again that the chocolate you use is of good quality, and the label on it states that it does not have any wheat products or it is not processed in a factory which processes wheat or gluten products.
There are definitely far more notes on gluten-free baking but this is merely a primer. For more information, simply google "gluten-free baking" and you'll get millions of hits to blogs all over the world introducing you to the strange new world of gluten-free baking. Enjoy! :]

Thursday, March 1, 2012

[Thursday's Trio] Multigrain Banana Loaf (with Sorghum)

There was a time, not too long ago, when my life merely revolved around white flour and wholemeal flour. Like I mentioned in my previous Thursday’s Trio post on buckwheat, it was blog surfing that introduced me to looking outside the “wheat box” and boy am I glad I did!

Today’s flour of the day or Thursday's Trio is sorghum flour, or jowar flour as it is known to many Indians. In my last post, some asked me what is sorghum and hopefully this post today will answer all your queries and perhaps whet your appetite to try out sorghum for yourself!


As with many cereals and crops, sorghum was originally cultivated in Egypt, and it continues to be a staple food source in Africa. I guess one main reason why it has lived through the ages is because of its sturdiness and resistance to drought. Over in India, it is commonly used, and appears in foods like jowar roti and other flatbreads (chapattis) all over India. You can check out some jowar roti recipes here here and here. They use pretty much the same proportions. And yes, I bought my pack of sorghum flour from the Indian shop as well :]

Sorghum has gained popularity recently because it is gluten-free and people suffering from celiac disease can safely enjoy foods made with sorghum. Sorghum is seldom used alone, because it is bland (flavourless). That being said, its neutral flavour and light colour is also precisely the reason why it is used as a substitute for wheat flour since it does not alter the taste and smell of the finished product. It does alter texture however – it results in a crumbly end product because of its lack of gluten, so it is usually used in tandem with rice or corn starches or more fat.


Three interesting facts on sorghum
  1. Sorghum is the 5th most important cereal crop grown in the world! It is typically used as a replacement for wheat in India and Africa. And what’s even more interesting is that it is also known as “Milo” in Spanish!
  2. There was once when the nutritional benefits of sorghum were not known – in fact, the UNFAO found them to have “poor nutritional quality”. Nowadays, sorghum is known as the next “superfruit” for its high antioxidant power – studies have shown that it has 4-12 times MORE antioxidants than fruits like pomegranates, acai berries, and blueberries!
  3. Sorghum is also high in insoluble fibre, which is helpful for improving digestion and bowel movement. Also, the starch in sorghum is more slowly digested than other cereals, which makes it friendly for diabetics because it controls blood glucose.
Three ways of using sorghum
  1. Sorghum is also used to produce sorghum sorghum syrup or molasses, which is used as a sugar substitute. The stalks of the sorghum plant are harvested, crushed like sugar cane to produce the syrup. Just check out this recipe for instance.
  2. Sorghum grains can be ‘popped’ just like popcorn, and they taste even better!
  3. You might not know this, but sorghum grains are usually found in the ten-grain mixes (十谷米) that you can find in organic food stores.
Three interesting recipes I’ve bookmarked from blogs
I couldn’t find local blogs using these recipes, so I’ve picked some from my favourite blogs, and I’ve cheated a little by including three of each category below to show you how versatile sorghum can be!
  1. Tart crust containing sweet white rice (glutinous rice), millet, cornstarch and sorghum by Tartlette
  2. Chocolate chip cookie using sorghum flour, millet flour and tapioca and corn starches

How to store sorghum flour?
Most recommend storing sorghum (and all other flours) in a sealed, airtight container and placing it in a cool dark place. If you're afraid that it'll deteriorate under the tropical heat, just store it in an airtight container and place it in the fridge :]


Gluten-Free Banana Loaf
Makes a 6" round cake or 15cm loaf and a couple cupcakes 
50g butter
45g brown sugar
25g castor sugar
55g egg (without shell)
150g banana, mashed
90g gluten-free flour mix* 
¼ tsp xanthan gum
¼ tsp baking soda
½ tsp baking powder
½ tsp cinnamon
½ tsp vanilla extract
50g milk

*I used a mixture of the following: 15g almond flour, 15g millet flour, 15g sorghum flour, 15g rice flour, 15g tapioca flour, 10g corn starch and 5g ground flaxseed.

Method:
  1. Preheat oven to 160°C.
  2. Sieve the various flours, xanthan gum, baking powder, baking soda and cinnamon together. Set aside.
  3. Cream butter until softened. Add in the sugars and cream until fluffy. Add in the egg and beat well, for about 1 minute or until mixture does not appear too curdled. 
  4. Next, add in the mashed banana and mix well. 
  5. Sieve in half of the dry ingredients, beating until all traces of flour disappear. Add in half of the milk and mix well. Repeat with a quarter of the dry ingredients and the remaining half of the milk, and end with the last quarter of the dry ingredients. You should get a smooth cake batter at this stage.
  6. If baking as a round cake or loaf, bake for about 30-35 minutes until a skewer comes out clean. If baking as cupcakes/muffins, bake for about 20 minutes, or until the tops turn golden brown. Let cool for about 15 minutes on wire racks before serving. The cake tastes best the next day, after it is fully cooled and the cake has had time to develop its rich banana flavor. 


Janine's jots: 
  • Taste: I upped the cinnamon this time around and I much prefer this cake because of the added spiciness.
  • Texture: Because of the lack of gluten, the loaf is slightly more compact and moist in the centre. But this could also be because of the greater amount of liquid (I used 50g milk instead of 20g per my previous recipe), greater amount of mashed bananas (150g instead of 120g) and smaller amount of sugar (70g instead of 90g). The batter is slightly more liquid than usual as well.
  • Serving size: I used a small loaf tin and made tiny cupcakes with the rest of the batter. If you want a nice and tall loaf, I suggest using a 15cm or (4 x 7) loaf tin!
  • Modifications: I would probably stick to the original liquid and banana amounts (about 20g milk and 120g banana) because I found this gluten-free version a little dense in the centre for my liking. I much prefer a breadier texture for my banana loaves. But this purely be because of the lack of gluten here. I haven't had enough attempts to determine my optimum proportions yet ;p But my mom did enjoy its moistness and said the extra banana made it super yummy.
  • Storage: Because the cake contains banana, it only stores well for a day at room temperature in our tropical climate. After that, the cake will feel a little sticky. I would advise keeping the cake in the fridge, and it will taste good for at least a week. If you prefer, give the cake a quick 5s zap in the microwave and it will be slightly warm, perfect with a cup of tea in the morning :]
  • Would I make this again?: Yes definitely! Check out my previous recipe here!


Check out the dense (and moist) crumb!


Wednesday, January 25, 2012

Healthy CNY cookies #3: Gluten-free Orange-Poppy Seed Squares

Oldies are the goodies. Although I've been trying all sorts of newfangled recipes, be it cakes or cookies, sometimes, mom's recipes still are the best. It may be because of the memories that we associate with the tastes, that makes it taste good, or perhaps the sheer number of generations that a single recipe has fed that makes an 'old' recipe good, so let's not question it ;p For Chinese New Year, in addition to the new recipes (white chocolate oatmeal cookies for example) I looked through my mom's recipe book, torn and tattered that it is, for some of the more traditional and loved CNY cookie recipes. I found this recipe entitled Oriental Cookies, and despite the exotic sounding name, it looked like a traditional butter cookie to me. So I decided that it was the perfect recipe to use for a batch of gluten-free cookies I was planning to make for my cousin.


I've been baking up a storm this CNY season, but even as I make the usual pineapple tarts and cashew nut cookies, I wanted the diabetics in my family (the 2 eldest folks in my family) to be able to partake in the cookies during breakfast and tea (CNY is all about the cookies in my family), so I came up with the sugar-free butter cookies. Looking back (now that I'm back in Singapore), I should definitely increase my repertoire of sugar-free or healthy cookies to a greater number, because the single jar that I brought back was readily consumed by my grandma and uncle, and it was the fastest cookie to disappear. I'm sure if I can make the cookies taste almost the same as the original, people won't be able to tell the difference! The only thing holding me back for now is that exorbitant prices of the sugar substitutes :/

Anyway, these gluten-free cookies were very very well-received by the family, even with the rest of the family who didn't need to eat gluten free. I didn't know exactly what foods my cousin couldn't eat, because a year ago, I was ignorant about these things, so I just made it gluten free. I actually found out later that he was on a GFCF and nut-free diet, which means that I shouldn't have added the almonds into the mix. Luckily, he's not allergic to them, so it's okay in small quantities. With my increased awareness of foods and baking, I'm definitely making something more interesting for him next year - I'm thinking of not only making it gluten-free and casein-free, but going all the way and making it vegan by doing an egg-free and butter-free version. That should be pretty interesting :]


For those of you who might be thinking, what the heck is this gluten-free thing and how does it affect me? I can eat anything! Well, I can too, but this didn't stop me from exploring. A gluten-free diet is basically a diet on which no gluten can be consumed - it may be for health reasons (eliminating wheat and enriched carbohydrates) or it may be simply because your body cannot process gluten (coeliacs). This was perhaps a lesser known phenomenon in Singapore and in Asia, but there has been increasing awareness of this disease because of the greater number of people being inflicted (or diagnosed) with coeliac disease. So what is gluten? Gluten is basically a protein found in wheat - it's the thing that makes bread rises and makes it so elastic and yummy. Thankfully for those in Asia, our staple food, rice is gluten-free. There are many other grains and seeds which are gluten free, such as millet and buckwheat, and other root starches like tapioca and arrowroot - these are the typical flours used in gluten-free baking. Sometimes, a binder or glue is required to mimic the action of gluten, and this is where xanthan or guar gum gums comes in. It's a gum derived from trees, and it acts as a 'glue' for the flours to 'stick' together. This gum might sound exotic, but trust me, it's not - it's a stabilizer commonly used in many processed food products - if you check your food label, it goes by the name E415.

So even though I'm perfectly healthy, I have been reading a lot about a gluten-free diet, because I think that by eliminating wheat flours in our diet, we are actually introducing a great variety of flours and new ingredients that we normally will not encounter. I still make cookies and cakes with white enriched flour, but this also goes hand-in-hand with my bread made of rye and spelt, my rice which has millet mixed into in, my granola which has flaxseed and quinoa and all sorts of other seeds and grains. All these serve to introduce interesting and healthful ingredients into my family's diets. This post is getting rather long, so I'll stop my long spiel for now. Be warned that this is but the first of many posts on such a topic - I do believe that more Singaporeans are looking into a healthier lifestyle (with all those organic food stores and 十谷米 products on the rise), and this is but one way of incorporating healthy living into our daily lives. 

Gluten-free Orange-Poppy Seed Stars
Adapted from one of my mother's recipes entitled Oriental Cookies (source unknown)
Makes about 60 star-shaped cookies 

60g      unsalted butter
⅛ tsp   salt
¼ tsp   baking powder (gluten free)
⅛ tsp   baking soda
½ tsp   orange zest (half an orange)
1 tsp    poppy seeds (or sesame seeds)
50g     icing sugar, sifted
12g     egg
100g   gluten-free flour mix*
½ tsp   xanthan gum

*I used a homemade mixture of the following flours:
10g cornstarch
20g tapioca flour (or tapioca starch)
20g almond flour (or ground almonds)
10g millet flour
15g sorghum flour
10g glutinous rice flour
10g rice flour
5g buckwheat flour

Method: 
  1. Sift the various flours together. Then, sift the flours together with the xanthan gum, baking powder and baking soda. Set aside. 
  2. Cream butter with icing sugar and salt, until pale and fluffy. Then, beat in the orange zest and poppy seeds. 
  3. Beat in the egg white until it is well-incorporated. Beat for about a minute at medium speed.  
  4. Add in the sifted flour mix and beat until all traces of flour is gone. You can beat the mixture for slightly longer because the lack of gluten in the flour means there is no fear of tough cookies! :]
  5. Roll out the dough to a thickness of 1cm, and you can either use cookie cutters or cut rectangular shapes. You may also roll the cookies into balls and flatten them. The cookies will be crispier if they are flatter. 
  6. Bake at 180°C for about 15-20 minutes, or until the cookies turn a light golden brown. Cool on a rack until totally cool to touch before storing in air-tight containers.  


Janine's jots: 
  • Note: Poppy seeds are banned in Singapore, but there is a variety of blue poppy seeds available in Malaysian supermarkets that you may use. Alternatively, you can use black sesame seeds or totally omit poppy seeds if you want. The poppy seeds merely add an extra crunch to the cookies, and for course are aesthetically interesting for kids to eat. In addition, if making for someone who needs to eat gluten-free, make sure that your baking powder is certified gluten free, or make your own. This is because baking powder is usually combined with wheat or some other products which contain gluten, so please please be aware of this! It could be deadly if you use normal baking powder for someone who is seriously allergic to gluten!
  • Taste: I love how the various flours used add to the complexity of the taste of each cookie. For instance, the buckwheat flour gives it a grassy nutty flavor, which is why I used a small portion of it. The almond flour, which I deliberately ground rather coarsely, gave it the nuttiness and crunch. Millet and sorghum both provide sweetness to the cookie dough, and you can also add gluten-free oat flour for more sweetness! 
  • Texture: In my mom's recipe book, she also adds that you can add a maximum of 30g chopped nuts (almonds or walnuts) for extra nuttiness and crunch. 
  • Serving size: This recipe is a halved version of the original, and depending on how large your cookie shapes are, you should get about 50 cookies or more. I had enough cookies to fill 2 8x11inch trays. 
  • Modifications: The original cookie recipe does not include the orange zest and poppy seeds, but I decided to add them in, because I thought the fragrance of oranges would be apt for a CNY cookie, with all those mandarins and tangerines around. 
  • Storage: These cookies store extremely well in an air-tight container, for 2 weeks or more. 
  • Would I make this again?: Definitely! Not only were they well-received by the family, it got a thumbs up by my friends who tried it as well. I personally think it's a nice cookie to eat, and most people didn't even know it was a gluten free cookie until I told them :] 


The first two parts of my "Healthy CNY Cookies" series were Pseudo-pineapple tarts (which were apple tarts in disguise) and sugar-free butter cookiesThis post rounds up this short series, but it's definitely not the last healthy cookie recipe I'm going to attempt. I've been reading up a lot on 'alternative' baking (for want of a better word) and it's high time I changed that into real experiments, so stay tuned!

PS: These photos are taken on my granite dining table back home, and I was playing around with my indoor flash. I definitely have much to learn about indoor flash!

Tuesday, November 8, 2011

Arugula, Basil, Cherry Tomatoes, Feta and Fig Salad with Balsamic Vinaigrette

You might realize that savory dishes are few and far between on this blog. The reason being that I live with my parents, so my mom cooks for me when I'm at home, and either I'm far too lazy to whip something up for myself, or I'm way too hungry to even take out a camera.

So on a rainy day when my mom wasn't home and there was nothing in the house - no pasta or day-old rice for me to fry, and absolutely nothing to eat besides vegetables, I decided to throw together this fig salad. These figs made a brief appearance in our supermarkets a few weeks ago, and knowing how short the season for figs were, I grabbed a few of them, intending to use them in anything I could think of. After using these figs in a tart and a pizza, as well as eating them as they are, I was left with a couple of figs left, and they were fast turning soft. On that rainy day, I decided to make myself some fig salad coupled with all the other veggies I had in the fridge. I happened to be lucky and had fresh basil and rocket/arugula as well as cherry tomatoes in the fridge - leftovers from a pizza-making session the day before. 

Together with some crumbled feta, a drizzle of honey and a mixture of balsamic vinegar and extra virgin olive oil, my lunch was settled. Like I said, I seldom have posts on such 'dishes', but I decided that the weather (post-rain) had really good light and I should definitely take a few photos of them figs, because I didn't take any photos of the other things I made with them >.< and figs are really pretty when photographed. I have to say that these hastily taken photos of the salad do look pretty mouthwatering, even though I'm typing now after a full meal of Vietnamese pho. 


There is no fixed recipe for this salad, and neither was this taken from any particular source, but I was inspired by a fig, goat cheese and arugula flatbread by Melissa (I made this during my pizza-making session and it was so yummy that there's no photographic evidence of it left heh).

***

Fig Salad with Arugula, Basil, Cherry Tomatoes and Feta, with Balsamic Vinaigrette
There is no fixed recipe for this, but these are the portions I used for a single serving for lunch. 

1 fig, quartered or sliced
Bunch of arugula
Bunch of basil, roughly chopped
10 cherry tomatoes, halved
2 tablespoons of feta, crumbled

2 parts balsamic vinegar to 1 part extra virgin olive oil
Drizzle of honey, if you want it sweet
Salt and pepper to taste

Method (in photos): 

Wash all your veggies/fruits well before cutting them :]

Combine the extra virgin olive oil together with balsamic vinegar, adding some salt and pepper to taste. Throw in the chiffonaded basil and combine.

After slicing and dicing the tomatoes and arugula, throw them into the vinaigrette and mix well.

Add in the figs (try not to toss the salad too much since figs are quite fragile) and crumble the feta cheese on top before consuming. Bon appetit! 

Janine's jots: 
  • Taste: I tend to prefer my balsamic vinaigrette more balsamic-vinegary, hence the 2:1 ratio. Do stick to equal parts balsamic vinegar and EVOO for a more balanced vinaigrette. I especially loved how the sour feta cheese went together with the sweet balsamic vinegar (make sure to get a good bottle - balsamic vinegar should be more sweet than vinegary), and matched with the sweetness of the figs. I felt that the basil played an important role in adding more 'zest' to the salad too. The peppery arugula was a plus!
  • Texture: Absolutely loved the different textures - the softness of the figs, the crunch from the tomatoes, coupled with the arugula - YUM!
  • Serving size: I wasn't too hungry - so the portions were enough for myself. I would think this salad will go well with a flatbread or as a delicious, tasty side to any meat dish. 
  • Modifications: You can use goat's cheese instead of feta, or any strong-tasting cheese to match the balsamic vinegar and honey. Any other salad vegetables would go well too!
  • Would I make this again?: Definitely! Like Donna Hay would say, fast, fresh and simple! :]

PS: Call me dumb/swakoo but I never knew that figs were known as 无花果 in Mandarin. Even though I knew that 无花果s had a seedy interior, the ones the Chinese ever eat (and the ones I ever saw) were the dried ones - small brown round things, about the size of a walnut. Which was why I was super shocked when my mom told me that figs are the very same as 无花果 (when I was lamenting the fact that figs are so rare and I've never seen them in Singapore ever). Of course, the dried ones and the fresh ones are of different species - one is the common fig, and the other probably black mission but hey, it's always interesting to learn something new everyday :]

Monday, October 31, 2011

Malaysian Monday #8: Ang Koo Kueh (红龟粿)

The bad thing about blog surfing, at any time of the day, is the food porn that greets you each time you visit a blog. I'm an extremely visual person, and am definitely susceptible to good food photos, so I try to blog surf after meals, so that I don't get too tempted. Alas, I still do and I sure do salivate when I see my fellow bloggers' posts - and when I mean I salivate, I literally DO salivate - the salivary glands under my tongue get activated and saliva pools in the lower cavern of my mouth - no joke!

Now, I've been craving for ang koo kueh ever since I saw Lena's post with purple sweet potatoes, but it became progressively worse because I was met with a deluge of ang koo kueh posts, no thanks to this month's Aspiring Bakers #12 - Traditional Kueh. For some mouthwatering versions, check out Edith's yellow sweet potato version and Ah Tze's red ang koo kuehs using beetroot.

I told my mom about making some for ourselves, to which she told me to just go and buy some. And so I did. I bought them because I don't own any ang koo kueh moulds, and because I didn't have glutinous rice flour and was too lazy to steam my own sweet potato. BAD bad decision. In a bid to satisfy my craving, I bought 5 ang koo kuehs from 5 different sellers (with different fillings) at the pasar pagi (morning market) when I accompanied my mom to the wet market, and with the exception of one, all the others disappointed me to no end - they were too oily, not tasty enough, the filling was too grainy, the gripes just go on...


Then I saw Sharon's post on MacGyver ang koo kuehs and I thought, hey, if she can make it with her silicone muffin cups over in Sydney, shouldn't I in Singapore do better, especially since these ingredients are so easily available? So I got myself some sweet potato, glutinous rice flour and decided that I shall save money and use my moon cake mould. It's the same one I used to make my mini snow skin moon cakes. I didn't have enough chopped peanuts at home, and I was far too lazy to go out and get some, so I substituted part of it with peanut butter. Worked like a dream I'd say! 

For those of you readers outside of Southeast Asia, this might look and sound a little foreign. Basically, kuih muih (plural for kuih or kueh) are traditional delicacies of Nyonya origins (Nyonya or Peranakan refers to the Straits Chinese in Singapore and Malaysia - the interracial marriages between the local indigenous people and the mainland Chinese - this marriage also brought about a marriage of chinese and malay and other local pastries, giving us the assortment of kuih muih we have today.) Ang Koo Kuehs (or Ang Koo Kuih) literal means 'red turtle cake' in hokkien, in my case, I guess I should probably name them Ung Ge Niu Kueh (Hokkien for yellow moon cake) since they're not red and not made using the special ang koo kueh mould that is usually used for making them. Anyway, ang koo kuehs traditionally are round or oval, and have soft sticky skin made of glutinous rice flour or rice flour or a combination of both - sometimes, mashed sweet potato (like what I've done here) is used too. Another feature of the ang koo kueh is its filling - traditional fillings include mung bean paste, sesame and peanut. This kueh is then steamed on a square piece of banana leaf. The most important feature must of course be its bright red color and tortoise shape/imprint on the kuih. Why tortoise and why red you might ask? Well, it's no secret that we Chinese are a very taboo bunch - so the color red is meant to welcome the good fortune and luck during an auspicious occasion; and because tortoises are known for the longevity, and we Chinese want to emulate that, so we print a tortoise on the red kuih to make it decoratively more pretty. 

Ang koo kuehs are definitely a popular item during ritual offerings and a baby's first month shower. Again, Chinese have this tradition of celebrating a baby's first month (or full moon, 满月) by giving out a set of goodies including dyed red eggs, ang koo kuehs, glutinous rice, and more recently, cakes. And just an interesting tidbit - ang koo kuehs were used to tell recipients of the baby's gender - if you got domed shaped ang koo kueh, the baby is a boy, and if you get flat ones, the baby is a girl. I'm not sure if this tradition still prevails but it's definitely something interesting to know :]

Cracked mooncake shaped ang koo kuehs! :]

Sweet Potato Ang Koo Kueh Recipe 
Adapted from Florence
Makes 10 moon cake sized kueh

For the skin
100g   sweet potatoes, steamed and mashed.
150g   glutinous rice flour
15g     oil
80g     water

For the peanut filling 
140g   roasted peanuts
50g     peanut butter
60g     granulated sugar
20g     water

10 pieces of baking paper or oiled banana leaves.

Method: 
  1. Steam the sweet potatoes until soft. In a bowl, mash the sweet potatoes with a fork or potato masher. Add in the glutinous rice flour, oil and water and mix well. Knead until you obtain a smooth dough. Cover with a damp cloth and leave aside to rest while you prepare the peanut filling.
  2. After roasting the peanuts, allow them to cool before putting them in the processor. Add the water and granulated sugar before processing it for a few seconds. Then, add in the peanut butter and process until you get your desired consistency. The filling should come together because of the peanut butter. 
  3. Brush the mould with some oil for ease of removal of the kueh from the mould. A good thing to do first is to take a portion of dough, roll it into a ball and press it into the mould. Add or subtract from the ball until the entire ball is smooth and flattened into the mould. Weigh that piece of dough - that should be the total weight of your kueh. Depending on how much filling you prefer, subtract from the weight accordingly. I used a 25g skin: 15g filling proportion, which is a little on the 'less filling side'. Ideally it should be a 2:1 skin to filling proportion. 
  4. Measure all the sweet potato doughs and roll them into balls. Do the same with the peanut filling. Take the measured portion of sweet potato dough and using your palm, flatten it into a round shape, making sure that the sides are thinner then the centre. Place a ball of peanut filling in the centre of the dough and pinch all the sides of the dough together. Then, roll it into a ball with both your palms. The seam should smoothen and almost disappear. 
  5. Then, press the ball into the mould firmly, with the seam side facing outwards, so that the smooth side will get the imprint of the mould. Then, tap the mould gently on all sides to remove it from the mould. Place the 'released' kuih on square pieces of oiled banana leaves (or baking paper). 
  6. After all the kuihs have been shaped, arrange them in the steamer and steam them in a wok over high heat for about 10 minutes. Remove from the wok and allow them to cool before consuming, about 15 minutes at least. 

In pictures:

Just prior to steaming - my ang koo kuehs have cracks in them, mainly cos I'm not too good at making them :p

They flatten out quite a bit after steaming, and become a more vibrant yellow. It appears oily but I didn't brush any extra oil on them.  

Check out how thin the skin can be! And look at that peanut filling!! :o)
YUM - I used some red coloring on this ang koo kueh to indicate that less peanuts was used heh.

I'll be submitting this post to SSB for this month's Aspiring Bakers #12 - Traditional Kueh as well as Muhibbah Malaysia Monday hosted by Shaz of Test With Skewer and Suresh of 3 Hungry Tummies :] 


Oh, and Happy Halloween, for those of you who 'celebrate' it ;p Guess you could try having this yellow/orange kuih on this day as well, in the spirit of all things orange and Halloween :]

Friday, October 21, 2011

Janine's Failed Macaron Cake aka a Flourless Chocolate Cake made with Maca-fails

I swear by the phrase "out of adversity comes creativity", not only because I am usually pushed by circumstances to think out of the box, but also because much of my (best) work is done when I'm facing a time crunch or other adverse situations. Just take today for example, I was craving ang koo kueh, a traditional glutinous rice treat filled with peanuts or mung beans, and since it was raining heavily and I couldn't go out, I decided that I should make myself some. And so I did. I did so even without the mould required for it, without the banana leaves, and without having peanuts/mung bean paste in the pantry. And it turned out quite successful I must say. I used baking paper and peanut butter as substitutes - creative no? ;p

Anyway, the cake below also stems from one of my 'creative' episodes. I have had many a failure with those dainty little things called macarons, and it's really a pain having to deal with them. This is because with pretty 'footed' macarons, I can gift them to various people, but with macarons that look like whoopie pies...well... let's just say taste is their only redeeming factor, which is sad because many people 'eat' with their eyes first. And the thing is, macarons are always hit-and-fail thing for me, I have as many successes as failures, which makes me hesitant every time I want to make macarons because I'm afraid of the results, or lack there of.


So after a particularly crazy streak of macaron baking which saw me using dozens of egg whites, I ended up with several pretty macarons and a hundred more feetless, shapeless macs. This meant that I had trays and trays of maca-fails, and being the thrifty person that I was, I didn't dump them in the trash right away. I really hate wasting food, so I stored them in airtight containers in the fridge, to the point that there were MANY such containers in the fridge, and my mom started nagging at me, asking me to get rid of them.

So what could I do?


This was when I put on the proverbial thinking cap. I knew that I could do verrines or Eton's mess with crushed macarons, but I'm not exactly a fan of sweet meringue and cream, so after having done it a few times, I had to resort to some other method of getting rid of these feetless horrors. I had always played with the idea of using them in a cake, and after a search on my trusty friend google, I found only one hit for 'failed macaron cake'. The unfortunate (or fortunate perhaps) thing was that the blogger there basically guess-timated her way through her own recipe, and didn't have any particular recipe for her macaron cake. I then deduced that if I pulverized the shells, I could probably replace any recipe which had ground almonds for them. And that was exactly what I did.


So I went about looking for a chocolate cake which made use of ground almonds, mainly because I had lots of chocolate flavored macarons. And as luck would have it, I landed upon Ju's Flourless Almond and Chocolate Cake, which I had bookmarked, a long time ago. If you read the recipe, you'll realize that it's pretty similar to the Queen of Sheba cake, made popular by Julia Child, but that has flour in it.


Anyway, I made a few liberal modifications to the recipe (like using the processor to make the cake), so do check out the original recipe if you're interested in the original cake!


***

Janine's Failed Macaron Cake (Flourless Almond & Chocolate Cake made with Powdered Macarons)
Adapted from Ju, who obtained it from Times Online 
Makes an 8-inch square cake

Ingredients 
200g  dark chocolate (I used a mix of 55% and 70%)
15g    hot brewed coffee (or 1 tablespoon)
15g    rum (or 1 tsp vanilla extract)
95g    caster sugar 
100g  unsalted butter
5        eggs, separated
¼ tsp salt
110g macaron shells


Method: 
  1. Melt the chocolate, brewed coffee, rum and butter in the microwave or on a bain marie. Stir well to combine and allow to cool. 
  2. Place the macaron shells in a processor and blitz them for a minute, or until fine, like ground almonds. Do not over process. Add 70g of the sugar and salt into the processor and blitz for a few seconds to combine the ingredients. Next, add in the 5 egg yolks and process for about 5 seconds. Add in the chocolate mixture and process for 10 seconds, or until all the ingredients are well combined. Empty the mixture into a clean bowl. 
  3. In a metal mixing bowl, beat the egg whites together with the remaining 25g sugar, until you get stiff white peaks. 
  4. Take some of the egg whites (about 10% worth) and mix them into the chocolate mixture to lighten it. You don't need to be gentle with mixing this 10%. Once the egg white is completely mixed into chocolate mixture, gently fold in the rest of the egg whites into the lightened chocolate mixture. This time, making sure to gently fold to retain the air in the egg whites. 
  5. Line your cake tin with baking paper and lightly butter the sides. Pour in the cake mixture and give it a few raps on the counter to get rid of any unsightly air bubbles. 
  6. Bake at 170°C for about 40-50 minutes before removing it. If you want it more fudgey/moussey - bake it for about 40 minutes and your cake tester will come out slightly wet. If you want a more cake-like texture, bake for 50 minutes or more, and some crumbs will still adhere to your tester. 
  7. Cool it in the pan for about 15 minutes before removing it to cool on a wire rack. 


Janine's jots: 
  • BEWARE: I actually made 2 vital errors for this recipe - which accounts for the picture you see above - I used a dark-colored pan, and failed to reduce the baking temperature, which explains why the bottom of the cake is quite over-baked. As for the dense layer slightly above the bottom, that was because I was multitasking while beating my egg whites and I slightly overbeat them, to the point that it was almost turning clumpy :/ This was probably why the cake didn't rise to its requisite height. Nevertheless, I did enjoy the dense layer at the bottom of the cake, because it tasted almost fudgey, and very chocolatey, which was a perfect contrast against the airy cake on top! That being said, I'm not sure if these 2 problems were the result of the powdered macarons, but I doubt so. Anyway, I'll probably try this out again soon (I know I'll have more maca-fails to try them with) and see where I go with it.
  • Note: You should process the macaron shells when they are at room temperature so that they are less 'wet' and can be processed into powder more easily. Otherwise, you might get tiny clumps because of the moistness of the macarons. However, don't worry too much because these clumps will dissolve somewhat after baking (whee!) :]
  • Taste: Having made the original and the modified version, I do feel that there is not much difference in taste, except for the fact that the almonds are much more discernible in the original version. I'd probably use a mix of half almonds and half macarons in the next try to get the best of both worlds :] Do remember to reduce the amount of sugar by a little as well, because the macaron shells after all, are half sugar, and will contribute to the sweetness of the cake. 
  • Texture: The chocolate cake feels almost mousse-y (and tastes that way too), but has a cake-like crust (thanks to my slight over baking), which is a delight to dig into. The best word to describe it would be 'airy'. 
  • Modifications: I reduced the sugar from the original of 150g to 95g, because I took into account that the macarons were half sugar. I felt that the amount of sugar can be decreased further because the cake is still a tad sweet for my liking. My family liked the level of sweetness though. 
  • Storage: The cake does not store well at room temperature because of its gooeyness but they did very well in the refrigerator. Let it sit for a while at room temperature before consuming for the best texture, but even if you don't, it's still really good. I stored a slice in an airtight container for almost 2 weeks and it tasted as delicious (maybe a little drier) as it did when I just baked it. 
  • Would I make this again?: Definitely! Now that I know how to make use of the maca-fails, I have no reason to try and try again :] I'd also serve this with some icing sugar on top, to hide the unsightly cracks - note that this cake WILL sink! Just maybe not as much as mine did.


So there you have it - my secret recipe for disposing of maca-fails! Do try this recipe out if you too have many maca-fails and don't know what to do with them - it's a yummy, alternative way to dispose of them :] If you don't have failed macarons (i.e., all your macarons are perfect) - I hatecha! (I'm jesting!) - this is still a very yummy flourless chocolate cake to try nevertheless :)

Have a great weekend y'all!


PS: I found a new spot in my cramped apartment to take photos and I'm quite happy with the results :) I took these photos in a rather precarious position - balancing on two chairs with the cake placed on a stool which rested on top of my washing machine so that I could get the sun to the side of my cake! What do you think? 

Wednesday, September 14, 2011

Homemade Strawberry Apple Jam, and the differences between jams, jellies, compotes, confitures, etc.

My local supermarket had quite a few offers on strawberries in the past few months, where a punnet of 454g USA or Australian strawberries were being sold for slightly less than $5. I grabbed a few punnets, partly because I was kiasu, and partly because I knew I wanted to do a ton of things with them. So far, I've eaten them (duh), used them as decoration on my chocolate cakes, on my tarts, in my cakes... but I still have so many of them and I was afraid they would rot. So I did the next best thing - I decided to can them and make jams out of them! I decided to do a combination of strawberries and apples, but when I was done, I hesitated over whether to call it a jam or preserve or even perhaps a compote?

Check out the ruby red chunk of strawberry in my 'jam' here :]

Naturally, I had to find out what were the differences and I settled on calling this 'thing' I made a jam. I have made a tiny table of what I have found out: 
  • A jam is basically made by boiling fruit and sugar together to a thick consistency whereas a preserve is where the fruits are made into either jams or jellies and are cooked in whole or large pieces to retain their shapes. 
  • A jelly is basically sugar boiled with fruit juice and gelatin, and does not have any fruit bits. It is usually sweeter and more transparent - think of those strawberry or other fruit jellies that we can get locally in those small plastic cones with a white plastic seal on them.  
  • Of course I had to ask what a marmalade was, and it's basically a jam made with citrus fruits and has bits of rind in it. 
  • A compote (or french for mixture) is defined as a dessert made with whole or pieces of fruit in a sugar syrup - sounds like preserves to me! 
  • Similarly, conserves are known as whole fruit jams, which also strike me as the same as preserves. 
  • To makes things more difficult, there are spreads, which wiki defines as a jam or preserve with no added sugar - confusing and contradictory much?! 
  • Then of course, I'm sure some of you have stumbled across terms like confitures and gelées before - these are basically french terms for preserves/jam and jelly respectively. 
  • Finally, there's the syrup. This is pretty simple - it's basically sweetened concentrated fruit juice!
  •  There are also things we know as chutneys and relishes which involve fruit too, but I'll keep that for another day!
And there you have it! I hope the above list was hopeful to at least someone other than me, because I finally got my doubts cleared and I also realized that many bakeries like to use the french word for jelly just to make their desserts sound a little more classy. 

And now onto my jam! A jam is made when fruit, sugar and acid are heated together. First off, all fruits contain natural pectin, but some, like strawberries, do not contain enough natural pectin to gel (to form a jam consistency). When you cut the fruit and heat it, pectin molecules are released. The sugar added helps to bind the liquid from the fruit to the pectin molecules, bringing them closer to one another. When the mixture is brought to a rolling boil, some of that excess liquid is then boiled away, encouraging greater binding between the liquid and pectin, creating a more concentrated mixture. The acid added, in the form of lemon juice does 2 things: it helps with the pectin and it also neutralizes any 'charge' that the pectin molecules might have, encouraging closer binds between pectin and liquid once again. And that's about all there is to making jam really! If you are keen to find out more about jams, there is lots of good information floating about the net, and a good place to start is Food in Jars (she cans all kinds of things) as well as this site where I got a headstart on.

Oops the picture's a little blurry :/


Strawberry Apple Jam

Loosely adapted from Ina Garten's Easy Strawberry Jam Recipe and Allrecipes.com

Ingredients
200g   fresh strawberries, hulled
90g     rose apple, peeled and diced
150g   castor sugar 
25ml   lemon juice

Method:
  1. Wash and drain the strawberries before hulling them. Cut them into halves or smaller pieces if you want a smoother jam. Wash, peel and dice the apple before combing with the strawberries and lemon juice in a heavy-bottomed pot. 
  2. Cover and cook gently until the fruit begin to release their juices, about 5 minutes. 
  3. Once the apples begin to break down, stir in the sugar. Once the sugar is dissolved, bring the mixture to a rolling boil over a medium heat, stirring often to ensure it does not stick to the bottom.
  4. Reduce the mixture to low heat, allowing the mixture to simmer for about 10 minutes or until it thickens. The mixture is ready when it registers 105°C on the thermometer or when it passes the gelling test*.
  5. Spoon the mixture into a sterilized glass jar before allowing it to cool to room temperature. Store covered in the refrigerator.
And the perspective's on this a little wonky :/
Janine's jots: 
  • *How to test the 'jellying point': There are 3 tests you can use - the 105°C temperature point I mentioned earlier, or the spoon test. Simply place a spoon in the freezer before you start jamming and when you think the mixture is thick enough, dip it into the mixture and raise the spoon out. The jelly is done when the syrup forms a sheet that hangs from the spoon. A similar test is the wrinkle test that some call it. Place a small plate in the freezer before you start and spoon a bit of the hot mixture onto the plate when you think it is done. Allow it to cool for a minute (I chill it in the fridge) and push your finger through it. If the mixture 'wrinkles', then setting point has been reached. 
  • Notes: You will realize that many jam recipes ask you to skim and discard any foam that forms but I did not indicate it above because of a few reasons - the foam is usually discarded because it is not the consistency people like in jams and also because it contains air which affects headspace which affects storage of the jam as well as food safety. Since I do not heat process the jars and consume the jams within a short time, this doesn't really affect me. Alternatively, you can prevent the foam by adding some butter or by microwaving the foam to produce normal jam again! 
  • Taste: The original recipe called for 200g of sugar, which I reduced to 150g, out of which 30g was muscovado sugar. However, I still found the jam rather sweet (I don't like overly sweet jams) - this might be because the rose apple used was very sweet. I will reduce the sugar to about 100g the next time. I also found the mixture a little too tart for my liking - I will probably reduce the lemon juice used to 15ml instead.  
  • Serving size: This makes about 250g worth of jam - which is just enough for a fortnight's worth of spread for breads and rolls for an individual like me :] Do feel free to double the recipe without any problems, because my recipe is half of the original. 
  • Modifications: If I were to do this again, I would boil the apples first before adding the strawberries because the apples take longer to lose their shape and because I want a chunkier jam (or preserve). 
  • Storage: Without heat processing, the jam will store well in the refrigerator for at least 2 weeks. If you wish to keep it for longer (up to a year), seal and heat process them. 
  • Would I make this again?: Oh yes, I foresee many lovely combinations, like strawberry rose, pineapple mango and other tropical combinations that will suit our climate perfectly!
  • Other comments: Do note that the quantities of sugar will really depend on your taste. However, beware of reducing the sugar by too much because this will interfere with the jam-forming process. Here, my strawberries were slightly tart and my rose apple was slightly crisp and sweet.  The sugar levels are thus adjusted to suit what I like. Also, if making an all strawberry jam, pectin might have to be added because strawberries are really low in pectin. I overcame that by adding apples and increasing the amount of lemon juice, both which are high in pectin. 
ETA: Since I wrote this post (which was quite a few weeks ago), I have made this same jam recipe with a few variations - less sugar, more fruit, less lemon, different type of fruit, etc. Another variation I have tried is with just 260g of strawberries, 130g of sugar and the zest and juice of a lemon. The jam was a little on the tart side, which was probably because I added too much lemon juice AND zest. 

Anyway, my mom loves my homemade jam and why not make more jam when there's someone appreciative of it right? :] Expect a few more variations coming your way soon!

Related Posts Plugin for WordPress, Blogger...