My blog has moved!

You should be automatically redirected in 6 seconds. If not, visit
http://www.unpastiche.com
and update your bookmarks.

Showing posts with label Nuts. Show all posts

Wednesday, May 9, 2012

Homemade Granola - Food Revolution Day

I will be talking about revolutions today. When anyone talks about revolutions these days, you think about the 'Arab Spring', or the year of Arab revolutions that began in Tunisia in December 2010 and resulted in a wave of uprisings across the Arab world. And when you actually think about it (and it's been credited in many newspapers and other media around the world), then one catalyst for this widespread revolution was the act of one man. One man, by the name of Bouazizi, who decided one day to set himself on fire to protest, not against his government - no, it was not such a noble act, but it was specially against the confiscation of his goods and the humiliation he suffered under the government officials who came around his street to harass him. This then led to widespread public anger and violence, which led to the fall of the Tunisian government. This of course spread to other countries around Tunisia, most notably that of Egypt and Libya. 

This of course brings to mind a very often quoted phrase these days, that repression is the seed of revolution. 


On this note, I want to talk about Food Revolution Day. What is it you might ask? Well, if you're an avid fan of Jamie Oliver, you will know all about his series, Food Revolution. Basically, it’s about creating a movement to educate children about food and to fight against obesity. Honestly, if you look at the food that the American school children are eating, you won’t be surprised why obesity is such a great problem there. Children there are served sodas, pizzas, huge burgers, fries, and mystery meat – basically the epitome of a great American meal. The revolution has gained momentum in many states in America, and I particularly watching the series and reading the toolkits that Jamie has provided to empower parents and children to make a change in their schools.

This brings to mind a quote by Marianne Williamson “Personal transformation can and does have global effects. As we go, so goes the world, for the world is us. The revolution that will save the world is ultimately a personal one." Jamie Oliver made food education his personal revolution, and I would like to think that he has succeeded somewhat in impacting the world. Food Revolution Day is perhaps a culmination or an extension of what has been done, it goes beyond food education to school children – it is slated on 19 May 2012, and it is a day for people to recognize that we need to start thinking about where our food comes from. It is a day for parents to realize that food habits are cultivated at home, and they too have a part to play in improving the lives of both themselves and their children.

Anyhow, I’m not sure if my own consciousness about food began before or after I watched the series or heard about it, but I have been increasingly conscious of what I am eating of late. One reason is because after starting work, I’ve been eating lunch at hawker centres and elsewhere, and this, coupled with a lack of exercise, has resulted in some weight gain. What I am about to relate is probably the story of many.

Often, when I eat at hawker centres (Lau Pa Sat and Golden Shoe for example), I can’t help but feel a tad sick at the amount of oil, salt and MSG that’s going into my body. So why not eat salads you might ask? Salad shops are abundant where I work, mainly because all of us here are white collared workers, but the cost of these salads are astronomical! A bowl of bak chor mee or wanton mee will probably set me back $3 - $3.50, but salads start from at least $8! And that’s the most basic salad with NO meats! Being the cheapo that I am, I can’t help but think that for $8, I can buy buttercup, arugula, tomatoes, cucumbers enough to feed my entire family of 5! Trying to eat healthy in Singapore really is expensive! And because of my work hours (I often work till 10pm), I really don’t have the time to prepare salads or other homecooked food myself. Enter my mother. Sometimes when I don’t make it back for dinner, I get my mom to pack my dinner for lunch tomorrow, so that I can not only save money, but know that I’m eating healthy home cooked food. These are the small things that I have been doing in order to have a healthier lifestyle. For those who don’t have such nice mothers like I do, don’t fret – you can make a huge batch of pasta sauce and freeze it into meal-sized portions – I do that with my Spaghetti Bolognese which I pack to the office and heat up with the microwave in the office. You can also fry rice (not so much mee hoon and kuay teow since they don’t last long) and store it in the fridge. On weekends, I bake breads or steam paus, and these are very easily stored in the fridge or freezer.

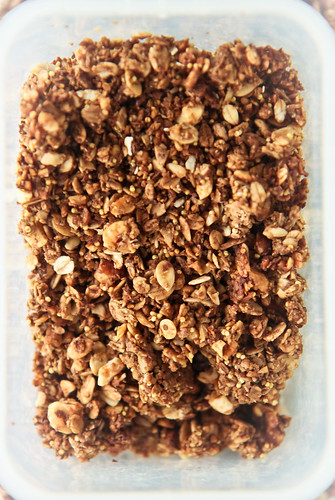
Another thing I also do is to make batches of granola which I keep in airtight containers, and this, along with the steamed paus, makes up my breakfast for the week.


Like I mentioned in my previous post, I’ve been experimenting with many granola recipes, and I have come to realize that the beauty of granola is that there is no fixed recipe. Using the granola formula as your base, you can play around with as many add-ins as you want – some think that rolled oats are a must-have for granola, but I’m telling you that I’ve used rolled barley and rolled spelt and the granola tastes equally good. You can make yourself a chocolate granola, or a nutty granola, or a fruit & seed one – the world is your oyster when playing around with granola recipes! That said, I’m still working on a foolproof granola recipe that I can publish on the blog, so please be patient while I work out the kinks :]

This recipe below is the first granola recipe that I tried, and one that I didn’t tweak too much because I knew that the sweetness would be pretty much okay for me.

Granola Recipe with Molasses
Adapted from Cook with No Books who adapted it from Melissa 

240g rolled oats
1 cup assorted nuts/seeds (I used a combination of almonds, pecans, hazelnuts, sunflower seeds, pumpkin seeds, millet grains and quinoa)
½ tsp sea salt  
½ tsp ground cinnamon  
50g unsulphured blackstrap molasses*
10g honey
35g unsalted butter
30g water
½ tsp vanilla extract

Optional: dried fruits such as raisins

*You can find blackstrap molasses at organic food stores – it retails for about S$5 or less per jar.

Method:

  1. In a large mixing bowl, combine together the rolled oats, assorted nuts, sea salt and ground cinnamon. I am far too lazy to chop the nuts, so what I do is to take the nuts and give them a quick whirl in the food processor to get huge chunks. At the same time, I also take a quarter of the rolled oats and blend them in the processor until I get an almost fine powder. This helps to bind the rolled oats together so that you can get granola clusters.
  2. In another bowl, combine the molasses, butter and water together. Microwave on high for about 30 seconds, or until the butter has melted. Stir in the vanilla extract.
  3. Then, pour in the liquid ingredients into the large mixing bowl, stirring well until every dry ingredient is slightly moistened. It will appear as if the liquid is insufficient at first, but continue mixing and it’ll be okay. Rest the mixture for a few minutes while you prepare a baking tray lined with baking liner or a non-stick liner.
  4. Pour the granola mixture on to the tray and evenly distribute it. You should also try to flatten and compact it. Try to leave gaps in the layer so that you can easily turn over the granola layer for even baking later. Bake it at 150°C on the middle rack for about 20-25 minutes, or until the granola turns a dark golden brown. (The mixture is already a golden brown before baking because of the blackstrap molasses.) If you are afraid that the bottom of the layer is not evenly brown, remove the tray at about the 15-minute mark and gently fold over the layers from the gaps you have created earlier. Be careful not to break up any granola clusters.
  5. Remove the tray from the oven when it is a dark golden brown and allow the granola to cool thoroughly. If you desire, stir in the dried fruits at this juncture.


Janine's jots: 
  • Taste: I actually found the recipe not sweet enough, because I reduced the sugar amounts a little. I would recommend increasing the amount of honey or sugar at least 10% more. Also, if you're new to blackstrap molasses, you might wish to reduce the amount a little because the 'iron-like' taste takes some getting used to.
  • Texture: In order to get clusters, one way is to grind up some of the oats so that it forms a powder to bind the other oats. I usually grind up about 50g of oats. If you want more binding powder, do add in some flax or linseeds.
  • Serving size: This recipe makes approximately 500g of granola, which is sufficient for a fortnight's worth of breakfasts for a single person.  
  • Modifications: I have made many more modifications to this original recipe since the first time I made it - you can change up the amounts of fruits/seeds/nuts as well as the type of rolled grain - I have used rolled spelt and barley to great success as well.
  • Storage: Once thoroughly cooled, store in airtight containers in a cool and dry place. Try to consume within a month.
  • Would I make this again?: Definitely!


So anyway, the purpose of this post is not to stop you from buying cornflakes or cereal (unless I figure out a way to make them myself) or even granola right this moment, but I'm reminding you to be aware. To be aware of what you're putting in your bodies, whether it be refined products or not. And if you're interested to know what Singapore is doing on 19 May 2012 for Food Revolution Day, do check out the Singapore Food Revolution Movement here!

Tuesday, March 20, 2012

Ferrero Macarons for Macaron du Jour

Today’s Jour du Macaron or Macaron Day in France, and a couple of other places around the world. If you’ve never heard of Macaron Day, well now you have. It’s created by none other than Pierre Hermé, in a collaboration with members of the Association Relais Desserts to raise awareness for a charity. This year, the charity is Autistes sans frontiers, or Autism without Frontiers. What happens is that you can pop by any participating Pierre Hermé Paris boutique and receive a couple of macarons completely gratuit (free). All you have to do is to drop a donation of any amount in the boxes available at the boutique. Pierre Hermé also has a macaron he creates specially for Macaron Day. What’s interesting is that in the recent years, there is a ‘map’ of the participating Pierre Hermé boutiques and if you pop by every one of them, you will get a complimentary box of 25 macarons! And mind you, there are probably that many macaron flavours available at each outlet!


I really enjoy the message behind Macaron Day. While it might have stemmed from a selfish desire to promote his macarons and his boutiques (I’m just speculating here), it does promote a good cause. And I’m hoping that one day, all the macaron-selling patisseries across Singapore can band together and celebrate Macaron Day as well, whilst promoting a good cause. However, knowing how stingy Singaporeans are, the macarons cannot be sold completely free. Not that I’m shaming Singaporeans but honestly speaking, I know of many who cheat the honor system when taking transport in Europe (most transport systems there require you to buy your own ticket and random checks are done). Can you imagine selling newspapers based on the honor system? Many Swiss cantons have a newspaper box where you can grab a newspaper and drop the appropriate amount of money in the box for it. I can imagine many people paying less or even not paying anything for the newspapers! I guess our society just has not progressed to that stage of development yet? Anyway, I digress. What I mean to say is that even though macarons cannot be sold completely free, I’m sure something can be done this time next year to promote the patisseries selling the macarons as well as a chosen charity. Hopefully someone’s listening? ;)


So anyway, this being Macaron Day (it's Macaron Day over at Mactweets as well!) and Macaron Month over at Aspiring Bakers (Aspiring Bakers #17 is March Macaron Madness! hosted by Alan of Travellingfoodies), I decided that it was appropriate for me to try something more interesting. And I decided to make myself some Ferrero Macarons! :] Okay, I know that this perhaps isn’t too spectacular, but this is a step up from what I usually attempt. Instead of just ground almonds, I used a bit of ground hazelnuts and instead of just one ordinary ganache, I used two! Yes nothing too fantastic but who cares, it’s my prerogative; p I love hazelnuts and chocolate (otherwise known as gianduja), and I love Nutella (which is gianduja paste) and Ferrero Rochers, so it’s only natural that I make macarons modelled after them. In fact, I guzzled down jars of nutella when I was studying in Europe, where jars were humongous and it was dirt cheap. I also have fond memories of unwrapping the gold-foil wrappers of ferrero rochers and slowly eating it layer by layer, until I got to the hazelnut at the heart of the sphere.


So without further ado, I present you my ferrero macarons (aka gianduja macarons)!

Ferrero Macarons
Adapted from David Lebovitz
Makes about 40 2-cm large macarons shells 

For the shells: 
80g icing sugar, or confectioner's sugar
20g ground almonds
20g ground hazelnuts
20g cocoa powder

50g egg whites
50g castor sugar 

For the hazelnut praline or gianduja: 

Method 1 (the lazy person method): 
30g chopped hazelnuts, toasted
50g cream
30g milk chocolate 

Method 2 (making hazelnut praline): 
30g hazelnuts
20g castor sugar
50g milk chocolate 
10g neutral oil (grapeseed or canola or olive oil)
Pinch of salt 

For the chocolate ganache: 
90g cream (at least 35% fat)
70g bittersweet chocolate (I used a mix of 66% and 70% chocolate)

Method:
  1. For the macaron shells: Toast raw whole almonds and hazelnuts (without skin) on a tray at 150°C for about 10 minutes. Allow the nuts to cool before grinding them separately. Sift the nuts individually and weigh about 20g of each. The ground nuts can be stored in the fridge for at least a week. 
  2. Sift the ground almonds, hazelnuts and icing sugar together. Sift at least twice before setting aside. 
  3. Beat the egg whites (which are at room temperature) with the castor sugar. You can put in the castor sugar right from the start. Beat until you obtain stiff peaks. This should take slightly less than 10 minutes, depending on the strength of your mixer. 
  4. Using a spatula, dump in all of the dry mixture into the stiff meringue. At first, the mixture will seem clumpy and impossible to fold, but do press on and continue to gently fold the mixture. After about 25 folds, all the dry ingredients will 'magically' be incorporated. The mixture will still seem clumpy, so continue folding until you get a shiny, viscous mixture which 'flows like magma'.
  5. Spoon the mixture into a pastry bag fitted with a plain tip and proceed to pipe 2 or 3-cm large rounds onto baking sheets lined with nonstick liners. After piping the shells, be sure to rap the baking sheets against the counter to get rid of any excess air. 
  6. Let them sit at room temperature (or air conditioner temperature would be fantastic) until they are dry to touch. You need not actually touch the shells because it will be rather obvious when they dry and form a 'shell'. This should not take more than an hour. 
  7. In the meantime, preheat the oven to 140°C (fan-assisted), with the rack in the middle, with top and bottom heating. Bake the macarons for about 16 minutes, making sure to open the oven door at around the 8th minute (or after feet have formed) to let out excess hot air and to turn the tray from front to back. Once the shells are firm to touch, remove the trays from the oven and let them cool on the trays for at least 15 minutes before proceeding to cool them on cooling racks. If you use a nonstick liner, they should be easily removed, if not, use a knife or metal spatula to release the macaron. Store the shells in an airtight container until ready to assemble. 
  8. For the chocolate ganache: Chop the chocolate into small pieces and place them in a heatproof bowl. Heat the cream in a saucepan until it starts to bubble. Take it off heat and pour the hot cream over the chocolate, making sure to mix quickly until all the chocolate has melted and you get a homogenous mixture. The mixture will appear very liquid but it will thicken after you allow it to cool for at least 30 minutes. 
  9. For the gianduja #1: Follow the same method as the chocolate ganache above by heating the cream and pouring it on the chopped milk chocolate pieces. Then, add in the chopped hazelnut pieces. For convenience, toast these hazelnuts together with those in step 1 and in fact, just use the hazelnut pieces which are too big to sift through for varying sizes. 
  10. For the gianduja #2: You first have to make a hazelnut praline, which requires you to heat the sugar in a saucepan. In the meantime, make sure you have got toasted whole hazelnuts (without skin) neatly lined on a baking tray lined with nonstick liner. Once you get a caramel, i.e. when the sugar turns a medium brown, pour the caramel on the hazelnuts and allow to cool. DO NOT TOUCH THE CARAMEL because it is very hot! If the caramel is at the right temperature, it will harden almost immediately. After it hardens, remove the praline from the nonstick liner and break it up into pieces. Place the pieces into a food processor and process until it breaks into very small pieces. Do not process too much because you still have to add in your chopped chocolate pieces and oil. What I did was to remove some of the processed praline and dumped in the chocolate, salt and oil, and processed until I got a smooth paste. I then added the processed praline back into the mixture to get those chopped pieces of hazelnut praline. 
  11. To assemble: You can choose to use a piping bag or use the lazy method and spoon the ganaches onto the macaron shells. I spooned a teaspoon worth of the chocolate ganache on one side of the shell, and about quarter a teaspoon worth of gianduja on the other shell. Match the shells together and store the shells for at least a few hours (preferably a day) before consuming. Remove the macarons 5-10 minutes before serving for the best experience :]


Janine's jots: 
  • The gianduja: I have included two recipes and methods for the gianduja which I tried. The first method can be accurately called a gianduja paste whereas the second would be more accurately called a hazelnut praline paste. For the trouble undertaken for method #2, I would definitely not recommend making such small portions. I actually made a triple batch of hazelnut praline (to use as a layer in my entremet) - it keeps very well in the fridge. Of course, the second recipe is sweeter (because of the caramel) than the first recipe. 
  • Notes on the ingredients: If you notice, I haven't used cream of tartar or salt with the egg whites in this recipe, as compared to the previous strawberry macarons. Also, I used freshly cracked egg whites here. I have found that there really is no need to dry them out or add egg white powder although that would definitely help in stabilizing the meringue. After numerous attempts at making macarons, I can safely say that it's the macaronage or technique that determines if you have feet or not, because you can use any nut (or not) with varying amounts of sugar and add-ons. So really, practice makes perfect!
  • Taste: The shells by themselves were awesome, because the toasted nuts added a different dimension. For my under baked shells (i.e. those which stuck to the paper), I felt as if I were eating chocolate hazelnut paste because the hazelnut taste was so prominent! I also enjoyed the combination of bittersweet chocolate with milk chocolate and chopped hazelnuts. Deliciously sinful! For more chocolate-hazelnut sinfulness, you can add in some Nutella in the chocolate ganache. 
  • Texture: The macarons were also undermixed this round, because they were bumpy but on the plus side, they dried out in less than 10 minutes, and I could bake them almost immediately. I enjoyed the crisp chewy shells coupled with the chocolate ganache, added to that was the fact that the gianduja paste had chopped hazelnuts in it. To really replicate a ferrero rocher, I'd suggest adding half a hazelnut in the centre of the macaron :]
  • Serving size: I got about 20 paired macarons, but my macarons were about half the standard size - about 2 cm or slightly more than an inch.
  • Modifications: As I said earlier, this is my go-to chocolate macaron recipe, but I would definitely try reducing the amount of sugar in the recipe as the shells were very sweet (too sweet for my liking). I would probably begin by reducing the castor sugar used to about 40g. The bittersweet ganache helped in cutting down the sweetness, but the gianduja had milk chocolate, so that didn't help with the sweetness. 
  • Storage: Because the filling is a ganache, the macaron lasts pretty well at room temperature - it starts to soften and slide apart only after half an hour or so.
  • Would I make this again?: Definitely! This is my 4th or 5th time using this recipe :]

Matched up, unfilled shells :]

If you're looking for another method of making macarons - i.e., the Italian meringue method, do check out my other post on salted caramel macarons. And don't forget to participate in my strawberry powder giveaway!

Tuesday, January 31, 2012

On the 9th day of Chinese New Year, I had ... Cashewnut Cookies

If you check in every Singaporean or Malaysian mother’s recipe book for Chinese New Year cookies, I bet you'll find a recipe for cashew nut cookies. These cookies are ubiquitous during Chinese New Year and I’ve never had one go past without seeing and eating these cookies. It is also mainly during this period that my mom fries up kilograms of cashew nut cookies and packs them into glass jars for relatives to snack on. Why so? Well, knowing how superstitious Chinese people are, we have associated symbolisms and meanings even to food we eat. I mean, the entire process of lo hei (捞起) yu sheng or yu sang (鱼生) is filled with symbolism - check out this website for the 'prosperous words' to say when you're in the process of making the prosperity salad and tossing it.


As for cashew nuts (腰果), we Chinese believe that the nuts resemble gold ingots from days long gone, and so we eat them in a bid to get wealthy. Ironic much? In any case, you can choose to roast the cashews by placing them on a tray in a preheated oven, but from experience, these are not as nice as compared to fried ones. All you need to do is to use some oil (olive oil is good) and continually toss and 'fry' the cashews. They turn a lovely golden brown (as you can see above), and taste better. And because you're making this snack yourself, you can choose NOT to salt them. And they are cheaper if you buy them raw and fry/roast them yourself rather than buy them packaged and salted, ew. The healthier option of course is to roast them in the oven, but I justify it by eating less of these nuts. Another good thing about these cashews is that they have a lower fat content than most other nuts and more than three-quarters of their fat is unsaturated fatty acids. They contain high quantities of oleic acid, which is the same fat which promotes good heart health. But as with any foods, eat in moderation! About 20 cashews (35g) count as one serving, and as with most nuts, do not eat more than one serving a day. It's best to eat less than 3 servings per week. Most importantly, cashew nuts are rich in minerals, such as zinc (important for growth and development) and copper (important for your joints and antioxidant defenses) among others. I learnt this recently, and I've been encouraging my mom to eat more cashews because she suffers from low blood pressure and has a weak constitution, so iron and minerals in any natural form is most welcome!


So as I was saying previously, oldies are goodies, and these are my mom's super good cashew nut cookies recipe. I'm not sure where the original was from, but I'm pretty sure both the ingredients and instructions have been modified enough over the decades for my mom to call it her own. I find it rather astonishing (and amusing) at how similar my mom and I are in terms of recipe jotting – my mom crams a few recipes on a page, which I do now without knowing she did the same, and she writes comments such as “very good” on the side of recipes she tries, which I do as well. 

If you recall, I also baked this last year, but I used the original recipe and didn't post the recipe up. So here it is: 

120g butter
120g shortening
125g sugar
1 tsp vanilla
1 tsp salt
1 cup ground cashew nuts
155g self-raising flour
125g plain flour
Some cashewnuts for decoration


This year however, I had to do some modifications. As usual, I only decided to bake this very last minute (ie, on the eve of New Year’s eve), so I didn’t have all the ingredients I needed. I didn't have the shortening and self-raising flour that was required, so I replaced it with margarine and normal flour with baking powder instead. So here is 2012's modified recipe:

Cashewnut Cookies
At least 100 cookies

120g unsalted butter
120g margarine
125g castor sugar
1 tsp vanilla extract
1 tsp salt
120g ground cashew nuts
280g plain flour
1½ tsp baking powder

Some cashewnuts for decoration
1 egg yolk for egg wash 

Method: 
  1. Preheat the oven to 160°C. 
  2. Choosing the smaller sized cashew nuts, split them into half along their seams and place them face up on a baking tray. Place the tray in the preheated oven for about 10-15 minutes, making sure that the cashews DO NOT turn too golden brown. You just want them less raw so that they can bake in time with the cookies later. 
  3. Weigh the discarded or weird shaped cashew nuts (until you get 120g) and place them in a food processor. Grind them up and set it aside. 
  4. Sift the plain flour together with baking powder and set it aside. 
  5. Let the butter and margarine both sit at room temperature until softened. Cream butter and margarine together, then add sugar, salt and vanilla extract. Cream until pale yellow and fluffy. 
  6. Add in the ground cashew nuts and give the mixture a quick stir. Next, add in the sifted flour and stir the mixture until all traces of flour has disappeared. 
  7. Next, proceed to measure out small balls (depending on how large you want your cookies to be - mine were about 7-9g each). Place them on a greased baking tray and leaving about a thumb's space between each ball, because you will have to slightly flatten them and the cookies do spread a bit. After flattening your cookie balls, press in your pre-roasted cashews. Use an egg wash over each cookie if you want them to have a golden brown hue (much like gold ingots). 
  8. Bake at 160°C (fan-forced) or 175°C (conventional) for about 18-20 minutes, or until golden brown. Remove the cookies when they're done, and allow to them to cool before storing them in airtight containers. Do resist the temptation of eating them immediately, because the cookies taste better the next day. 


Janine's jots: 
  • Note: This recipe can be easily modified by substituting any other ground nuts, and I'm sure it'll taste equally good. In fact, I think it will be a really good base for a gluten-free cookie (though not nut-free).
  • Taste: I love cashew nuts, so these cookies taste perfect for me (and all my relatives). They are also not as sweet as those you get from shops, and hence are the perfect sweetness. I didn't have to experiment with the sugar amounts because this sugar amount has been tried and tested, and derived after many years of baking them (by my mom). 
  • Texture: These cookies are an absolute delight - crispy with an extra crunch from the cashew nuts. Everyone who ate these cookies loved them. I believe the crispiness is derived from a mixture of margarine and butter, because I can't seem to get this same texture with an all-butter recipe. But I might be wrong. More experiments next year ;p
  • Serving size: I can't recall how many cookies I made, but I could fill 3 large containers with cookies, so perhaps 100 cookies at least? 
  • Modifications: NONE. They're perfected well enough already, in my book. 
  • Storage: These cookies store really well in an airtight container. It has been almost two weeks since I last made them and they still are as crispy and yummy. 
  • Would I make this again?: Definitely. My aunt made me promise. And among all the cookies I made for CNY, this was one of the more well-received ones, because it was traditional, and because it was yummy. Also, I loved making it because it was so simple - I got the dough made and the cookies baked in less than three hours. And this is taking into consideration that my oven can only bake one small tray at a time!


Anyway, today's the ninth day of Chinese New Year, and it's the day that Hokkiens pray to the Jade Emperor (or 天公). There are varying stories of why this is so grandly celebrated by the Hokkiens, but the common thread is that the Hokkien people were forced to hide in sugarcane plantations by their enemies during the Chinese New Year, and when it was finally safe, it was the 9th day of Chinese New Year already. So these Hokkiens went back to their homes and celebrated this 9th day as if it were the 1st day, hence the grand celebrations and the act of giving thanks. Not sure how true this story is, but at least it explains the grand feasts that some have on this day (roast pig, et al).

I don't exactly celebrate Chinese New Year besides the first and second day, because that's all the holiday I get from the Singapore government, so these cashew nut cookies reminiscent of gold ingots are all that I'll be offering to 天公 for now :]

And yes, I took these photos the same time as I did the gluten-free orange poppy seed cookies the previous post, and was still experimenting with indoor flash. I'm still not too pleased with the photos but I was in a rush as usual, so I can only grumble and learn from my mistakes now, after post-processing. 

Wednesday, October 26, 2011

Pink Salted Caramel Macarons for Breast Cancer Awareness Month

This post has been long in the making. Like 8 months kinda long. Ever since my first post on macarons more than half a year ago, I've been making macarons on and off, experiencing more failures than successes. I'm experimented with technique, temperature, equipment, ingredients and a whole lot of other variables, and have come to the conclusion that macarons are indeed iffy little creatures and having a humid and cramped kitchen to work in is definitely not the most ideal of places. I say this with a caveat of course, since I know that bakers in similar situations have churned out beautiful macarons but let's face it - you do get better results if you work in an air-conditioned (or low humidity) environment. Also, let's just say that I impose exacting standards on myself and even the 'successful' macarons you see below still don't pass muster in my books - the feet are a tad too short and the tops are not flat and shiny enough.


I'm still experimenting with different recipes (you might say, just stick to a darn recipe girl! But I'm fickle minded that way), and am still determined to get my french meringue technique right - I'm still in the process of tweaking the different variables to see where I'm going wrong.

Like I mentioned previously, I tried making macarons using the french method for a consecutive five times, and each time, the macarons turned out feet less. I was so dejected and disappointed - at that point, I knew that I had to turn to the italian meringue, which had given me results on my first attempt. And to that I turned, and it did give me results as promised. You might query why the hesitation in using a successful method? Well, for one, I find the steps tedious, and you do need a candy thermometer in order to make the italian meringue and second, I really wanted to get my french meringue method right. Suffice to say, after having successful macarons with the italian meringue, I have given up on making macarons for a while and have focussed instead of using up those macaron shells. Once I've cleared my fridge of all those shells, it'll be back to more macaron experiments for me!

For those interested, these are what my failures looked like:- volcano and cracked tops as well as undercooked bottoms for some.


***
After reading MANY troubleshooting posts (see Not so Humble PieMiso Hungry, Duncan, Vivian for some imminent examples) on why my macarons turn out the way that they do, I have concluded that it was a combination of several factors, including:

1. Not allowing the 'crust' to develop sufficiently, hence the mega cracks
2. Too humid weather and too high baking temperatures (see this useful post by Silvia and Ivan on dehumidifying)
3. Over folding the batter.


Check out the difference in the bottoms of the macs - the left ones are using a generic silicone mat and the right ones are made using baking paper. 

***

Nevertheless, I was sick of getting failures, so I escaped by using the italian meringue method (yes I'm escapist) and I ended up with this bunch of macarons you see here:

Finally, some successful macarons.

Macarons with relatively smooth shells but super tiny feet. Well, at least they had feet right? And strangely enough, I ended up with salmon pink macarons, even though I used brown coloring. I thought, hey, that might just be serendipity, since I was dying to come up with macarons to qualify for this month's Mactweets Mac Attack Challenge #24, Pink October Macarons. For those not in the know, Mactweets is a monthly macaron challenge started by Jamie and Deeba, both of whom have wonderfully written blogs. This month's Mactweets is special, because it is the second time they are supporting a wonderful cause, since October is also Breast Cancer Awareness Month. I was actually hoping to have some failures which looked like breasts (i.e., those with nipples), but as fate would have it, I didn't get that particular type of maca-fails. So normal pink macarons it is!

I've been wanting to talk about Breast Cancer Awareness this entire month, but time just seems to have passed me by and all my pink-related bakes weren't successful enough to be blogged about. Anyway, I'm at that age where the idea of having breast cancer seems foreign, but I've come to realize that although the risk of getting breast cancer increases with age, being young doesn't mean there is no risk. Women as young as in their early twenties have been diagnosed with breast cancer! I know that many older women have the mentality that this can't happen to me (a friend of my auntie was diagnosed recently and she was in denial, refusing treatment for months before she got some sense knocked into her) - but it does and can happen to ANY of you, male or female! Yes, it does occur in males, though less than 1% of the population. And you can help yourself by doing your own self-examination, and going for a mammogram, especially if you're 40 years or older. Early detection does save lives! I mean, come on - self examinations are free and it costs $50 to go for a mammogram in Singapore. For more information, especially for people in Singapore, please do check out the Breast Cancer Foundation website, where you can get information about breast self examination and other useful information related to breast cancer!

So, if you're female, give yourself some self-love today (terrible pun to tie in the photo below, I'm sorry), and do a self-check to reassure yourself that you're breast cancer free! :]


Alrighty, and back to my macarons. I shall be providing you with Pierre Herme's Italian Meringue recipe, which I translated from his Macarons book which I have in French (yes, the English version was just released). I also used his recipe for caramel fleur de sel (salted caramel buttercream filling), which was awesome (as usual). Because I upped the saltiness a little, the filling matched the sweet shells perfectly. 

Macarons with Salted Caramel Buttercream, using the Italian Meringue Method

For the Macarons
150g   ground almonds
150g   icing sugar
55g     egg whites
1 tsp   egg yellow food coloring (I used 2 drops brown coloring)

115g   castor sugar
40g     mineral water
55g     egg whites

Method: 
  1. At least a day (24 hours) before attempting the macarons, separate the egg whites from the yolks and let them rest in the fridge (it is too humid and hot here for them to rest on the counter for more than a few hours) to age and 'liquefy' (in the master's words). 
  2. Sift the icing sugar and ground almonds individually to get rid of the large lumps. Then, sift the icing sugar TOGETHER with the ground almonds. This is known as your "tant-pour-tant" (literally, so much for so much or equal parts). Mix in the food coloring into the first 55g of egg whites. Then, combine these colored egg whites into your tant-pour-tant. Mix well and leave this aside. 
  3. For the remaining 55g of egg whites, place it in a clean mixing bowl. Next, heat the castor sugar and water in a saucepan over a medium heat. Do use a candy thermometer - allow the mixture to boil until it reads 118°C. However, once the syrup reaches the 115°C mark, start whisking the egg whites. The sugar syrup should read 118°C just as the egg whites reach a soft peak (the timing is pretty accurate). Pour the sugar syrup down the sides of the bowl and continue whisking the egg whites until you achieve a stiff peak. The egg whites should read about 50°C when stiff peaks are achieved. 
  4. Fold in the egg whites in 3 additions into your tant-pour-tant mixture, gently folding the batter until it is glossy and 'flows like magma'. I generally use the indicator of how long a fold takes to 'dissolve into itself' - about 15 to 20 seconds to check if my batter is ready. 
  5. Pour the batter into a pastry bag filled with a plain tip (about 10-15mm in diameter should be just right) and begin piping the mixture into circles of about 3cm in diameter onto your baking sheets lined with parchment paper. If you have problems piping evenly sized shells, do print out a template or you can trace out 3.5cm rounds on the back of your parchment paper. Since the shells will spread out a little, do pipe the shells a little smaller than the circles you have drawn. Leave a 2cm space in between each shell. After you are done piping, rap the baking sheet against your work surface to ensure that there are no air bubbles trapped in the shells. 
  6. Allow the shells to develop a 'crust' - this crust is simply a skin that ensures that the shell will not stick to your finger. It literally feels like a thin membrane. For a humid environment like Singapore, try to work in an air-conditioned environment or you can place the shells in front of a fan. My shells took about 1 hour to develop a crust.
  7. Preheat the oven to 160°C (some recommend 180°C but I find that 160°C works best for my oven). Place the tray in the middle rack of the oven and bake for 12-15 minutes. At the 5th minute, the feet should have developed. At the 8th and 11th minute, do open the oven door a little to release the build up of steam. If your macaron shells start to brown, your shells are overcooked. What I do is to remove the tray from the oven at the 12th minute and flip one shell over to check if it adheres to the baking paper. If it does, put the tray back to bake for a few more minutes; if not, the shells are done. 
  8. Once out of the oven, remove the shells from the baking sheet (still on the parchment sheet) and allow them to cool on a cooling rack. This will ensure that the shells don't continue to cook on the hot baking sheet. Once the shells are cool enough to handle, remove them carefully from the parchment sheet (ideally they should not stick at all) and pair them up. 
  9. Fill the shells with your desired filling and store in the refrigerator for at least 24-48 hours before consuming, to allow for an 'osmosis' of the buttercream to the shells. 

For the salted caramel buttercream filling
100g sugar
115g whipping cream
15g butter 

1 tsp fleur de sel, or any sea salt. 
70g butter, softened. 

Method: 
  1. Add half of the sugar to a saucepan and allow it to melt before adding the remaining half of the sugar. Do not stir the mixture and allow all the sugar to melt to a amber color. 
  2. At the same time, bring the cream to a simmer. 
  3. Once the sugar has turned a dark amber color, remove from heat and add the first 15g of butter. Stir quickly and be careful as the mixture might splatter. Then, add in the cream which has been simmering and stir quickly to incorporate. 
  4. Put the saucepan back onto a medium heat and allow it to boil until it reads 108°C on the candy thermometer. Pour the mixture into a heatproof dish to stop the mixture from cooking and allow it to cool. 
  5. Once the caramel mixture has cooled, stir in the sea salt, making sure it dissolves. Begin beating the softened 70g of butter for about 5-10 minutes, or until it becomes soft and fluffy. Add in the cooled caramel mixture in two additions, making sure that the caramel is fully incorporated into the fluffy butter. Place the mixture into a piping bag and your salted caramel buttercream is ready to be piped!


Janine's jots: 
  • Note: Veron from Kitchen Musings has this delightful series on Macarons which you should read - more relevantly, her comments on Pierre Herme's italian meringue method here come in handy should you wish to attempt this recipe. For a photo tutorial, do check out Edd's post for this exact same recipe. If you wish to look at local bloggers attempting the italian meringue method, do check out Swee San's step-by-step tutorial for Wendy, both of whom had beautiful macarons with frilly skirts :]
  • Taste: I enjoyed the saltiness of the caramel but it might be a tad salty for people unused to the taste of sea salt. I would recommend starting with half a teaspoon and working your way up through tasting (you can do that with the cooled caramel). The sweetness of the macaron shells were thus countered with the salted caramel. 
  • Texture: For the best experience, DO allow the filled macarons to rest in the fridge for at least a day or two, because the part of the shell in contact with the buttercream yields more easily and this gives you a crisp and chewy mouthfeel, the hallmarks of a good macaron. 
  • Serving size: I halved both the macaron shells and buttercream recipe, so that I got a smaller number of shells (about 30 pairs). 
  • Modifications: I didn't get my hands on salted french butter or creme fraiche, so I changed that to normal unsalted butter but used instead an extra teaspoon of sea salt to adjust the saltiness to my liking. Creme fraiche was substituted with whipping cream as well. I did reduce the sugar in the sugar syrup by quite a fair bit - the original calls for 150g of sugar and 37.5g of water but I found that reducing the sugar a little worked as well. 
  • Storage: The macarons keep extremely well in the refrigerator - you can even freeze them for a month, but note that the shells will soften and lose its crispiness. 
  • Would I make this again?: Definitely! The italian meringue method requires much more work than the french, but it promises results each time, so I know which recipe to turn to when I have a macaron craving! However, I intend to tweak the recipe a little to see if I can use less sugar for the sugar syrup in order to reduce the sweetness of the shells. 

Well, I had ONE successful chocolate macaron from the batch of chocolate failures.
The texture of the shells were pretty good - slightly crispy with a chewy interior. There are also no visible air pockets whee! :]

Alright, this post is getting a tad long, so I shall end with a final picture of some heart-shaped macarons I attempted. As you can see, I'm still quite bad at filling the macarons, but I try! ;p

Till my next macaron adventure!

Playing around with colors. I quite like the washed out look here. What say you?

Friday, October 21, 2011

Janine's Failed Macaron Cake aka a Flourless Chocolate Cake made with Maca-fails

I swear by the phrase "out of adversity comes creativity", not only because I am usually pushed by circumstances to think out of the box, but also because much of my (best) work is done when I'm facing a time crunch or other adverse situations. Just take today for example, I was craving ang koo kueh, a traditional glutinous rice treat filled with peanuts or mung beans, and since it was raining heavily and I couldn't go out, I decided that I should make myself some. And so I did. I did so even without the mould required for it, without the banana leaves, and without having peanuts/mung bean paste in the pantry. And it turned out quite successful I must say. I used baking paper and peanut butter as substitutes - creative no? ;p

Anyway, the cake below also stems from one of my 'creative' episodes. I have had many a failure with those dainty little things called macarons, and it's really a pain having to deal with them. This is because with pretty 'footed' macarons, I can gift them to various people, but with macarons that look like whoopie pies...well... let's just say taste is their only redeeming factor, which is sad because many people 'eat' with their eyes first. And the thing is, macarons are always hit-and-fail thing for me, I have as many successes as failures, which makes me hesitant every time I want to make macarons because I'm afraid of the results, or lack there of.


So after a particularly crazy streak of macaron baking which saw me using dozens of egg whites, I ended up with several pretty macarons and a hundred more feetless, shapeless macs. This meant that I had trays and trays of maca-fails, and being the thrifty person that I was, I didn't dump them in the trash right away. I really hate wasting food, so I stored them in airtight containers in the fridge, to the point that there were MANY such containers in the fridge, and my mom started nagging at me, asking me to get rid of them.

So what could I do?


This was when I put on the proverbial thinking cap. I knew that I could do verrines or Eton's mess with crushed macarons, but I'm not exactly a fan of sweet meringue and cream, so after having done it a few times, I had to resort to some other method of getting rid of these feetless horrors. I had always played with the idea of using them in a cake, and after a search on my trusty friend google, I found only one hit for 'failed macaron cake'. The unfortunate (or fortunate perhaps) thing was that the blogger there basically guess-timated her way through her own recipe, and didn't have any particular recipe for her macaron cake. I then deduced that if I pulverized the shells, I could probably replace any recipe which had ground almonds for them. And that was exactly what I did.


So I went about looking for a chocolate cake which made use of ground almonds, mainly because I had lots of chocolate flavored macarons. And as luck would have it, I landed upon Ju's Flourless Almond and Chocolate Cake, which I had bookmarked, a long time ago. If you read the recipe, you'll realize that it's pretty similar to the Queen of Sheba cake, made popular by Julia Child, but that has flour in it.


Anyway, I made a few liberal modifications to the recipe (like using the processor to make the cake), so do check out the original recipe if you're interested in the original cake!


***

Janine's Failed Macaron Cake (Flourless Almond & Chocolate Cake made with Powdered Macarons)
Adapted from Ju, who obtained it from Times Online 
Makes an 8-inch square cake

Ingredients 
200g  dark chocolate (I used a mix of 55% and 70%)
15g    hot brewed coffee (or 1 tablespoon)
15g    rum (or 1 tsp vanilla extract)
95g    caster sugar 
100g  unsalted butter
5        eggs, separated
¼ tsp salt
110g macaron shells


Method: 
  1. Melt the chocolate, brewed coffee, rum and butter in the microwave or on a bain marie. Stir well to combine and allow to cool. 
  2. Place the macaron shells in a processor and blitz them for a minute, or until fine, like ground almonds. Do not over process. Add 70g of the sugar and salt into the processor and blitz for a few seconds to combine the ingredients. Next, add in the 5 egg yolks and process for about 5 seconds. Add in the chocolate mixture and process for 10 seconds, or until all the ingredients are well combined. Empty the mixture into a clean bowl. 
  3. In a metal mixing bowl, beat the egg whites together with the remaining 25g sugar, until you get stiff white peaks. 
  4. Take some of the egg whites (about 10% worth) and mix them into the chocolate mixture to lighten it. You don't need to be gentle with mixing this 10%. Once the egg white is completely mixed into chocolate mixture, gently fold in the rest of the egg whites into the lightened chocolate mixture. This time, making sure to gently fold to retain the air in the egg whites. 
  5. Line your cake tin with baking paper and lightly butter the sides. Pour in the cake mixture and give it a few raps on the counter to get rid of any unsightly air bubbles. 
  6. Bake at 170°C for about 40-50 minutes before removing it. If you want it more fudgey/moussey - bake it for about 40 minutes and your cake tester will come out slightly wet. If you want a more cake-like texture, bake for 50 minutes or more, and some crumbs will still adhere to your tester. 
  7. Cool it in the pan for about 15 minutes before removing it to cool on a wire rack. 


Janine's jots: 
  • BEWARE: I actually made 2 vital errors for this recipe - which accounts for the picture you see above - I used a dark-colored pan, and failed to reduce the baking temperature, which explains why the bottom of the cake is quite over-baked. As for the dense layer slightly above the bottom, that was because I was multitasking while beating my egg whites and I slightly overbeat them, to the point that it was almost turning clumpy :/ This was probably why the cake didn't rise to its requisite height. Nevertheless, I did enjoy the dense layer at the bottom of the cake, because it tasted almost fudgey, and very chocolatey, which was a perfect contrast against the airy cake on top! That being said, I'm not sure if these 2 problems were the result of the powdered macarons, but I doubt so. Anyway, I'll probably try this out again soon (I know I'll have more maca-fails to try them with) and see where I go with it.
  • Note: You should process the macaron shells when they are at room temperature so that they are less 'wet' and can be processed into powder more easily. Otherwise, you might get tiny clumps because of the moistness of the macarons. However, don't worry too much because these clumps will dissolve somewhat after baking (whee!) :]
  • Taste: Having made the original and the modified version, I do feel that there is not much difference in taste, except for the fact that the almonds are much more discernible in the original version. I'd probably use a mix of half almonds and half macarons in the next try to get the best of both worlds :] Do remember to reduce the amount of sugar by a little as well, because the macaron shells after all, are half sugar, and will contribute to the sweetness of the cake. 
  • Texture: The chocolate cake feels almost mousse-y (and tastes that way too), but has a cake-like crust (thanks to my slight over baking), which is a delight to dig into. The best word to describe it would be 'airy'. 
  • Modifications: I reduced the sugar from the original of 150g to 95g, because I took into account that the macarons were half sugar. I felt that the amount of sugar can be decreased further because the cake is still a tad sweet for my liking. My family liked the level of sweetness though. 
  • Storage: The cake does not store well at room temperature because of its gooeyness but they did very well in the refrigerator. Let it sit for a while at room temperature before consuming for the best texture, but even if you don't, it's still really good. I stored a slice in an airtight container for almost 2 weeks and it tasted as delicious (maybe a little drier) as it did when I just baked it. 
  • Would I make this again?: Definitely! Now that I know how to make use of the maca-fails, I have no reason to try and try again :] I'd also serve this with some icing sugar on top, to hide the unsightly cracks - note that this cake WILL sink! Just maybe not as much as mine did.


So there you have it - my secret recipe for disposing of maca-fails! Do try this recipe out if you too have many maca-fails and don't know what to do with them - it's a yummy, alternative way to dispose of them :] If you don't have failed macarons (i.e., all your macarons are perfect) - I hatecha! (I'm jesting!) - this is still a very yummy flourless chocolate cake to try nevertheless :)

Have a great weekend y'all!


PS: I found a new spot in my cramped apartment to take photos and I'm quite happy with the results :) I took these photos in a rather precarious position - balancing on two chairs with the cake placed on a stool which rested on top of my washing machine so that I could get the sun to the side of my cake! What do you think? 

Sunday, March 27, 2011

Malaysian Monday #2: Muah Chee

Posting a little early for MM, but here's something which you can whip out in less than 10 minutes (if you have the ingredients available in your kitchen) and best thing is, it's gluten-free! :]

Muah chee is a treat right out of my childhood. I will always buy it (or rather my parents would buy it for me) when we were out and about on weekends and if we chanced upon random roadside uncles/aunties hawking this delectable treat. Also, I love everything to do with peanuts. I love peanut pancakes, peanut snowballs, peanut soup, peanut tang yuen, peanut ang koo kuehs - you get my drift, basically anything peanut = my favourite. My mom usually dry fries the peanuts, grinds them up and keeps them in a jar in the fridge, so that whenever we want say, peanut toppings, we can easily whip the jar out of the fridge and add them in. She also has a jar of whole peanuts, which we pop when we have a craving for peanuts. This is also used when we have our traditional "thunder rice tea" or (客家擂茶) since my mom is Hakka :] My mom also uses the same ground peanuts (with peanut butter and sugar) in her peanut baos, which I absolutely love. I'm somewhat of a picky bao eater, so I only eat my mom's peanut and vegetable baos. Peanut bao is not something you can find anywhere - anyone knows where you can get nice ones in Singapore or Malaysia? Anyway, the point of the story is: always keep peanuts in your fridge, you never know when you need them - like when you have a craving for apam balik or muah chee :]

I specifically searched for a recipe which didn't require steaming, because my craving had to be satisfied now! So microwaveable muah chee it was! (Btw, I use my microwave for many other purposes, including making sausages and instant noodles when I'm lazy.) These photos are again, taken with my iPhone, because the muah chee was done in minutes (literally) and went into my stomach within seconds! So, there was absolutely no time to take the camera out =p

What was left of my muah chee after I remembered to take a photo of it.

Muah Chee
Makes enough to serve one 
Ingredients
25 g glutinous rice flour
40 g water

25 g peanuts, toasted and chopped (or ground)
  5 g sugar, or to taste

Method:
  1. Combine the peanuts and sugar together in a bowl. Set aside.
  2. In a microwave safe bowl, add the glutinous rice flour and water. Mix well and ensure that there are no clumps. Place it into the microwave (I used power at 70w) for 2 minutes. The mixture should be sticky but not gooey. 
  3. Using a fork (or spoon), drop the microwaved dough onto your peanut mixture and use a pair of scissors or knife to cut the dough into smaller pieces and roll it about the peanut mixture. 

Janine's jots: 
  • Modifications: The original recipe is from Ju. If you are serving the muah chee to a family, do use the original recipe which should serve 5 or more people for a light snack.  
  • Taste: I left out the shallot oil, because I didn't have any, but in the future, I'd probably add a little bit of vanilla extract to make the muah chee more fragrant :]
  • Texture: Just like those selling on the streets! You can microwave it on high (100w) for 2 minutes and it's fine as well. I tried microwaving it for 3-4 minutes and there was no visible change to the texture (ie, it didn't harden). 
  • Storage: I doubt the muah chee can be stored in the fridge because it has to be continually steamed or kept warm for it to be soft and chewy. In any case, whipping up this dish takes less than 5 minutes if you have all the ingredients on hand!
  • Would I make this again? Definitely! All you need to do is place everything in a microwave and that's more than half the dish done already :] On top of that, it's so much cheaper to make this at home (peanuts cost well, peanuts and the glutinous rice flour is <$2 for 500g!) and you know exactly what goes into the muah chee!


This is my second entry for the Muhibbah Malaysia Monday event hosted by Shaz of Test With Skewer and Suresh of 3 Hungry Tummies

Monday, March 21, 2011

Malaysian Monday #1: Apam Balik/ Min Jiang Kuih

I suddenly was craving apam balik a few days back, so I googled and found myself on Lily's blog. Her blog is a veritable trove of Malaysian/Singaporean dishes, and she even had three variations of apam balik! Min Jiang Kuih is typically thicker and you can tell from the name that it's the Chinese version - this is the version that is selling in Jollibean and Mr. Bean - the "peanut pancake" version. Of course, there's all sorts of variants to the name - Ban Jian Kuih and whatnot, but my parents called it Min Jiang Kuih, so it's Min Jiang Kuih for me too! Apam balik means the same thing - apam = pancake and balik = turnover or folded, so it's just Malay for folded pancake! I tend to think that there's the thick version of apam balik with peanuts, sugar and creamy corn (YUMMEH) and the thin crispy version, which is oh so delicious as well. This tends to be sold by Malay uncles on those motorbikes in Malaysia, but can also be found in pasar malams. I lovex100000 apam balik, especially those hybrid types which are not too thick, and yet crispy on the outside, and they've this "sweet spot", typically in the centre, with the highest concentration of peanuts and butter. Anyone know what I'm talking about? :)

PS: I have this really amusing story about apam balik. I've been eating it for ages, since I was a little kid, and I always thought it was called "Abang balik" which means big brother come back in Malay. And NO ONE corrected me when I ordered apam balik, until a few years ago, when this toothy old (seriously very very old) uncle told me, abang balik - salah lah dik, abang tak mahu balik! Basically, he was joking with me, saying that it was the wrong name, and big brother doesn't want to go back. LOL. 


Apam Balik
Ingredients:
Adapted from Lily's recipe here

For the pancake: 
85 g   all-purpose flour
50 g   rice flour
15 g   cornstarch
1 tsp   double action baking powder
¼ tsp  baking soda
¼ tsp  salt
1        egg, about 55g
60 g   castor sugar
1 tsp  vanilla essence
90 ml water
10 ml milk

For the filling:
50 g melted butter
30 g granulated sugar (castor sugar is fine too)
60 g roasted peanuts, chopped

Method:
  1. Prepare the filling by melting the butter, mixing it together with sugar and peanuts. 
  2. Add the sugar into the egg and mix until sugar dissolves. Add in the vanilla essence and mix well.
  3. Sieve all the dry ingredients together (all-purpose flour, rice flour, cornstarch, baking powder, baking soda and salt). 
  4. Mix together the water and milk and add it into the egg mixture. 
  5. Gradually add the dry ingredients into the wet ingredients, making sure to stir well to avoid clumping. Strain the mixture if you cannot get rid of the lumps. 
  6. Set the ingredients aside in the fridge for at least 3 hours for it to thicken. I left it overnight in the fridge. 
  7. Heat a crepe pan or small nonstick pan - and add a little bit of oil/butter to coat the pan. Using a ladle or tablespoon (for small pancakes), quickly spread the batter onto the pan, making sure the batter is uniformly thick. 
  8. Cook until you see the edges of the pancake starting to brown. At this point, add in the filling on one half of the batter. This makes sure that the filling will adhere to the pancake better when it's ready to be folded. 
  9. Once the bottom is golden brown, using a heatproof spatula to lift up the half of the pancake without the filling and fold it into half. 
  10. Repeat the process for the next pancake. 
  11. Allow the pancake to cool for a minute or two before consuming!
Janine's jots: 
  • Taste: The pancake is slightly too eggy for me, but that might be due to the fact that I'm using organic virgin eggs. 
  • Texture: This yields a pancake with a crispy texture, so if you're looking for a thick chewy version of apam balik - this is not it!
  • Serving size: The original recipe is twice that noted above, but this halved portion is more than enough to make 10 pancakes (at least!) I managed to churn out close to 20 mini 4-inch pancakes. 
  • Modifications: The batter is slightly thick, even after sitting at room temperature for a while. I'd probably put more milk in the future and reduce the amount of water to give the pancake for flavour. 
  • Other comments: Be sure to let the batter sit for at least 20 minutes to let it reach room temperature so that it will be easier to spread. If you're greedy (like me) and can't wait for 20 minutes, simply add a teaspoon or two of milk to the batter and incorporate thoroughly such that the batter is more fluid and spreadable. 
  • Storage: The batter is able to last pretty long in the fridge. I managed to eat pancakes every day for breakfast for 4 days. However, note that there's an egg in the batter, so if you're icky about leaving a raw egg in a batter for 5 days, I'd advise you to consume the batter at one sitting. 
  • Would I make this again? Definitely! It's almost too easy to whip up if you're having an apam balik craving! You just need to have rice flour in your kitchen :]
In pictures: 
Spread the batter on your pan as thinly as possible. As you can see, I'm not really good at spreading it thinly and my pan is a little small >.<
Once the edges start to brown, you can add your peanut filling. I cheat by adding the butter directly to the batter without melting, and then sprinkling the sugar and peanuts.
Mmmmmm =D Be sure to fold it into half the moment you get it off the pan because it hardens very quickly when cooled and will crack if you try to fold it then!
Oooh thin crispy goodness! You can make a thicker version (a min jiang kuih version) with the same batter!
Or you could be more 'French' and add nutella to the apam balik instead! It tastes as good as the ones with peanuts, seriously!

PS: All these photos are taken with my iPhone, with minor adjustments done on the computer. Looks not bad eh? I've been using my phone to take a number of my photos, mainly because I don't have the camera with me sometimes, or am too lazy to take it out.


Also, this marks my first entry into Muhibbah Malaysia Monday event hosted by Shaz of Test With Skewer and Suresh of 3 Hungry Tummies. My mom is a really good cook, and I do hope to gradually write all her recipes down so that I can cook equally delicious meals for myself in the future and possibly pass it on! So may this be the first of many entries into MMM :]


Related Posts Plugin for WordPress, Blogger...