
I've been thinking about macarons all week along, after my successful attempt with David's macaron recipe here for my cousins on Chinese New Year. I knew I wanted something pink, for Valentine's, and something heart-shaped, so the only thing left was to decide on the flavor of the shell and the filling! I hemmed and hawed, and finally decided on using my vanilla beans (so that I can put the pod into my vanilla extract jar here) in the shell for a vanilla flavor, and a salted caramel buttercream.
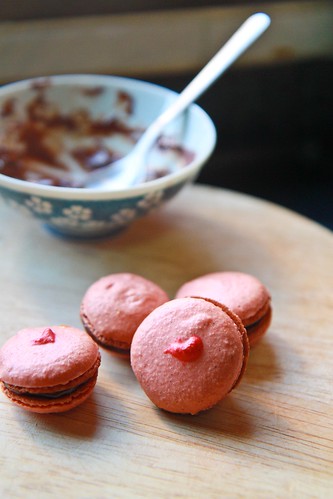
You might notice that in some of the photos, my macarons look as if they have a black, chocolatey filling - well, that's because my salted caramel buttercream was a flop! Although I managed to make a nice salted caramel, I failed making the actual buttercream because I just couldn't get my butter to whip properly. So I used just the salted caramel in some macarons, while using a chocolate mint ganache in others.
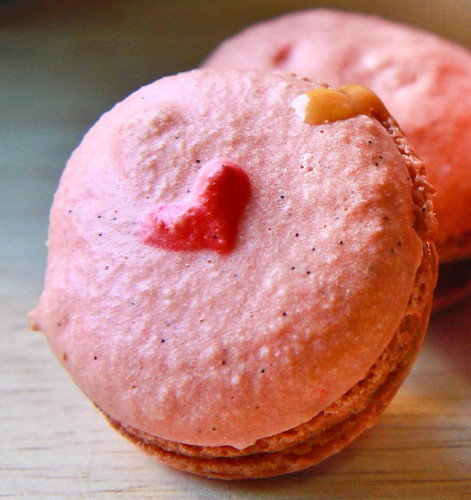 |
| Oops there's extra caramel on the top of the shell! |
I'd also like to apologize because I don't have any photos of the macaron-making process and I know how important these are when you are new to making something. Trust me, I've looked at tens (maybe even hundreds! And I'm not exaggerating) of blogposts on how to make this elusive little cookie and looked at many more videos. I've been thinking of writing a post compiling all these tips I've garnered (with the right attributions of course), plus what I myself have learnt, but I just haven't got the time! Plus the fact that I did start on it but my computer gave up on me, swallowing that post up with it, has made me balk a little at re-starting.
Anyway, I was in a real hurry to complete the macarons to give to my friends - I only had about 3 hours to spare, and thankfully, I took 2 hours from start to end (from measuring and sieving the ingredients to finally filling them up with ganache and photographing them)! Hence even the 'end product' photos are quite gross. The amateur photographer in me was practically cringing at the bad exposure and shadows in almost ALL the photos :/
Okay, onto the macaron recipe I've used. I won't be sharing the salted caramel buttercream recipe I've used because it was a failure.
Janine's jots: I've halved the original recipe, which apparently is the same one Canele uses for its macarons. For the life of me, I can't remember where I got this recipe from, but I think I've adapted and edited it sufficiently to call it my own :) The macarons are quite good, and not as sweet as other recipes that I've tried previously. For my next try, I'll try to decrease the icing sugar a little more and increase the ground almond portion.
Vanilla Bean Macaron
Makes approximately 40 shells, or 20 macarons
Special equipment needed:
Baking paper to line your baking tray
Spatula
Piping bag with large round tip
Ingredients for the shell:
50 g almond meal
90 g icing sugar
44 g egg whites
12 g castor sugar
Seeds from 1 vanilla pod
2-3 drops of red food coloring
Method:
- Weigh the almond meal and icing sugar and sieve them together. If you have a food processor, place both ingredients inside and pulse it a few times to combine.
- Split the vanilla pod in half, and remove the tiny black seeds from the pod, adding it into your almond-sugar mixture.
- Beat the egg whites with your mixer, starting at low speed until it froths and switching to high speed. Once the egg whites start to 'whiten' (the soft peak stage), add in your castor sugar gradually, mixing until stiff peaks are reached.
- Using a spatula, start folding your almond-sugar mixture into the stiff meringue. Once it is semi-incorporated, add in 2-3 drops of food coloring and continue folding until everything is fully incorporated. Do not mix the batter because this will break down the air inside the meringue which enables you to get your feet!
- The resultant mixture should be shiny, and what people describe as "flowing like lava". My own gauge is that the mixture should be the viscosity of a thick exfoliating facial scrub (those facial washes with beads in them), and if you fold over a trail on the surface of the batter, it should take longer than 30 seconds to disappear.
- Using the spatula again, scoop the mixture into a prepared piping bag and start piping your shells onto your baking sheet. You should try to pipe uniformly, so that the shells bake evenly. My shells are about 1.5 inch in diameter, on average.
- Once you are done piping, gently rap your baking sheets in order to remove any extra air bubbles in the shells.
- Here's the important bit - leave the macarons at room temperature for 30 minutes until a skin is formed. This means that when you touch the surface of the shell, it should not stick to your finger and there really is a 'skin' that is formed. What I do to speed up the process is to blow my stand fan directly at the trays so that the top of the shells will dry, inducing the skin to be formed.
- In the meantime, start making the filling of your macaron. After 20 minutes, you should start to preheat your oven to 150 degrees.
- The macarons should be baked using the middle rack, so only one tray of macarons in the oven at any single time please! At about 3 minutes, the shells should have rose and the feet formed already. What I do to reduce the steam and humidity in the oven is to open the oven a little at the 6th minute, placing a chopstick in between the gap; then removing the chopstick after 30 seconds. You can also rotate your tray if you see that one side of your tray is baking faster than the other. I repeat the chopstick process at the 10th minute.
- The macarons take about 12 -15 minutes to be done, depending on your oven. Remove them from the oven, and leave them to cool on the tray for 5-10 minutes before lifting them up from the baking paper to cool on a wire rack.
- Fill them with your desired filling once the shells are cooled (about 20-30 minutes) and pair similar-sized shells together.
- And there you have it - a French macaron =D
Here's a few more photos for posterity's sake :]
 |
| As you can tell from the shadows, this was taken as the sun was setting! I was in a hurry to get these done for the party in the evening! And as you can see, the shells are not very smooth - because I didn't ground my almond meal fine enough, and the batter could have been mixed just a little more! |
 |
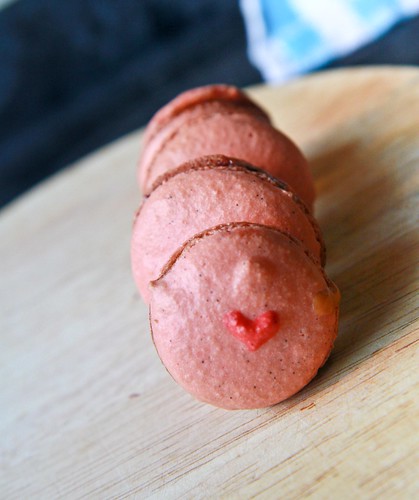
| Oooh lovely feet (but oh so horrible shadows). The bumps that you see are actually the hearts I added onto the shells. I kept some meringue and made it a deeper pink, and used a chopstick to draw the heart onto the shell. The hearts rose while baking too :) And yes, my shells are not exactly uniform in size =X |
And I'm submitting this to Aspiring Bakers #4: Love is in the Air (Feb 2011)! I also made some heart-shaped macarons, as you can see here, but they kinda were packed for my friends before I remembered to take a photo of them :/
ETA: I've finally plucked up the courage to submit this post to Mactweets Mac Attack Challenge #16 here. Mactweets was started by Jamie and Deeba, both of whom have wonderfully written blogs, and they hold a monthly macaron challenge with a theme. Hopefully this will be the start of many challenges that I'll be joining! :)
ETA: I've finally plucked up the courage to submit this post to Mactweets Mac Attack Challenge #16 here. Mactweets was started by Jamie and Deeba, both of whom have wonderfully written blogs, and they hold a monthly macaron challenge with a theme. Hopefully this will be the start of many challenges that I'll be joining! :)
13 comments:
very beautiful feet Janine!!! must be really yummy!! i'm making another batch of macaroons now! hehe!
@jess: good luck with your macaron attempt :D
ah Janine! the secret is finally out! lol nice work!
Pretty macs! ;)
@cathy and travellingfoodies: thanks guys :)
Lovely Macs with that cute pinky heart in the center :)
I love the little hearts on the shells. So cute!
your pied formed really well!
BEE-YOO-TI-FUL!! Thank you for plucking the courage and joining us at MacTweets Janine. It's a pleasure to have you there, and wonderful to see the love-ly feet you brought! Love them, the flavours and the little hearts!
thanks everyone for the kind comments :)
@deeba: i'm glad to be there - I hope to make this a monthly affair!
Wow, looks like your macs have beating hearts full of love (and delicious flavors)!
Beautiful feet! I love the hearts on top, great idea!
Here's a good tip: why not add the food coloring to the meringue?
That's what I normally do and that way I don't have to worry about over mixing!
Post a Comment