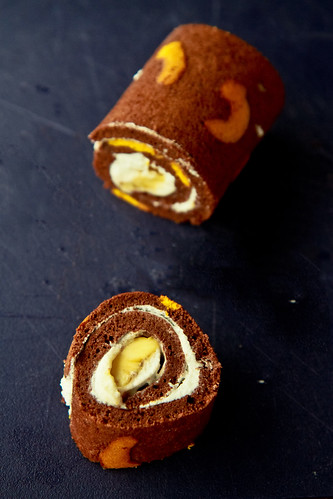
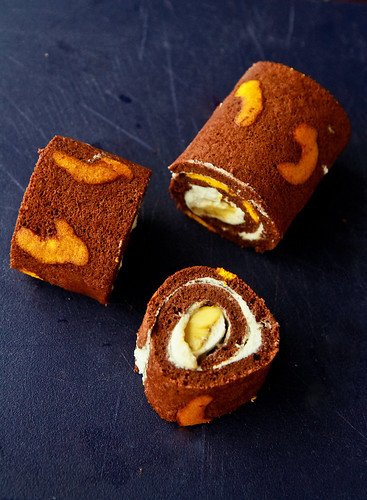
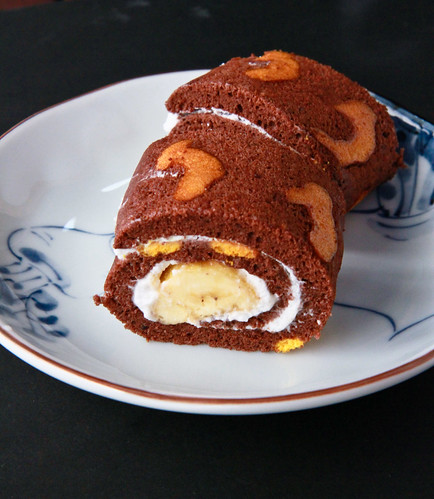
I'm thinking the longer and more accurate name of the cake should be "Banana-patterned Chocolate Swiss Roll with Vanilla Whipped Cream and Caramelized Banana with Whisky". Anyway, I've been wanting to try out a swiss roll recipe for ages, and when I saw a particular strawberry printed swiss roll appeared on the blogosphere, I couldn't resist coming up with my own version of it. I first saw it on Reese's blog here, who got the idea from 小本 and I couldn't wait any longer! This is a preview of what I came up with ------------------------>
I'm not much of a plain swiss roll fan, so I decided to incorporate some cocoa powder into the cake. This meant a little more work for me to do however, since I had to separate some of the egg yolk and white mixture such that I could color it yellow for the bananas later. Anyhow, as with all baking experiments, this was another huge learning curve, although I did get good reviews from my family about the swiss roll. After I got the cake out of the oven, I realized it was a little thin for a swiss roll, so here's my post-mortem of my mistakes - which hopefully will help someone else who's new at swiss roll making.
Things that went wrong:
- I'm not blaming anyone, but I think the blogger whose recipe I followed wrote her instructions wrongly, because I later realized when I saw the original recipe in Chinese that some of the instructions were translated wrongly. This was because the instructions were to mix in the flour with a mixer even after adding the whipped egg whites (which meant that I was effectively deflating them) - as I was doing that particular step, I was really doubtful of it, but I decided to stick to it to a T, since I know from experience how deviations from the recipe don't result in good things. Anyway, I've commented on the blogger's post to clarify (if I was wrong), but she still hasn't got back to me, so we'll see :] I've included the original recipe from 孟老师 which I've translated into English.
- This of course meant that my swiss roll did not rise sufficiently - you can see from the pictures that the swiss roll is rather thin (or deflated) in size. I tried the same recipe the second time the next day (since I hate failures) but using my amended method and it got me a cake twice the thickness - really yummy and fluffy!
- This was my first time in the year making a swiss roll (and second time in my 'baking life'), and I was rather unsure how to spread the whipped cream such that it would appear even after rolling. Turns out I was a little stingy with the cream and everything got squeezed out at the end =X
- Also, I initially wanted to put a whole banana in the centre, but chickened out in the end as I thought it would be too large. Needless to say, half a banana in the centre (as seen in the photo) looks rather measly.
 |
| <---- Note the mistakes committed! |
Anyway, this is one of my more successful 'overhead' photograph that I have taken this year, even thought the subject matter isn't exactly too pretty. I've been trying really hard to learn different techniques in photography and I'm glad to say that I do think I have improved marginally! I would, of course, appreciate any helpful critique/comments about how to improve my photography!
Recipe for
Chocolate Swiss Roll
Adapted from 孟老师的美味蛋糕卷, makes a 36x26cm roll25 g butter
72 g egg yolks (about 4)
10 g castor sugar
20 g cold water
20 g cocoa powder, unsweetened
45 g low protein flour (use cake/TOP flour)
90 g egg whites (about 3)
60 g castor sugar
- Melt butter in the microwave. Set aside to cool.
- Whisk egg yolks together with 10g castor sugar, until the mixture pales in color and doubles in size.
- Sieve the cocoa powder and mix well, before adding cold water to the mixture.
- Beat the egg whites until foamy, and add remaining sugar. Beat until stiff peaks are achieved.
- Add 1/3 of the egg white into the egg yolk mixture in [3]. Mix gently with a spatula - don't worry about deflating the egg whites because you are tempering the mixture.
- Fold the remaining meringue into the batter.
- Sift in the flour in three portions, folding well each time.
- Add in the butter into the batter.
- Bake at 170 degrees for 15-20 minutes before removing the cake to cool.
Caramelized banana
2 ripe bananas
4 tbl sugar
1 tbl whisky
3 tbl water
- Place the water, whisky and sugar in a small saucepan on medium-high heat.
- Once the sugar starts to dissolve, add in the bananas, stirring gently until all the sugar has dissolved and mixture starts to brown.
- Remove from heat and let bananas macerate in the mixture whilst preparing the whipped cream.
Whipped cream
100 g cream
10 g castor sugar
1 tsp vanilla extract
1 tsp vanilla extract
- Place cold cream and vanilla extract in a clean bowl. Start whipping the cream.
- Add the castor sugar gradually into the cream, whipping the mixture until soft peaks are reached.
To assemble:
- After cooling the cake, spread whipped cream generously on one side of the cake (prefably the uglier side).
- Place the caramelized banana on the bottom edge of the cake where you wish to start rolling
- Roll up the cake and there you have it - a perfectly made swiss roll :]
Janine's jots:
- I used 孟老师's 分蛋式海绵蛋糕体 method, which loosely translates to "separated egg sponge cake" method. This basically just means that the egg yolks and whites are whipped separately. I am still having problems with this method, so expect more experiments coming this way!
- I'm not sure if I'm reading the instructions wrongly, but I thought the sieving of cocoa powder into the egg yolk mixture before adding the water was rather superfluous. On hindsight, I think mixing the cold water with the cocoa powder to form a paste first sounded more logical since then I wouldn't deflate the egg yolks that much.
- I haven't provided instructions on how to make the 'banana' print - but it's basically the same as Reese's instructions here. It's slightly more troublesome here because you have to separate the batter right from the start since once you add the cocoa powder, the batter will be brown and hard to color.
- Instructions on making light prints on a chocolate cake: Basically, before adding the cocoa powder, take out a few tablespoons worth of egg-yolk batter and set aside. Do the same for the egg white meringue, flour and melted butter, setting aside a proportionate portion of each. I eyeballed everything, so no measurements here! It doesn't really matter as long as the portions are more or less proportionate. Add a few drops of yellow coloring and place into a piping bag to pipe our your desired banana shapes on the baking pan (which you have lined). Bake the 'bananas' in the preheated oven for about 3 minutes, before pouring the remaining batter and proceeding to bake for another 15 minutes, or until a skewer comes out clean.
In pictures:
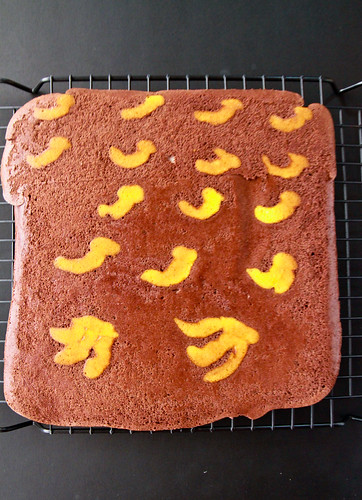 |
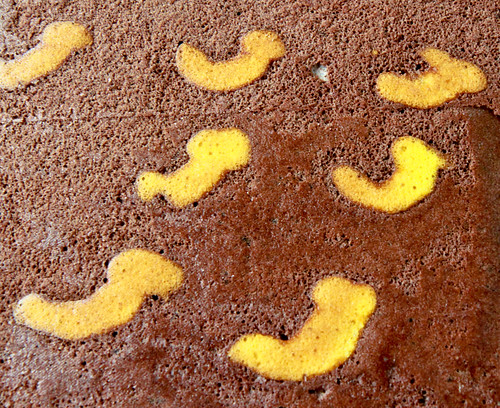
| Cooling the cake. My baking paper gives me odd textures on my cake. |
 |
| Maybe it's my sub-conscious, but my bananas look like letter "J"s to me, which is just fine since that's my name. It's like a cake dedicated to myself! :] |
Whew! Making this just in time for the deadline of Aspiring Bakers #5 : Fruity March (March 2011) hosted by Jess of Bakericious! Can't wait to see what the round-up for this month, and the reveal for the theme for the next month, although I might not be particularly active because I'm starting my finals this coming month and I'll be setting everything aside to focus on the last hurdle. Yes, these will be the finals, as in final exams for my final year in university! I will continue to get baking done, and updating my twitter with pictures of my baking, but it'll be pretty quiet around the blog, unless I can't resist the urge to blog =p

19 comments:
looks good to me! and choco with banana, the match made in pastry heaven. So its can't good too wrong yeah? Good thing you'd noticed the discrepancy in the instructions.
oh yeah! good luck to your exams and may you ace all your papers!
I've seen that strawberry patterned swiss roll before too. I like how you personalised yours with a banana theme. Now this got me thinking, maybe I should make one with a cherry theme. Haha!
btw, nice photos.
Lovely swiss roll :)
Nevertheless, it's still a great looking swiss roll.. nicely and neatly rolled. And you can never go wrong with chocolate and bananas ! :)
@alan: I noticed the discrepancies but I still followed them nevertheless >.<
@sotong: do try the cherry theme! I'm sure they'll turn out lovely :)
@cathy and joyce: thanks :D
you like bananas huh!
regarding your paste and beaten eggs note:
alot of pastissiers use the method of incorporating the beaten eggs into paste, i believe this help to retain the airy-ness of the beaten item. My macaron recipe is based on that as well.
Ive heard of pancake recipes where the eggs whites are beaten separately and added in to make it more fluffy
absolutely beautiful swiss rolls! you are so creative Janine!
sometimes, i face the same problem too. maybe you should follow your feelings the next time and bake it your way (: still, that look so LOVELY! (: great job janine!
Janine, think banana is your favourite! hehe... You've seen you making banana in cake quite often. I bet they're delicious. The swiss rolls look super gorgeous. Thanks for sharing it.
Hope you're having a great weekend.
Blessings, Kristy
The banana prints are so cute!! :)
oh, I also made a similar "swiss roll" using this book. But mine cracked during rolling, so ended up as a cake instead.. ha.. you can see my "roll" at:
http://fong-kitchen-journal.blogspot.com/2011/03/banana-caramel-chocolate-cake.html
absolutely beautiful !! congrats !!
I have an award for you. Check this out:
http://smallsmallbaker.blogspot.com/2011/04/one-lovely-blog-award.html
Ha ha, you're slightly banana obsessed aren't you? The swiss roll looks very pretty and I like the actual banana in the middle of it.
@jess, hanushi, clarinette, jasmine: thanks :)
@ssb: thanks for the award!
@fong: nice! the end product looks good!
@shaz and kristy: just a little :D I like to eat baked banana products!
Janine,
the part on mixing flour into the batter after egg whites have been added should work.
I know it definitely works for the genoise sponge (whole eggs) but it is very very risky. If done wrongly, the batter will deflate. Personally, I wont do it, cos it doesn't work for me.
fast forward to 4:51 in the video. (genoise sponge)
http://www.youtube.com/watch?v=DYUwSDCHNPg&feature=related
@bakertan: ohh i see! this is the classic case of the lousy carpenter blaming his tools (or in this case, a good recipe which I executed lousily) >.< thanks for the video link - it's helpful!
I have to say, the print looks like something other than bananas and "j"s...
@julie: let's keep this between you and me ;p
Post a Comment