
It's Singapore's 46th birthday today, and sadly, I'm stuck at home doing work for lessons tmr. I indulged in a spot of baking today, and no surprises, it was tarts again! Anyway, although I've received some mouthwatering entries for Aspiring Bakers #10: Easy as Pie (August 2011), entries have generally been trickling rather slowly. As the host, I guess I should provide the lead by showing you that pastry crust are really not that difficult! (In a later post, I'll show you my very first attempt at an apple pie (which was a failure) and my new, second attempt at it - it looks and tastes much better this time!)
I know many novice bakers tend to stay away from making pies and tarts, and for good reason too. Pastry can be a really finicky thing to work with, and over here in Singapore, the problem is magnified because of our warm and humid weather. Butter softens within minutes of being taken out of the fridge, and with heat from our hands, it melts as quickly as an ice-cream under the summer sun. I still remember the first batch of shortcrust pastry which I attempted myself - I quartered the recipe because I didn't want to waste two whole block of butter should I fail. I even read up many different sites and books on the techniques of pastry making, but really, nothing prepares you better than actually trying it out for yourself. From that very first attempt, I was addicted. Addicted to the variations that could be done with not only the pastry recipe, but to the fillings. Addicted to what could be the loveliest smell on earth, after the smell of baking bread - that of tarts baking in the oven. A buttery sinful aroma will waft through your kitchen and permeate your home.
Also, strangely enough, I initially thought that pies and tarts might not be an Asian thing, but then again, I realized that hey, we have egg tarts and who can forget about the pineapple tarts that most of us love during the Chinese New Year?! Pineapple tarts are really something unique to Southeast Asia - besides Malaysia, Singapore and maybe Indonesia, I believe no other place in the entire world can pride itself on having pineapple tarts for Chinese New Year. That itself is made using a pâte sucrée, or sweet dough, which has more sugar and maybe an egg added as compared to the pâte brisée, which literally means 'broken dough', or just shortcrust pastry for any other type of tarts or pies. Most recipes tend to advocate the use of the pâte sucrée for sweeter fillings and the pâte brisée for savory fillings but really, I think it's all up to you.
 |
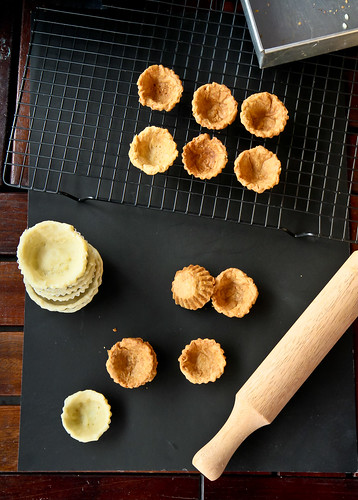
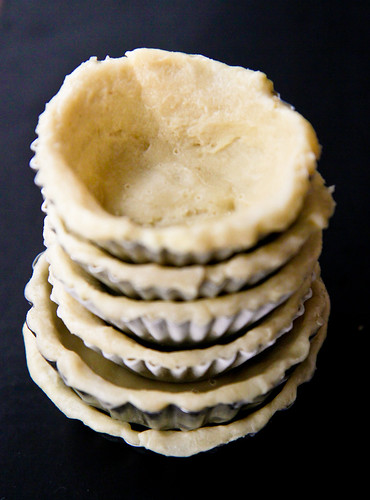
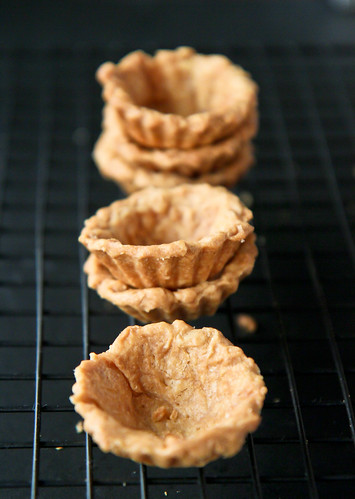
| 'Rustic' looking tart crusts |
Today, I'll be sharing with you the other shortcrust pastry (pâte brisée) that I've tried and love - the Bourke Street Bakery's pâte brisée. I have to admit that I did have the book some time ago, but didn't attempt any recipes from it because I read online that some of their recipes didn't work and I was rather put off by that. However, after my trip to the bakery itself in June, I was a convert. Their shortcrust pastry was flaky, and smelt so buttery, and not to mention that ginger brûlée tart. I'm still dreaming about it even now. I know I should try to make it, but the lack of a chef's torch is my excuse for not attempting it yet. I guess I don't want to fail and mar my impression of the tart :p
Anyway, I decided to be daring and made the entire recipe, which calls for an entire 400g of butter! I made sure the butter was well chilled and I handled the dough as little as possible and in a few minutes, I was done. I split the dough into four discs, cling wrapped three of them really well and popped them into the freezer immediately. And yes, this was done about 2 months back, so I can safely say that the frozen dough still produces lovely tarts 2 months after freezing. I reckon with this quarter recipe, I got 12 mini tartlets (3-cm diameter) plus a few more larger ones.
FYI, I used this recipe for half of my fresh fruit tartlets (the other half using the remainder of my foolproof pie recipe) and filled with Pierre Herme's pastry cream. Both pie recipes are equally delicious, but this one might just beat the foolproof one for its ease (instead of vodka, vinegar is being used). Although there is a lower proportion of butter in this recipe, the buttery taste is more prominent here, maybe because of the amounts of sugar, but in any case, this recipe is good! :]
FYI, I used this recipe for half of my fresh fruit tartlets (the other half using the remainder of my foolproof pie recipe) and filled with Pierre Herme's pastry cream. Both pie recipes are equally delicious, but this one might just beat the foolproof one for its ease (instead of vodka, vinegar is being used). Although there is a lower proportion of butter in this recipe, the buttery taste is more prominent here, maybe because of the amounts of sugar, but in any case, this recipe is good! :]
Sweet Shortcrust Pastry (Pate Brisee)
Sufficient for 20 8-cm tarts or 1 9-inch pie recipe
This is the forward from Bourke Street Bakery - "The following recipe for sweet shortcrust pastry will leave you with a slightly uneven edge around the rim of the tin when you line it, resulting in a tart that looks rustic and home-made, which is what we aim for at Bourke Street Bakery. If you are looking for a perfectly even effect, this is not the correct recipe to use. The fact that this dough has water in it means it will shrink as the water evaporates during baking; the following method is to help counteract this shrinkage. This recipe makes enough pastry for twenty 8 cm (3 1/4 inch) tarts with a little left-over. The number of tarts is going to vary from baker to baker depending on how thin the pastry is rolled. The pastry can be frozen for up to 2 months, so it makes sense to line all the shells, freeze them and simply blind bake them as you need them."
Ingredients:
400 g unsalted butter, chilled, cut into 1.5 cm cubes
20 ml (1 tbsp) vinegar, chilled
100 g caster sugar, chilled
170 ml (2/3 cup) water, chilled
665 g all-purpose flour, chilled
5 g (1 tsp) salt
Preparing the dough,
- Put the vinegar and sugar in a bowl and add the water. Stir to combine and make sure the sugar is completely dissolved. What I do is actually to use warm water combined with the vinegar and sugar and then chilling the mixture in the fridge for at least half an hour ahead.
- Remove the butter from the refrigerator 10 minutes before you start mixing (the original recipe calls for 20 minutes but butter melts quickly in our environment). The butter should be just just soft but still very cold so it doesn't melt through the pastry while mixing.
- Mix the flour and salt in a bowl. Add the cubes of butter and using your fingertips, rub the cubes of butter into the flour to combine. In your bowl, you should see bits of flour and butter, as well as flakes of butter.
- Turn this out onto a clean work surface and sprinkle the chilled sugar mixture over the mixture. You can know begin to fraisage* the mixture. This is basically using the heel of your hand to smear the mixture away from you across the work surface, and then gathering it all up into a bowl and repeating. Make sure to work quickly and repeat this smearing process twice. You should still be able to see streaks of butter marbled through the pastry.
- Divide the dough into even sized portions (I did 4) and shape them into flat round discs of about 2-cm thick. Wrap each disc in cling wrap and refrigerate for at least 2 hours or overnight.
Preparing to bake
- Remove the pastry dough disc from the refrigerator 20 minutes before you wish to roll it.
- After flouring your work surface and rolling pin, roll out the disc to about 3-5mm thick. It is best to start rolling from the centre and rolling the dough away from you, rotating the dough whilst you are at it. Do not attempt to stretch the dough overly, because the pastry will just shrink in the oven later.
- After rolling, transfer the dough into a tray and put it in the fridge to relax the gluten, for 2 hours.
- For 8cm tart tins, cut the pastry using a round pastry cutter with an 11cm diameter. Place the pastry on top of the mould and use your fingers to gently push the pastry into the mould. There should be about 1cm of dough hanging over the sides.
- Fold the overhang onto the sides until there is no pastry left protruding. This will help counteract the pastry shrinking when it has baked.
- Put the tart tins into the freezer for at least 20 minutes to relax the gluten. In the meantime, preheat the oven to 200°C.
- Now, you are ready to blind bake the tarts. Blind baking simply means pre-baking the pastry before filling it. You can use pie weights, dry beans or rice. I opt for using rice, because that's the only thing I have in my pantry that's suitable.
- Be sure to line the pastry with a layer of aluminum foil, making making sure the foil is pushed well into the corners. Pour in the rice grains to fill up the case and bake for about 20 minutes. The done pastry should be a golden brown color.
Janine's jots:
 |
| Frozen tart crusts ready to be baked! |
- *Note: To get a better idea of how to 'fraisage' or smear the dough, do look at this video here. It helps to work in small portions.
- Taste and texture: I've exalted this crust more than enough times in my post - it's buttery (the smell when it's baking in the oven is one of my favorite smells in the world!) and is extremely flakey. In fact, it's quite a forgiving recipe. One portion of my dough sort of melted when I was prepping the other tins and what I did was to chill it in the fridge again and it was good to go. There was no obvious difference between the un-melted tarts save for a little less flakiness.
- Modifications: Another way of baking which I find helpful but a little more troublesome is to bake it with the aluminum foil for the first 15 minutes, then taking the tarts out to remove the rice grains and the aluminum foil before placing it back into the oven to bake for the remaining 10 minutes. This will make sure that your tarts will crisp up and brown perfectly.
- Storage: If left unfilled, the tarts store well in an airtight container for a week before starting to 'lose air'. If filled, please consume within the day otherwise the crust will turn soggy. For the frozen dough, I have tried storing it in discs as well as freezing the tart tins which have already been lined with pastry. The latter method is faster because then you can just blind bake the tarts at any time without having to wait for the dough to thaw before you roll it out. Both methods work fine. Be sure to freeze the tarts individually first, before stacking them up and keeping them in a ziplock bag, otherwise they'll stick to one another and the surface will dry out excessively!
- Would I make this again?: Definitely! But I'm also going to try other recipes to see how they compare to this :]
- Other comments: I find it useful also to chill the bowl that I am using to mix the pastry in. I cheat by placing the bowl together with the flour+salt in the freezer for about 10 minutes while I'm dicing the butter to save time. Also, when in doubt, chill! Chill meaning always err on chilling your dough more than you should - it helps with the shrinking problem. As you can see, some of my tarts are quite misshaped because they didn't spend enough time in the fridge (and because I'm still learning how to properly place my pastry into the tins).
In pictures:
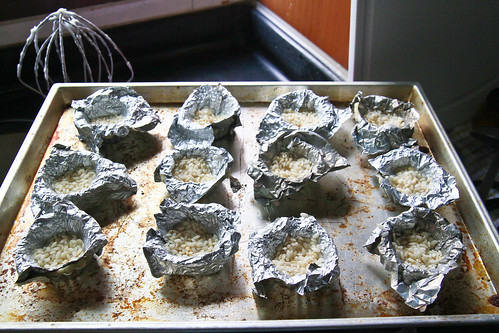 |
| Preparing to blind bake my tarts. |
 |
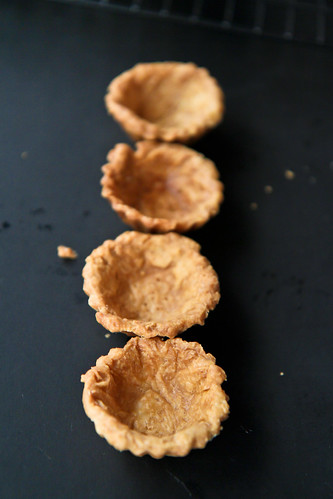
| Baked tart crusts cooling in their tins in awful yellow kitchen light. Be sure to cool them for about 10 minutes in their tins before popping them out to cool for another 30 minutes before filling them. |

8 comments:
hi janine, thanks for sharing this pastry making recipe of yours. hope one day i will be able to try out the desserts from bourke st bakery.
Janine, im using French Pâte sucrée as the sweet tart; may I know what is the difference with yours (pâte brisée)?
400g butter! whoah! i've read somewhere that vinegar is the secret to flaky crust.
yeah, i'm one of those people intimidated by pastry! haha
will be submitting my entry soon.
hmm... its an interesting gesture that they discredit their recipe first. but it does have a rather rustic and if I might say "free-spirited" appeal, which might not work for everyone.
It's also noteworthy that there are generally two schools of thought when it comes to making pate brisee. Some would need the butter to be cold, and practically everything else chilled like laduree, and in this case, Bourke Street Bakery while others would use their butter and other ingredients only at room temperature e.g. pierre herme. intriguing indeed...
Thanks for sharing all your techniques and tips in baking these delicious flaky pastry. I love the book, Bourke Street Bakery. It is one of fav books.
@lena: i hope you get the chance too!
@hankerie: the technical difference is that the pate sucree tends to have a higher proportion of sugar as compared to the pate brisee which will have little or no sugar but the Bourke Street Recipe seems to me to be a mix of both.
@sotong: yeah vinegar or vodka works the same :D I've tried using 2-3 types of vinegar and all of them work the same.
@alan: teehee the "rustic" looking-ness of the tarts might not be because of the recipe but purely due to my lack of tart making skills. My crusts usually turn out like that :S yup i realized that about the butter as well, and still haven't figured out what's the science behind either school!
@zoe: do try out the recipe in the book, it's really detailed and lovely :)
I love BSB shortcrust pastry. A little fiddly but the result is amazing. You must try to fill them with ginger brûlée :)
Great post! It really goes into a lot of detail which I think helps to understand how pastry works :)
Post a Comment