
Technically, this is the 6th batch of pineapple tarts (consisting of both enclosed or open) that my mom and I have been churning out for the Chinese New Year, but this is the second most distinctive recipe we've been using, the first being the one here and other slight modifications on the basic recipes. This time, the recipe for the pastry has been modified from Youfei's recipe here to suit my own tastes and preferences. Basically, I halved the recipe, and instead of 1.5 egg yolks, I just used one yolk. The custard powder, which essentially is corn flour with flavoring, I left out because I didn't have any custard powder. I replaced that with more flour. I really do like the flavor that the milk powder brings to the pastry.
I'm also posting my mom's 'guess-timate' pineapple paste recipe here for my own reference:
Pineapple paste
 Ingredients:
3 normal pineapples
3 Honey pineapples (these are smaller and sweeter - like Sarawak pineapples)
300-500g granulated sugar (depending on sweetness of pineapples)
3 cloves
1 cinnamon stick
1 pandan leaf (also known as screwpine leaf)
½ tsp of anise
½ tsp of lemon juice
Method:
- Cut and grate pineapples. If you don't particularly care for 'chew' (or fibers) in your pineapple paste, you can blend the cut pineapples instead. Do remember to wear gloves when you grate and cut otherwise the acid in the pineapples will eat into your cuticles.
- Give the grated pineapples a little squeeze to get rid of excess water, otherwise the paste will take a longer time to dry out!
- Place the grated pineapples in a heavy-bottomed pan on medium fire, together with the spices, and cook until the water has evaporated.
- Stir continuously, making sure that the paste does not stick to the bottom of the pan. After an hour, remove the spices and the pandan leaf and add the sugar.
- Keep a close eye on the paste, making sure to continually stir it. It will slowly turn golden brown and extremely sticky.
Janine's jots:
- The whole process, including the cutting and grating of the pineapples, will take up to 6 hours! Do keep a whole morning aside for making the pineapple paste. This isn't something that you can cook on the stove, and leave it until time is up because the pineapple paste will stick to the bottom of the pan.
- As it browns, the paste will get harder to mix because it gets very sticky - lots of elbow grease is required, but don't be disheartened because you're almost done!
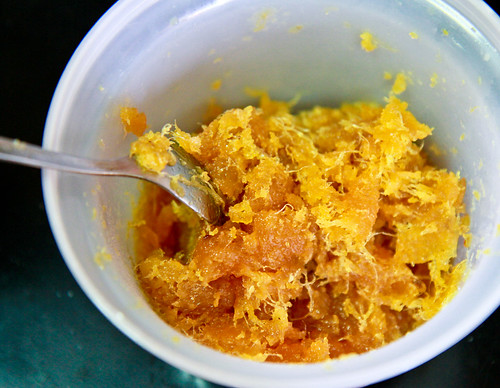
- After the paste turns a golden brown (as shown in the picture below), switch off the fire. You can leave the paste in the pan to let it cool before storing it in containers.
- Because this is not commercially made, it does not keep well at room temperature. Use the paste on the day it is made, or refrigerate it. Most people recommend keeping it for up to 2 weeks, but my mother has tried using pineapple paste which she made a year ago and froze and it still tastes as delicious as a newly made paste =)
 For the pastry:
 180 g unsalted butter, cold
250 g all-purpose flour
50 g icing sugar
2 tbl milk powder
1/4 tsp salt
1 egg yolk
1 tsp pure vanilla extract
Method:
- Sift the flour, icing sugar, salt and milk powder together in a large mixing bowl.
- Remove the cold butter from the fridge and cut it into 2-cm cubes. Add the cubes into the mixing bowl.
- Using clean fingertips, gradually rub the flour into the butter until the mixture resembles coarse bread crumbs.
- Add the egg yolk and vanilla extract into the mixture and using your fingers, lightly incorporate them until a soft dough is formed. Do not knead anymore!
- Put the dough in the fridge while forming the pineapple balls.
- Shape the pineapple balls to a size of your own preference (I used about a teaspoon of pineapple paste to 13g of dough - yes, I weighed them out individually.) Take the dough out of the fridge and divide them into 13g portions (I wanted small, bite-size tarts but any weight will suffice - up to your own preference).
- Placing the dough in the middle of your palm, flatten it into a circle and place the pineapple ball in the centre of it. Pinch the ends of the dough together and give the dough a quick roll of your palms so that a perfect sphere can be obtained.
- After lining up the completed tarts, apply an egg wash on them (you can use a 4:1 egg to water ratio, or you can simply just use milk) and bake in a 170 degree preheated oven for about 15-18 minutes.
In pictures:
 |
| Using your fingertips, rub the butter into the flour (or vice versa) - you do so by literally rubbing the cubes of butter together with the flour with your thumb, against your fingers. |
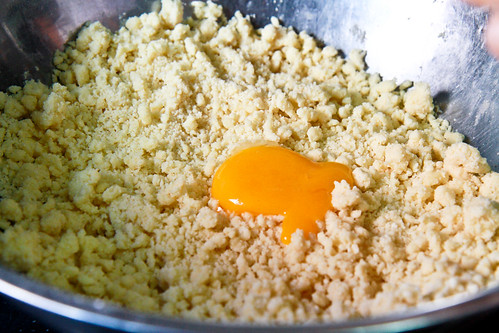 |
| When the mixture resembles coarse breadcrumbs, add the egg yolk and vanilla extract (not shown) and gently incorporate it. The egg yolk might look as if it is not enough to moisten all the breadcrumbs but trust me - it is more than enough! |
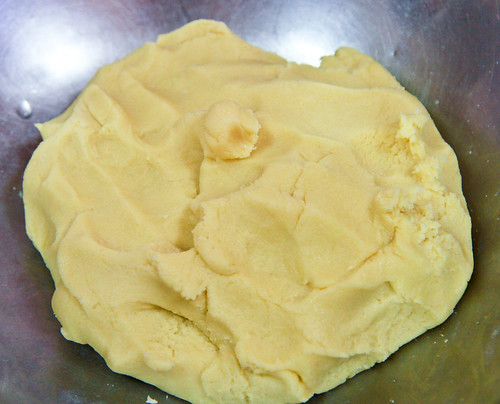 |
| The finished dough should look like this - DO NOT knead it! (You don't want gluten to form, otherwise you'll have a chewy pastry!) |
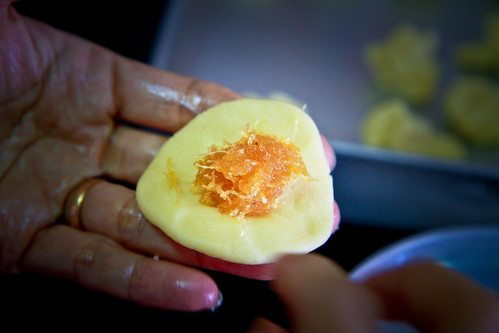 |
| Press the dough into a circle, and place the pineapple ball in the centre. |
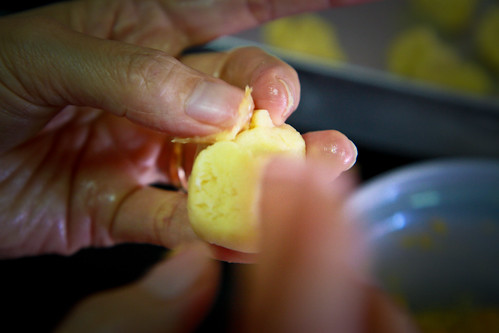 |
| Pinch the seams together and give the ball a quick roll to make sure it's uniformly spheri |
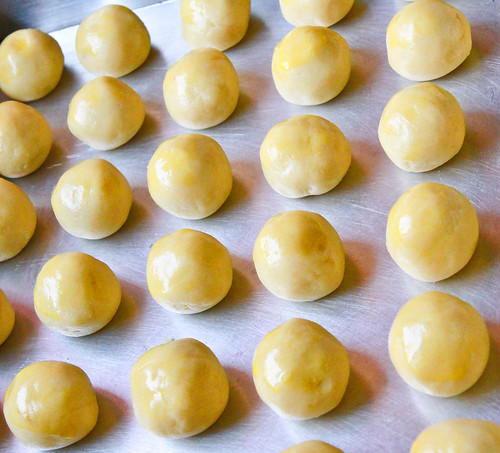 |
| Give the completed balls a light egg wash. |
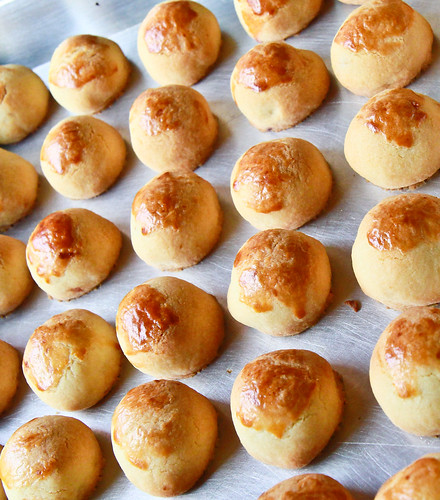 |
| Tadah! The pineapple tarts are done! They're slightly overbaked here - way too brown but still as yummy :) Leave them in the tray to cool for about 10 minutes before cooling them on a wire rack. |
I'm submitting this pineapple tart entry for Aspiring Bakers #3: My Favourite CNY Cookie (Jan 2011) because this recipe is one for keeps! My fibrous and chewy pineapple paste is encased in a crumbly pastry which literally melts in your mouth after the first bite. The mild sweetness and milkiness of the dough complements the tartness and sweetness of the paste, making this pineapple tart recipe one of my favorites so far =) However, I wouldn't use this recipe for the open-faced pineapple tarts because I prefer those tarts to be less crumbly - so I use one entire egg instead of just the yolk for the dough (my mom's original recipe).
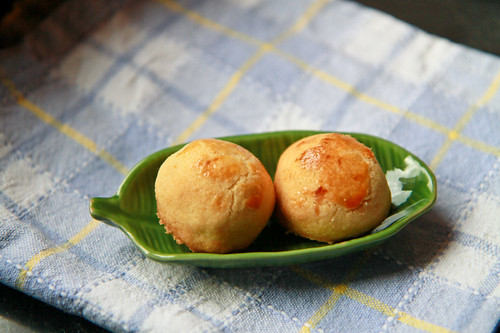
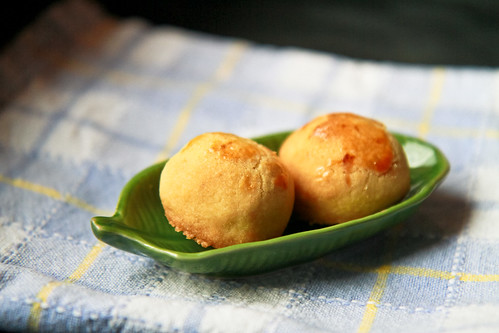 |
| Two ong-lais in a pod - Gong Xi Fa Cai guys! =) |
Ps: Ong-lai is hokkien dialect for pineapple, and it sounds the same as the phrase 'prosperity come' (literally) or basically, welcome prosperity to your home - which is one of the reasons why pineapple tarts are baked during Chinese New Year, so that you can welcome prosperity to your home in the new year =D
ETA: This post got featured in foodgawker here :) Whee - a first for me! This is proof that my photography skills are improving =D
8 comments:
very beautifully done! i would love this!
Mmmm..my favourite cookies. They are beautiful. That's a lot of times you tried out! Amazed at your determination :) Thanks very much for sharing. MaryMoh at http://www.keeplearningkeepsmiling.com
@jess and mary: thanks :D
I've never had these before but they remind me of the larger pastry buns that are usually filled with bean paste. SO GOOD!
how many cookies does this recipe make?
@cookie: they're actually open-faced tarts with pineapple filling, so just imagine open apple tarts and you're half there :)
@missy-j: it depends on how big/small you make the individual balls, but I got about 2 trays worth, so probably close to a 100 of them?
Thats a whole lot of research into pineapple tarts and a very comprehensive step by step. Thanks so much for sharing!
they look fabulous! thanks for the step by step instructions and pictures :)
Post a Comment