
I also wanted to document a baking failure I had a few days ago. I tried out a new sponge recipe, but no thanks to my folding technique, the cake turned out dense and almost inedible. All pictures below are taken with my iPhone, which I've been using to document recent bakes since my brother took the camera with him for travelling.
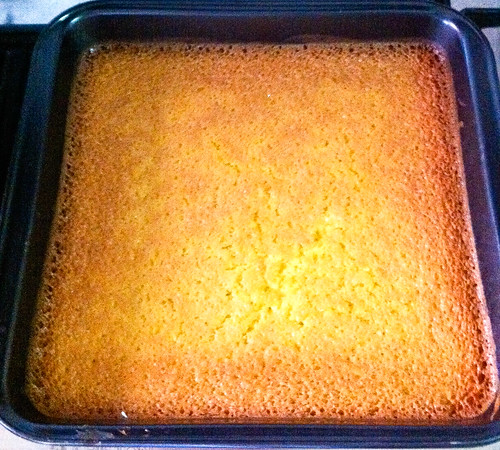 |
| When I saw this end product, my heart sank. Why are there so many large holes all around the edges? :/ Not to mention the fact that I kinda overbaked it a little. |
 |
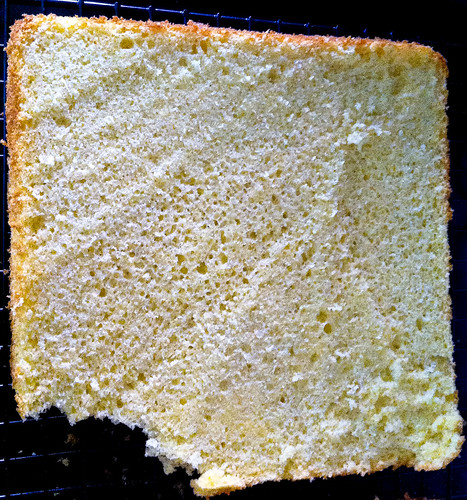
| HORRORS: the cake has a jelly-like hard, inedible bottom layer! |
I made the executive decision to slice the cake into half... (slicing skills need work I know)
Thankfully, the uncooked flour bits were only on the bottom of the cake, and I actually retained the top half in a container, hoping to eat it with my morning milo. The bottom half, went straight into my dogs' bellies because I doubt any human being would have been able to consume it. Then, as luck would have it, I saw Cathy’s post on her truffles, which she had made from her failed apple cake on the very same day. And a light went off in my head - just like a Eureka! moment. I could make cake pops out of the dry sponge cake! Some call it cake truffles, but truffles bring to mind chocolate balls with chocolate or other liquer or nut filling, so I'd rather call these cake pops. And of course, I went off to look at my favorite cake pop website, Bakerella.
 |
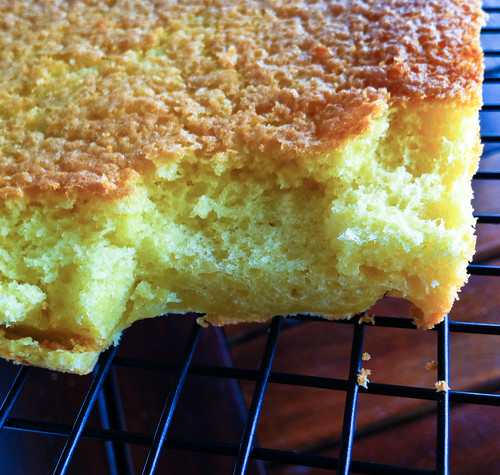
| The top layer's still salvageable although the air holes are rather big. |
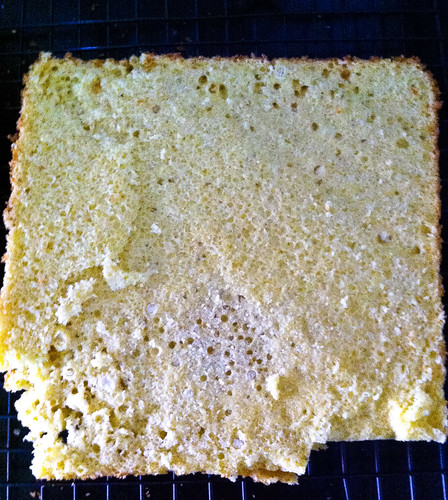 |
| OHMYGAWD. Here's an example of a cake inside you never want to get. Holey, with uncooked flour bits = complete FAIL |
Thankfully, the uncooked flour bits were only on the bottom of the cake, and I actually retained the top half in a container, hoping to eat it with my morning milo. The bottom half, went straight into my dogs' bellies because I doubt any human being would have been able to consume it. Then, as luck would have it, I saw Cathy’s post on her truffles, which she had made from her failed apple cake on the very same day. And a light went off in my head - just like a Eureka! moment. I could make cake pops out of the dry sponge cake! Some call it cake truffles, but truffles bring to mind chocolate balls with chocolate or other liquer or nut filling, so I'd rather call these cake pops. And of course, I went off to look at my favorite cake pop website, Bakerella.
 For the uninitiated, cake pops are basically little balls of cake, mixed together with frosting or chocolate and covered with melted chocolate or candy melts. They're called cake pops because well, just like lollipops, they're little round bits of cake on a lollipop stick! Cake pops are usually covered in candy melts because people make stuff with the cake pops - Disney characters, faux cupcakes and icecreams and other gift ideas! Here's a picture of her book (which is available in Popular, Kino and other local bookstores) taken from her website! Look at the tiny chick cake pops and snowmen cake pops - the possibilities are endless I tell you!
Basically what is required is simple - some cake, some frosting, and something to coat it with. You might need lollipop sticks, but I just used some toothpicks since I don’t have lollipop sticks lying around. Also, you need Styrofoam boards to prop the balls up so that you can let the coating set and to chill the balls, but since I didn’t have them, I made do with….you’ll never guess it…. lettuce! =] basically I stuck the toothpick into a head of lettuce and it was placed in my fridge. It worked brilliantly I’ve to say :]
Recipe for cake pops
Ingredients:
1 batch failed cake
Suitable amount of frosting (should be roughly the same as icing the cake – you can choose to use melted chocolate, any form of buttercream or icing – try not to make the icing overly sweet because you’ll be coating the cake ball with another layer of candy/chocolate)
Method:
- Break the cake into a large bowl. You can crumble it with your bare hands or with the tines of the fork.
- Pour frosting (which has been left standing at room temperature) into the bowl and mix it into the cake crumbs.
- Once incorporated, use clean hands to press the cake crumbs and mould the cake balls. If you require extra moisture in the 'batter', add some milk to the mixture. Refrigerate the balls for at least 15 minutes or until firm.
- In the meantime, melt your chocolate (over a bain-marie or in a microwave like I did) and let chocolate cool to room temperature.
- Roll your chilled balls in the melted chocolate and attach the balls to a lollipop stick. Keep the cake ball upright (ball side up) and allow to cool on a styrofoam board so that the chocolate coating can cool and harden.
- For best results, chill the cake ball again for at least half an hour before consuming. This will give a pronounced hardened chocolate exterior, which will give way to a soft and moist cakey inside.
What I did:
 |
| I mixed my frosting with the cake crumbs, and made them into balls. Chill them until firm. |
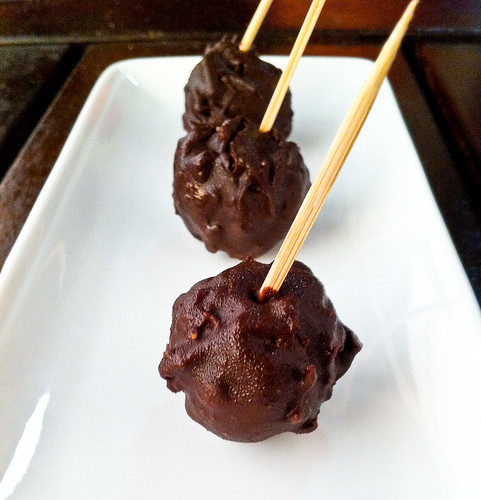 |
| Melt some chocolate - I melted some strawberry Rittersport together with Dove dark chocolate and rolled the cake balls around the melted chocolate mixture. Make sure the chocolate isn't too hot. Stick them onto your styrofoam/lettuce until the chocolate sets a little before chilling them again. If you see here, the cake pops are well chilled and starting to 'sweat' from the heat already! |
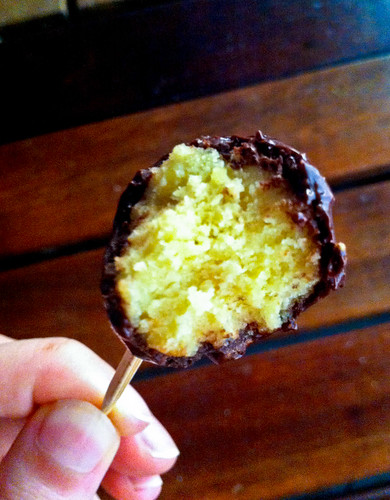 |
| NOMNOMNOM =D It's really nice for something which I'd written off as a cake failure! |
As a new baker, I have more failures than successes than I dare to count. Also because my family aren't too receptive to my baking sometimes, it's up to me to finish everything, and the cake/bread tends to stale after a while, so I give those to my dogs too. My dogs have benefited tremendously of course. I don't know why the cake pop idea never ever entered my mind even though I look and salivate at pictures of cake pops all the time!?!
The best thing about the cake pop is, you just need to use a yummy frosting - I used a cream cheese swiss meringue buttercream which was left over from my carrot cupcakes - it gave the sponge cake, which was plain vanilla the additional oomph. And I've to say using a mix of milk chocolate with strawberry filling (Rittersport) and dark chocolate was a brilliant idea because the strawberry flavour came through to complement the cake and the chocolate, as always, is delicious with anything. The next best thing is, every baker will have these ingredients lying about their kitchen! You can use any form of chocolate, baking or normal confectionary ones, any form of icing - buttercreams or what have you, and as I've demonstrated, you can use toothpicks and lettuceheads for props! If you find it troublesome, just roll your chocolate-coated cake pop in a bath of cocoa powder and put them into pretty little cupcake liners and you'll have an equally beautiful result, sweetness complemented with an extra bitterness from cocoa powder.
So lesson learnt friends - don't throw your cake failures away because you'll never know what you can do with them! :]

8 comments:
Your cake pop looks yummy! great job! :)
How creative of you to turn your failed cake into something that looks so delicious! I always give my failed bakes to my dog too :P
hi janine, a recycled cake! that's a brilliant idea! i was just laughing when i saw you writing that ingredient for the cake pops.." 1 batch failed cake!"
@cathy: thanks! It was thanks to your idea :)
@jeannie: I think I've given too many to my dogs cos they're really fat now!
@lena: hehe sadly, the idea didn't originate from me - really give kudos to the person who first thought of it!
You've a quick mind :)) Your cake pop looks perfect!
Love how you've salvaged a failed bake so beautifully!
great save! and genius idea to use a head of lettuce.
when i made the cake pops, i filled up a loaf pan with rice. it wasn't perfect but it got the job done.
Great save! I'm so glad it didn't end up going to waste. Actually about to try cake pops soon myself :).
Post a Comment