
My best friend came over to my place to bake some time ago, during our mutual free day. She isn't one to bake bread, but she was very inspired by 제빵왕 김탁구 (King of Baking, Kim Tak Goo)! I'm sure from the name you can tell that it's related to baking - bread specifically. It's a typical Korean drama, with complicated sub-plots and vengeance and revenge and what not, but that's besides the point. The point is that, there is alot of baking done in the show! Here's a tiny clip of the father baking :)
Well, this is not exactly inaccurate, as the clip owner suggests, because breads do contain eggs. The only gripe I had was how fast the bread proofed and rose but well, it's a show after all right!
Anyway, my friend wanted to bake a bread, so I was racking my brains as to which bread would be easy to do AND yummy to eat. I finally decided on focaccia, because both of us had an enjoyable time in Italy and focaccia is something that is pretty hard to go wrong on. Previously, I'd only used the no-knead recipe for focaccia breads (which yield damn tasty breads btw), but in this case, since my friend wanted to experience the feeling of making breads herself, the no-knead recipe was a no-go, because I'd have to put together the ingredients the night before and only do some brief kneading before putting the bread in the oven. My search brought me to Amiscell's blog, a native Italian living in Singapore. His blog isn't frequently updated nowadays, but do take a look at his archives if you're interested in Italian cooking! Like most Italians, he probably goes by the motto of fresh produce, cooked simply. That's what I totally love about Italian cuisine. How pasta and pizza and breads in Italy (oh not forgetting gelato!) can taste so good - just because the freshest and best quality ingredients are used. I once ate a tortellini dish in Modena, and it was "just" tortellini in broth, but I tell you, it was the one of the best, and by far the most memorable meal I had in Italy. The trattoria had no menu, and it was definitely family-run. The daughter came up to us, speaking to us in Italian. Luckily, I could understand little bits of Italian (I'm pretty good with Italian food names hehe - and French ones as well heh) and we managed to order ourselves a primo, a secondo with some contorno and dolce :] That's basically a first course of pasta (I had tortellini and I also tried their tagliatelle which was AWESOME), a second course of meat (I forgot what meat I had actually because the pasta was so excellent), contorno is basically side dishes of vegetables/salad to go with the secondo and dessert! Of course, there is the caffè served after the meal, to cleanse your palate. I'm sorry I don't have any pictures to go along with the description but you've to trust me on this - it was dee-li-cious!
OH and I totally forgot the most important part - while waiting for the meal, I had the most wonderful basket of bread, together with balsamic vinegar and olive oil. And lambrusco of course. The bread, consisted of what I think is a variation of focaccia - because there's probably a million variations of focaccia in Italy and it basically just refers to any flatbread. Modena is in the province where balsamic vinegar originated - Emilia-Romagna (since the Middle Ages!), and I tell you, it is seriously THE BEST balsamic vinegar you'll ever have, period. I've eaten at quite a number of Italian establishments in Singapore, and so far, no balsamic vinegar served here even comes close to beating the ones served in Modena. The aceto balsamico is served in tiny round-bottomed flasks, with cork-stoppers which have red wax seals on them. I've had the pleasure of trying those aged 12 years and 25 years (the premium types), and it is just phenomenal. It's totally unlike any type of vinegar with balsamic vinegar is actually sweet, but it has this sour bite that is not over the top, making the sweetness totally acceptable. It's quite a lousy description because you'll really only understand what I mean when you taste it!
Anyway, enough of my rambling - I do get quite passionate about my food adventures in Europe, and I had a number of them considering that I spent a year there - I decided to make focaccia genovese, which basically translates to Genoa focaccia, or focaccia of Genoa. Genoa is a province in Liguria, which is in Northwest Italy (I especially remember Genoa because it's Genova in Italian, and the Princess in Princess Diaries (played by Anne Hathaway) came from the Kingdom of Genovia - which is rather similar in spelling lol. Anyhow, focaccia genovese is really a staple of Ligurian cuisine - and wikipedia defines it as a flat bread of up to 2 cm, seasoned with olive oil and salt. So what we've attempted below is really an onion-and-thyme-topped homage to focaccia genovese :]
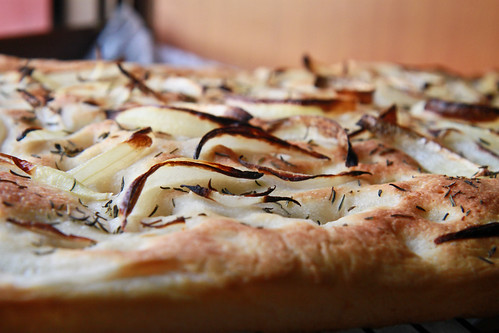 |
| Love the burnt bits of onion :] I used dried thyme here btw. |
I actually followed Amiscell's recipe to a T, and he has some lovely step-by-step pictures for those interested. You'll need to set aside about 4 hours of your time for baking this, out of which 1 hour will be active time - ie, time that you'll be kneading and shaping, the rest of the time is basically waiting for the yeast and flour to do its magic, and you can do anything else you want to do while waiting. Don't be put off by the many steps and the 4 times of proofing - it isn't too bad and my instructions below should be quite clear!
Focaccia Genovese
Makes enough for a 35cm by 28cm baking tray
Ingredients:
For the bread: 200 ml water, at room temperature
20 g extra virgin olive oil
7 g salt
3 g sugar
340 g bread flour
7g dry yeast
For the topping:
Some olive oil mixed with some warm water (in 3:1 proportions)
Some sea salt
And anything else you desire - I used 1 tbl of dried thyme and half an onion.
Method:
- Dissolve the yeast in water (about 20-30ml of the 200ml should suffice).
- Mix the rest of the water, sugar, olive oil, salt and half the flour (170g) into a large mixing bowl.
- Pour the yeast-water mixture into the dough and knead until it is fully incorporated.
- Add in the remaining flour, and continue kneading until the dough becomes tacky, and not excessively sticky. This should take about 10-20 minutes of hand kneading.
- Place the dough in the bowl and cover it with a damp tea towel. Let the dough rest for about 15 minutes at room temperature.
- Take the dough out of the bowl and stretch the dough slightly, so that you can do a letter fold. This is basically mentally dividing the dough in three and folding the two ends into the centre. This is your first horizontal fold. Turn your dough 90 degrees and do the same letter fold - this will be your vertical fold. Your dough should be about 30% the size of the tray you are baking it in.
- Pour some olive oil onto a baking tray, making sure that it evenly coats the entire tray. Place your folded dough onto the tray, and make sure it is evenly coated with olive oil on both sides as well. Let the dough rest for a 2nd time, for about 45 minutes, or until it has doubled in size.
- Using the heel of your hands, press the dough into the tray, flattening it until the whole tray is covered with the dough. Sprinkle some salt (preferably sea salt) onto the top to give the focaccia flavor. Let the dough rest for the 3rd time, for about 30 minutes.
- Pour some more olive oil into a bowl, and add some water to it to mix. Using clean palms, dip your hands with the oil-water mixture, and massage the liquid onto the top of your focaccia to spread it uniformly. After this, using your fingers (8 fingers minus the thumbs) - make depressions in the focaccia from the top to the bottom. You can add more of the olive-water mixture so that it sinks into the depressions. The oil-coated depressions will form softer areas when baked, which juxtaposed nicely against the crispy crust.
- At this point, add your favorite toppings to the focaccia. Here, I added sliced onions and dried thyme.
- Let the focaccia rest for a 4th and final time - for about 60 minutes. The dough would have risen to about 1.5 times its height. It does not matter if it doesn't rise as much since this is a flatbread!
- At about 30 minutes into the 4th proofing, preheat your oven at 220 degrees.
- Place the dough into the oven and bake for 15 minutes, or until the focaccia is golden brown.
- Remove from oven, and immediately remove the focaccia from the tray and onto a cooling rack to cool for 10 minutes before slicing. This is to make sure that the bottom of the focaccia does not turn soggy from the steam. Brush generously with the olive-oil mixture before serving.
Janine's jots:
- The original recipe uses 3g of malt instead of sugar, but I don't think most Singaporean bakers will have malt lying around their kitchen, and sugar really is quite a fine substitute in my opinion.
- If you are not kneading by hand, you can still use this recipe using a mixer - the time used in step 4 for kneading will most likely be reduced by half.
- You can use light olive oil or extra virgin olive oil or plain normal olive oil - it's all fine but just remember that olive oil will have a stronger taste. Italians are quite liberal in their use of olive oil, so don't be stingy when pouring the olive oil onto the focaccia!
- If you have a pizza stone, do use it instead to bake your focaccia because this will give a more evenly baked crust and bottom.
In pictures:
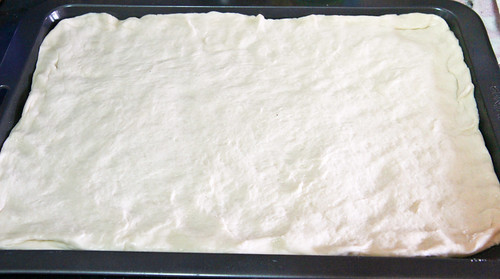 |
| This is the dough after the 2nd proofing. We've pressed it to cover the entire baking tray. Do try to use your hand to flatten it and don't stretch it because you want uniform thickness! |
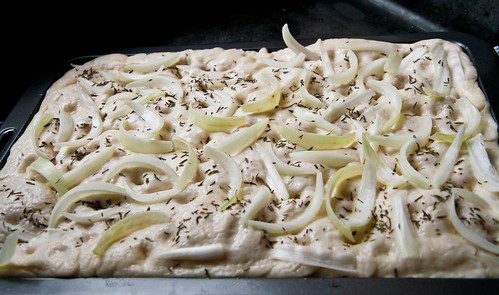 |
| Do try to slice your onions thickly - 5mm would be great and remember to press them into the dough, otherwise they will fall off when baked! Also, the onions might look a lot, but it's only half an onion and once baked, it's actually not that much after all! A whole onion would have been perfect! |
 |
| This is the completed focaccia! I've quite a bit of burnt onion because they weren't sliced thick enough. Also, I'm not a fan of too much olive oil, which explains why you see more golden brown bits as compared to the whitish bits, which are the depressions containing the olive-oil mixture. |
 |
| Yet another gratuitous shot of the focaccia. Do note that the depressions you made in step 9 will result in the white parts you see above because there is more oil in the depressions. These parts, eaten together with the crusty parts - are just perfect! |
This will be the first of my focaccia posts (I'll have at least 3 more focaccia posts with different recipes in each) and I've to admit after trying out a number of recipes, this is the second recipe I will go to if I want to eat focaccia genovese the traditional way. The first (and my favorite) recipe I will go to is Peter Reinhart's focaccia recipe, which I'll post soon. There is a longer waiting time for his recipe (overnight proofing in the fridge) - but it's worth it.

8 comments:
this look really good janine! i love onions!
Wow, your focaccia looks really good~ :)
Gorgeous! I can never get my focaccia to cover the whole tray:S
it look really yummy! (:
You focaccia looks wonderful! I've always wanted to try making this at home.
great write-up! and i like the the addition of the the video clip as well. looks really "drama", but i am envious how that dude has a stone/wood-fired oven in his home. I also fantasize about building one in my place.
have you tried using fresh rosemary with your focaccia? with good quality olive oil, the rosemary becomes wonderfully aromatic and crispy after the baking process. really tasty!
@jess, cathy, jeannie, jasmine and xiaolu: thanks :)
@jacob: nope i haven't tried using fresh herbs in singapore yet - where do you usually get your herbs?
i get mine either from cold storage or fairprice finest.
Post a Comment