
I'm a person of contradiction, on one hand, I really like order and neatness (in terms of how I put my things, have folders for various things, etc) and yet my mom can attest to my lack of order, especially in my bedroom. I'm the same baking wise, for certain recipes, I'm quite the stickler for following instructions to a T, and for others, I just go by feel, which isn't exactly the best way for things like pastries. I'm also quite of a spur-of-the-moment kind of baker, so this bread was the product of my fancies during the weekend.
I was studying, as usual, when it crossed my mind that I haven't been baking bread for a while now, since I had the necessary ingredients in the pantry (plus I needed to use up my wholemeal flour), I went to the kitchen to pound out some of my frustration on the dough. Btw, I highly recommend manual kneading of bread for anyone feeling highly stressed. I personally find it highly therapeutic and I usually do all my breads by hand, with no aid from the mixer or breadmaker.
 This recipe uses tangzhong, or what some bloggers have coined as the water-roux starter. In any case, it really helps with softer buns. For more information, please refer to my first ever post here! This recipe was adapted from Pei-Lin’s blog where she was making a wholemeal loaf. I’ve halved her recipe and made wholemeal rolls instead of a loaf but it’s still as yummy! They are still pretty soft the following day, as compared to usual bread recipes. This was also my first time using wholemeal flour to bake, and I really do like the taste of wholemeal, and I especially like the fact that I'm eating something with fiber and much healthier than just bread flour, which has all of its essential nutrients stripped away from it.
Wholemeal Bread Rolls, using the Tangzhong method (汤种全麦面包)
Ingredients
[A]
140g bread flour
100g wholemeal flour (I used organic wholemeal flour, which is the same thing but organically grown)
4g instant dried yeast
25g sugar
1g salt
[B]
30g egg, beaten (about half an egg)
50g milk, at room temperature
20g low fat yogurt
60g tangzhong, at room temperature*
[C]
25g salted butter, softened
*Refer here on how to make tangzhong - here, I used a proportion of 10g of bread flour to 50ml of water, to give me 60g worth of tangzhong for the recipe.
Method:
- Combine all the dry ingredients in [A] together. I used a sieve with larger holes so that the bran bits in the wholemeal flour could be sifted together with the other ingredients as well.
- Whisk together the egg, milk, yogurt and tangzhong (ingredients in [B]).
- Make a well in the centre of the dry ingredients and add in the wet ingredients. Mix until a dough comes together and pulls away from the sides of the mixing bowl.
- Turn the dough out onto your work surface and knead using the heel of your hands and knuckles.
- Once gluten has developed, knead in the softened butter until it is incorporated. I usually just take out the butter from the fridge, weigh it and put it in the microwave for a quick zap of about 15 seconds.
- This step is where lots of elbow grease is needed. Continue kneading the dough with the heel of your hand and your knuckles. The dough is initially not too cohesive and very oily, because of the addition of the softened butter. You should reach a point where the dough becomes slightly sticky.
- At this point, grab a small thumbsize portion of dough and gently pull the dough in opposite directions and check if a thin membrane can be formed. If such a ‘window’ can be formed without the dough tearing, it means that your dough has passed the windowpane test and is ready for proofing!
- Tuck in the ends of the dough and put in into a greased bowl (I just use the mixing bowl I used previously), cover with a tea towel and let it proof for about an hour, or until doubled in size. To check if it has proofed sufficiently, poke your finger into the dough and if the indentation doesn’t bounce back, it means that your dough has proofed sufficiently! If the ‘hole’ bounces back, let it proof for a couple minutes more and try poking again.
- Deflate the dough and divide it into 8 equal portions. Mine weighed about 55g on average. Shape them into rolls and tuck in the ends, placing the tucked in part on the bottom. You don’t need to flour your surface because the dough isn’t particularly sticky and this can be done without a work surface.
- Arrange the rolls in a round pan (I used my 9-inch cake pan) and leave some space (about 3cm) in between the rolls for them to proof for the second time. Cover the pan with a tea towel and allow them to rest for about 30 minutes, or until the rolls double in size and meet each other.
- Brush some egg wash (some of the egg left from above mixed with water) onto the tops of the rolls and bake them in a preheated oven at 170 degrees for 15-20 minutes.
- When the bread is golden brown (or a skewer comes out clean), remove from the oven and place the rolls on a wire rack to cool.
Janine’s jots:
- If you see the original recipe, I have decreased the amount of yeast because I was afraid of the buns having the yeasty taste which I don't really like.
- I've also reduced the amount of salt because salted butter was used here instead of unsalted butter.
- I also replaced some parts of the milk with yogurt because I feel that yogurt imparts a richer texture to bread.
- Now, if you are lazy, you should use your bread machine to do the work from you right from the start, or your mixer with a dough hook. The recipe below is for completely hand-kneaded because I needed to punch my stress out on some inanimate objects. For the bread machine version, simply place the ingredients in as required by your machine (usually yeast is left right on top), and simply click on the program which suits you. For your mixer, just use it to replace all the steps requiring manual labour - until step 7 where you take the dough out to knead for a minute or two before performing the window pane test.
- For some pictorial guidance on the entire process, please take a look at Carol's blog here which I found helpful.
- If you’re making a loaf, the suggested temperature is 180deg for 30 minutes. I forgot that I was making rolls and baked at 180deg, which resulted in the tops of the buns browning way too quickly. As result, the buns turned out a little drier than I would have liked. I’d suggest baking the rolls at 170 deg for about 15-20 minutes.
- If you are following the original recipe with 70ml milk, you might experience the dough being stickier, which will require you to flour your work surface so that you can knead without the dough sticking. If you flour your work surface, oil your hand so that the flour:fat proportion stays roughly the same.
- If you don't have wholemeal wheat flour, simply replace the entire amount in the recipe above with normal bread flour. You might find it that it takes a shorter time to knead because for wholemeal flour, the bran bits in the flour cuts the gluten strand, impeding the formation of gluten strands.
In pictures:
 |
| This is step 3, where you add B to A. Notice that the tangzhong has been thoroughly mixed into the wet ingredients before adding it in. |
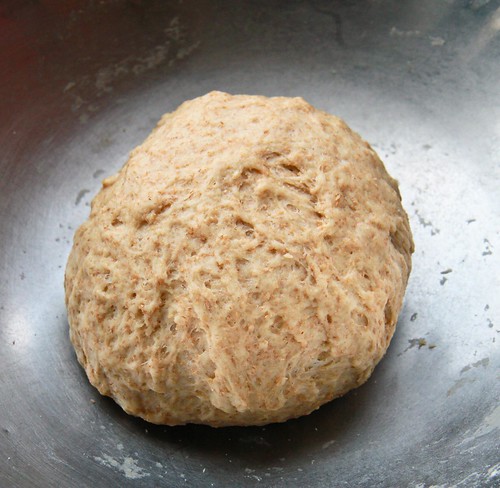 |
| This is after step 8, where I've already finished kneading and tucked the ends of the dough in to form a tight ball. It's ready for its first proofing! |
|
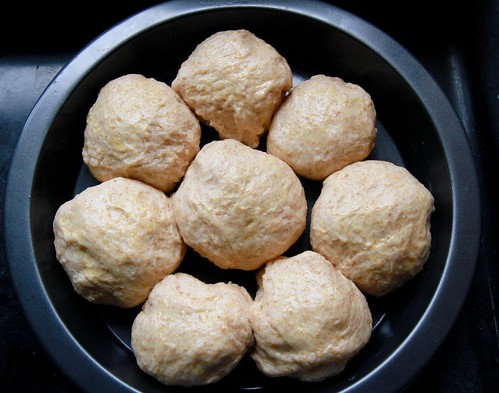
| These are the rolls after the second proofing. I've put the egg wash on and it's ready to go into the oven! Notice that the rolls have begun sticking to one another after the proofing, but that's okay because I want yummy pull-apart rolls! :] |
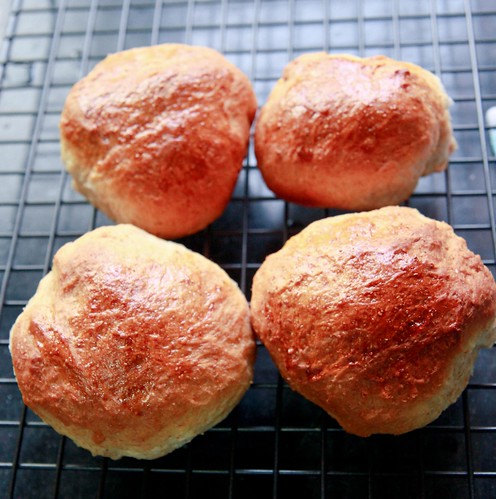 |
| The rolls look rather horrible in this photo, but trust me, it was delicious because the moment it came out of the oven, I took about this long before eating one and so did my family members. Which explains why there's only 4 left in this photo >.< Note that the rolls are a little overbaked (too brown in my opinion), so keep an eye on your rolls once it's 15 minutes! (especially if your oven runs a little hot, like mine) |
Sorry once again for the lack of detailed pictures because it's pretty hard to take photographs when you're kneading (especially since I've no tripod and I'm alone at home) and also sometimes my greed to taste my baked creations get the better of me and I forget that I should take some photographs for my blog. But since this blog is set up to indulge my personal food fantasies, I guess it's apt that I should devour them when they're the best tasting, and not after they're cold from excessive photo-taking =p

10 comments:
looks really yummy to me i love bread! of all kinds but i haven really gotten down to actually make a decent one haha!
Yeah, I too overbake my bread at times....must try this method one day...been too lazy to cook the water roux:P
Hello Janine! :)
I think I read up your (extremely) detailed post on water-roux previously, haha! Thanks for sharing :) I'll be trying the 16hours 'leng cang mian zhong' method to make breads tmr. Very excited! Btw do you know if all tu si (toast) dough can be used interchangeably with buns dough? Like can I make toast dough to make buns and vice versa?
Thank you^^
can I use toast dough to make buns *
@doreen: does the toast dough have more yeast in them? cos if they do, you can actually reduce them for making buns, otherwise I've used the recipes interchangeably and reduced the temperature as required!
the 16h (or is it 17h?) method is actually the same one as the no-knead method which was introduced by jim lahey! i find that it doesn't produce good buns, but if you like rustic loaves (like baguettes and such), they're pretty good :)
Oh, okay got it! Thanks :D
I heard of 17hours one too, its probably the same because the one I used was proofed at room temp. for 1 hour then 16hours in the fridge!
I see, I'd believe tht its used in no-knead doughs because I was super happy that much of the gluten was already developed in the ye zhong and after i mixed in the remaining ingredients, my "mega thin membrane" was formed the quickest it ever did compared to all other breads! (*phew)
But I have different opinions on buns produced with this method eh! My loaf turned out very well. I'm simply amazed at how short the kneading time was for this method dough as compared to others haha! :D
So you're studying in Uni now? :)
ohh okay looks like i need to do more testing soon heh. is the 16h method you're using making just the starter or the entire flour amount of the loaf? There's soooo many variations of each method that I become a bit fazed each time I read up :/
when i was on holiday last year, i did like breads almost every other day, testing different recipes and variations lol!
yup am in my final year of uni =S
Haha I totally know what you mean by prioritising the eating over the photo-taking!
Hey, Janine! Glad that you like the tangzhong method and like the whole-wheat bread recipe. =)
I have to be perfectly honest with you, I think I prefer your approach to writing a blog. Now, (food) blogs are mushrooming everywhere. I dunno why people start but I'm sure they have their own intentions, which differ one person to another. I much prefer spending my time reading and visiting those that do take writing seriously. You can tell by the efforts shown in his/her writing. Sometimes, comments can also show the person's sincerity and whether he/she does read a particular post before dropping comment. Just my two cents. I find you do take writing your own blog seriously rather than one or two lines and then recipe. Keep it up, K?
Nice to know you. =)
@Jing Wen: hehe glad to know that someone shares the same sentiments as me!
@Pei-Lin: thanks for stopping by and your comment made my day :)
Post a Comment