My blog has moved!

You should be automatically redirected in 6 seconds. If not, visit
http://www.unpastiche.com
and update your bookmarks.

Thursday, June 30, 2011

Steamed Bao (包子)

I returned home to Singapore yesterday, only to be greeted by heavy showers and thunder. I could see countless lightning bolts, although I couldn't hear the thunder, and see the heavy nimbus clouds as the plane flew through them as we were about to land. Just moments before, as the plane began its descent into Singapore, the sun was setting over Malaysia and Indonesia and it really was a sight to see. The clouds never looked so magnificent when they are basked in that golden glow which a setting sun can provide. 

When I arrived home, I was also greeted by a familiar sight (no smell since baos hardly emit any smell when steamed) - steamed baos waiting for my consumption :] I love baos - other than porridge, fried rice and Mee Hoon Kuay (面粉馃), they are my idea of a perfect homecoming present. I used to love to get these peanut baos from a coffeeshop near my place, but after hearing that no one consumes these baos and they are actually being repeatedly steamed on a daily basis for weeks (hence the oily bottoms and weird textures), I have not patronized them anymore. Instead, I bug my mother to make these baos for me. My mom makes a mean peanut steamed bun (花生包) and vegetable steamed bun (菜包). In fact, I now only eat baos that my mom makes, because I really don't like how mushy and weird tasting vegetable baos can get when purchased. I know many people swear by meat steamed buns (肉包) - 小肉包大肉包 but I don't really like meat buns because of the strong porky taste in those buns - I know right, I'm super picky. In any case, the only type of meat bun I like to eat is the honey-roasted pork bun (char siew bao or 叉烧包). This is the bun I will always order when having dimsum. However of late, I have been disappointed by the size, quality and price of these char siew baos. The filling has been decreasing in size, been increasingly replaced with more fats than meat, and the price of these baos have really skyrocketed! It was just a few months ago that I convinced my mom to attempt making char siew baos and to my delight, the results were phenomenal :] Needless to say, I hardly order bao when I'm out because these gems are really easy to make at home - you can make the filling on the first day and make the bao on the second if you don't have enough time - and it's really much quicker than making proper breads which require two periods of proofing and rising.


My mother got this recipe off the Blue Key bao flour box a long time ago, and has been making it for as long as I can remember. However, that tiny recipe booklet no longer accompanies the box (according to my mother), so here's the recipe for keepsakes [word for word from the booklet - see modifications below]: 

Ingredients:
Makes 14 moderately sized baos 

500 g   pau flour
6 g       yeast
100 g   sugar
50 g     oil/shortening
250 g   water

Method:
  1. Mix flour and instant yeast together and dissolve the sugar in water. 
  2. Mix all the ingredients in a mixing bowl, then knead the dough by hand for 10-15 minutes or by mixer until it becomes smooth and extensible. 
  3. Scale the dough at 40g each. Round it and leave it to rest for 10 minutes. 
  4. Flatten the dough and place your filling in the centre of the dough. Wrap the filling by folding the edge of the dough with desired design. Then place each dough on a small piece of square grease-proof paper.  
  5. Cover the dough with a piece of clean plastic sheet and allow it to rise for 35-40 minutes. 
  6. Place all the dough pieces in a steaming rack and steam for 15 minutes over the high heat.

Janine's jots: 
  • Modifications: I also add a pinch of salt to give the baos a little complexity to the taste. Also, be sure to use lukewarm water to dissolve the sugar, before adding the mixture into your flour and yeast. Once you get a rough dough, proceed to add in your oil. You can also use lard or shortening if you prefer. I use sunflower oil since it's available in my pantry all the time. 
  • Taste: This bao can actually be made into a mantou and be eaten on its own, because there is sufficient sugar to give it some taste. However, it tastes especially good when combined with a savory filling. 
  • Texture: The texture of the bao is perhaps not as smooth as those you can get from yum char places, but it's perfectly fine for consumption at home. Perhaps a little bit of wheat gluten and more shortening will result in that smoother bao you can get from shops. 
  • Serving size: This recipe makes enough for 14 similar shaped buns. 
  • Storage: These baos store in the fridge well for about 3 days and freeze perfectly. From the fridge, just steam them again for about 10-15 minutes. From the freezer, remove them to thaw before steaming them or you could just steam them for 30 minutes. 
  • Would I make this again?: Definitely. This is a family staple, and this is perhaps the only way in which I can consume my beloved peanut baos (it's so rare nowadays) and the only way in which I can have a vegetable bao with some chicken inside ;p 
  • Other comments: For the "grease-proof" paper that the recipe mentions, you can use baking paper or tracing paper, cut into little squares. 

In pictures: 

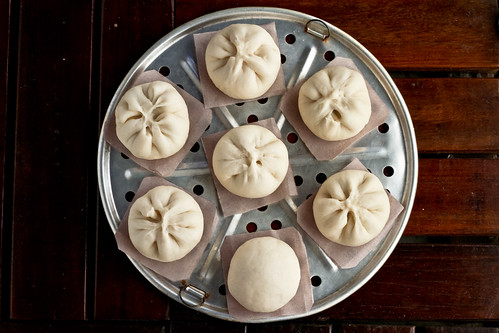
These baos are proofed (see how the pleats are not as prominent as before) and ready to be steamed :]
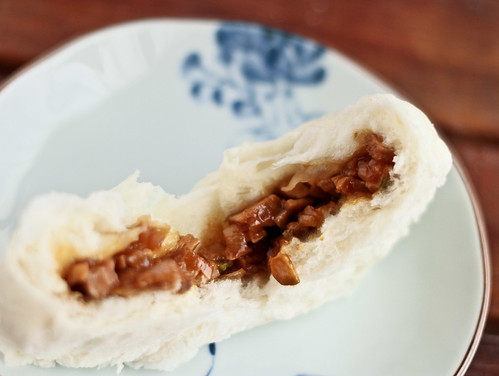
Look at this dreamy char siew filling! Unlike those in stores, this is all meat and little fats - no red coloring is used :]
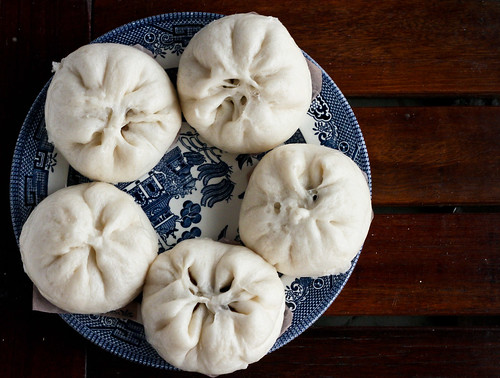
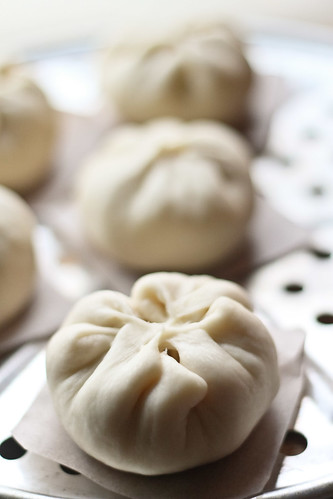
Steamed baos - look at how fat they have become - the pleats are almost giving way :/
Another close-up for good measure :]
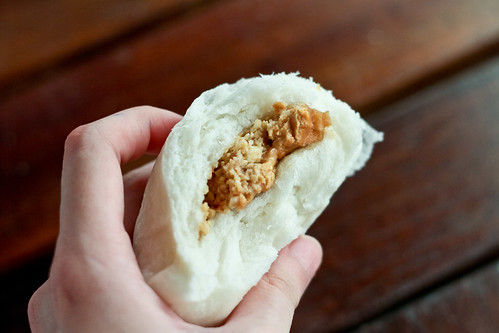
My absolute favorite - the peanut bao

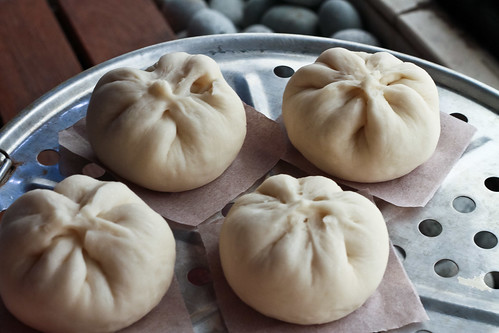
And last but not least, my mom's version of vegetable bao - with half a hardboiled egg and pieces of chicken :D

These photos are not taken yesterday, but are from my attempt a few months ago. I've been wanting to post them, but since the recipe is on the booklet, I haven't had a chance to steal them from my mom to type it out. I'll only be writing the recipe for the bao 'skin' today, because I'm still kinda tired from all that travelling that I have done, and I need to figure out the exact measurements to the fillings since my mom usually just 'agars' (estimates) when making the filling (and so do I).


This is my last minute submission to Jasmine's Aspiring Bakers #8: Bread Seduction as well as my 4th Muhibbah Malaysia Monday event hosted by Shaz of Test With Skewer and Suresh of 3 Hungry Tummies (sorry I didn't exactly post this on a Monday cos I wanted to be in time for the roundup!)


Sunday, June 26, 2011

Japanese Soft Rolls

Although I have been baking quite a bit in Sydney, experimenting with things I've never done before in my life, such as baking with zucchini and rhubarbs, as well as soy cream cheese, sour cream and ricotta, I have not been diligent in writing down the recipes and taking photographs :/ I have been really happy with much of the baking here, and have even (finally) tried making puff pastry, after avoiding it for so long for fear of failure. I have to admit though, it was mainly a success thanks to the low temperatures - the kitchen was probably about 18 degrees without the heater turned on, so the folding of the butter and flour layers was a breeze! 

The only thing bad about winter, in my opinion, is baking bread. I tried making bread once, and I didn't want to give it another go, because the bread here takes about 2-3 hours to rise! This is in comparison to the short 30-40 minutes it takes for my bread to rise in Singapore! Thinking about breads make me miss my bread rolls - for the past few months, I have been baking and modifying a single bread recipe, in a bid to perfect my bread roll recipe. I believe that after more than 10 attempts at the bread, I have come up with my perfect bread roll - which I have found to be really similar to the western recipes for "soft dinner rolls" and the Japanese pan. I have also attempted variations with this basic recipe, and have found them to be equally nice. 

Japanese Soft Rolls 

Ingredients:
300g    bread flour
30g      butter, unsalted
210ml  milk (weighed together with one yolk)
30g      castor sugar
4g        salt
5g        yeast 


Method:
  1. Let the butter soften to room temperature and allow the milk to stand to room temperature as well. 
  2. Using the recommended addition of ingredients of your bread machine, place the ingredients (flour, milk+yolk, sugar, salt and yeast) into your machine and allow it to start kneading. I recommend using the basic kneading program because you will eventually remove the dough to bake in the oven. (If hand kneading, mix flour, sugar, salt and yeast together, before adding in the milk and yolk. Knead for about 5 minutes, before adding the butter as below.)
  3. After a rough dough is formed, add in the butter in small cubes into the dough, allowing the butter to be kneaded into the dough. 
  4. Once the dough is tacky, allow it to rest for approximately one hour, or until it has risen to twice its size. Alternatively, just use the basic white bread program on your bread machine, which includes the rising time.
  5. Punch down the dough and remove it from the bread machine. Shape the dough into your desired shapes. You can also weigh the dough to make sure you get evenly sized rolls. Place the shaped rolls into a baking tray or pan and cover it with a tea towel, allowing it to rise again for another hour or until doubled. If you wish to get rolls to stick together, make sure that you allow about 1-2 finger's space between the rolls because they will expand during the second rise. 
  6. Meanwhile, preheat your oven to 170 degrees. Once the rolls have doubled in size, apply an egg wash or milk wash on the tops of the rolls to get a nice browning when baking. 
  7. Bake the rolls for about 20-30 minutes, depending on the shape of the rolls. Once the tops get your desired brown hue, remove from the oven. Allow it to cool in their pans for about 5-10 minutes, before removing it to cool on a cooling rack. Make sure to cool it on the rack, otherwise moisture will form on the bottom and result in a soggy bottom. Also refrain from eating the rolls too soon, because the insides are still hot and are still 'baking'.  

Janine's jots: 
  • Taste: The rolls are slightly on the less-sweet side, so you can choose to add a little more sugar if you wish - my advice is not to, because sugar will inhibit the yeast from working as well, and you will have to add more yeast to get the same fluffy texture. In 
  • Texture: The bread tastes the nicest when it is fresh out of the oven, and is able to retain the same texture up till 24 hours later (ie, the next day). On the subsequent days, the bread will harden and it will tend to crumble when bit into. To make your buns even softer and fluffier, do try to make small dinner rolls, and make sure they stick to one another after proofing so that you can the 'tear-apart' rolls. 
  • Serving size: This recipe is enough to make approximately 5 100g sausage rolls, or about 6 80g dinner rolls. For the pictures below, I made a combination of them both. 
  • Storage: Best consumed within 24 hours. Freezes well for about a week. 
  • Would I make this again?: Definitely! Do check out the variations I have recommended you can make with this basic recipe. 
  • Other comments: Although I believe in hand kneading bread, I highly recommend using a bread machine or a stand mixer for kneading this bread. This is because the dough is really wet and hard to handle, especially for new bread bakers and you might be tempted to add more flour than you should. 

The above is really the stripped-to-the-bones, basic recipe, but having used this recipe on a regular basis for the past few months (I baked every other day to provide my family with bread for breakfast), I have come up with variants, all of which I find equally delicious. I don't have pictures of these variants, but feel free to experiment! Below, I have also tried to explain the science behind the variations, which I hope will help you because I find that an understanding of the science behind the ingredients help when I'm doing modifications to recipes. 

Variations: 
  • Flour: For the 300g of flour, you can substitute up to 100g of all-purpose flour. I do not recommend using more than that amount, because the bread will not turn out as fluffy. This is because all-purpose or pastry flour has a lower gluten content, which means that the flour is unable to form as much gluten, and gluten is the key to introducing air and fluffiness to the bread. I have also tried substituting some of the bread flour with wholemeal flour (again, up to 100g, but preferably 70g) and it works fine as well. The wholemeal bread will not be as soft as white bread, but that is merely because wholemeal flour contains husks and particles which cut the gluten strands, reducing the amount of gluten and air that can be introduced into the bun. Alternatively, just increase the amount of yeast by 1g to ensure that there is more yeast to form more gluten. 
  • Butter: You can use salted butter, but be sure to reduce the salt to about 2g so that the bread doesn't turn out too salty. If you are far too lazy to wait for the butter to soften, you can also melt the butter in the microwave and use it in the dough. Alternatively, you can also use oil (sunflower or olive oil) - both work as well - the only drawback is that the bread will not have the buttery taste which is oh-so-nice :] Also, if you use olive oil, try to use extra virgin or your bun will have that strong olive smell which some might not like. Also, reduce the oil to 20ml, because oil tends to be 'oilier' than butter, if you get what I mean (no pun intended). 
  • Milk: The original japanese recipe calls for 210ml of milk+yolk, and I have stuck to this in my basic recipe because I find that this gives me a really fluffy and nice tasting bread. Naturally, you can also use just 210ml of milk, which tastes just as nice. You can also reduce the amount of milk to approximately 100ml and top up the rest with water - the end result just doesn't taste as rich and buttery. Other variants I recommend are using cream - you can substitute about 30g of the milk for cream and choose not to use the yolk. The yolk merely acts as a tenderizer for the bread. Yogurt and sour cream substitutes work as well, but do not substitute all the milk for it, because you need that amount of liquid in the recipe to ensure a wet dough and to achieve the fluffiness. 
  • Sugar: I have used both castor and granulated sugar - there is not much difference in the end product. As for brown or raw sugar, I do not recommend it in this recipe, because you might get some of the graininess when kneading the bread. I have also tried to reduce the sugar to 20g - the bread to me tastes fine, but according to my mother, the 30g-sugar bread tastes the closest to those in stores. I have also used honey instead of sugar, and the result is a even softer and fluffier bun, but with a slight honeyish taste to it. Do try it if you're aiming for a sweet roll!
  • Salt: I have used table and sea salt - you might have to reduce the amount for sea salt a little because it is extra salty. 
  • Yeast: You can use up to 7g of yeast, but avoid using more than that because the bread will have a yeasty smell. 4g of yeast is really the least you can use, but you will have to put in extra effort to knead because the gluten takes a longer time to form due to less yeast. You can use less yeast if you want to knead for a longer time, or if you are keeping the dough overnight to rise in the fridge. Otherwise do increase the amount of yeast if you are using lower gluten content flour or wholemeal flour. 
  • Other variations: You can also try the tangzhong method for this recipe, which I have tried countless of times. For times I am lazy, I just use the straight dough method. I know there are detractors from the tangzhong method, saying that it doesn't produce fluffier breads, but I sincerely believe that there is a slight difference, and scientifically there should be a difference. The bread instead of turning crumbly after just 24 hours, take slightly longer to stale and retain to the fluffier texture for a longer time. Of course, since we do not use bread improvers or dough softeners, there is no way for our homemade bread to retain to the soft fluffy texture for long. Trust me, I've tried. 
  • For the tangzhong, use 20g of flour and heat it with 100ml of milk or water. Follow the method illustrated here. You then mix the 280g flour together with the remaining 110ml of milk. Add the tangzhong into the dough after you have mixed the other ingredients together. You can add up to 50ml of extra liquid, but do not be tempted to add anymore because it will be really hard to handle. I find that the tangzhong method enables me to hand-knead with greater ease, because some of the liquid is already 'cooked' into the tangzhong. 
  • You can also try the overnight rise (also known as the 17h method or 中种法) - the end result is delicious too! I have also tried the overnight rise together with the tangzhong method, and the result is a really soft and fluffy method, but the effort isn't really worth it, in my opinion. 


Lovely brown tops!

Oooh look at the bottoms - well baked too :]
I just love this moment when you pull the rolls apart and see the 'strands' connecting them together :]
Look at how soft the bread is! Boing-boing!

I hope that someone will be encouraged to try this basic recipe out, as well as the variations I have recommended, because this really is the result of many attempts at perfecting this bread recipe. I will be submitting this for Jasmine's Aspiring Bakers #8: Bread Seduction - bread is really my favorite thing to bake, but I haven't been able to bake as much bread as I'd like here in Sydney since winter's a real pain in the ass for baking bread! Anyway, do try this recipe and let me know what you think! :]

Friday, June 24, 2011

A to Z of Australia: A is for Adriano Zumbo

As promised, I shall start with my Australia oriented travelogue, going down the alphabet as I recount my foodscapades and experiences :] 

To start, I have Adriano Zumbo. I'm not sure how many Singaporeans or Malaysians know about him, but he's the cute young bald chef who appears sporadically in Australia's Masterchef, and his appearance never fails to bring trepidation in the hearts of those Masterchef hopefuls, because they know they're going to have to recreate a really hard dessert made by Zumbo. Some of my favorite desserts by Zumbo include the V8 Vanilla, which I hope to recreate soon, and his macarons :]

Pictures linked to their original sites.
The V8 Vanilla cake. 

Also, 6 November, when he celebrates his birthday, is also known as Macaron Day in Sydney. He goes crazy by producing more than 60 flavors of macarons, usually wacky and unheard of macaron combinations. Check out this post from Simon to get an idea of the 66 flavors for 2010 and this one by Helen for the 60 flavors for 2009. Check out the pictures for an idea of how crazy things get on that day. I'm pretty sure the queue outside his bakery stretches on for miles! How I wish I could be here this year!

Anyway, one of my most vivid memories of my last trip to Sydney was having a macaron and a chocolate cake from Adriano Zumbo. I made a trip down to the Balmain outlet, queued for some time, before deciding on this huge macaron - the Houdini (macaron with fresh strawberry, raspberry and basil curd) and this multi-layered chocolate cake. I can’t remember the names of these desserts now, but I still remember the amazement I had when I tried them. I still remember the praline and feuilletine layer in that marvelously executed chocolate entremet. He also conducts these macaron master classes once in a while, but alas I couldn't get myself enrolled into one during my stay here. 

Naturally, Adriano Zumbo was one of my first stops (actually not really since it was a week after I arrived in Sydney that I got here) and surprisingly, I was rather underwhelmed by the selection he had in store. Maybe it’s because I’ve tasted so many macarons and sweets in Melbourne (will write about those soon), but I felt that Zumbo looked a little rundown after the chic patisseries I went to. His macarons were not of the same size – see the different between my salted caramel and strawberry one, and the filling across the macarons were not equal! That is unacceptable to me – slight differences are okay but I had to choose the macaron with the most filling because the guy was going to pick one which looked under-sandwiched :/ 

Nevertheless, he is still one of the more inventive patissiers that I believe Sydney has seen! Just check out his website for an idea of how creative he is! Every season, he comes up with an array of new cakes and macaron flavors, and obviously, this season's inspiration must be Asian, or more specifically Malaysia, as he has these palm sugar and pandan entremets, as well as satay flavored macaron! I wasn't that daring to try the satay macaron, and stuck with plain old salted caramel and strawberry, as well as toasted white chocolate for a later trip.


The exterior of his lesser known Rozelle outlet. There's seating inside!
Inside his lab...
An open kitchen where you can see the patissier filling up the macaron shells. 

Flavors of the day - 6 flavors, including very Malaysian ones like pandan, palm sugar and satay(!)

Beautiful skirting on the shells, but see the size difference? =[
Eeks definite NO-NO! 
It was strawberries and cream, and it did taste pretty good though!
An almost finished almond croissant - the actual thing is three times the size! 
An innard shot of the almond cream. 

I was not too impressed with the almond croissant - the croissant was pretty good - the outside was crusty, but the layers did not have that buttery flavor I was seeking, and the almond cream inside reeked too much of almond essence and not of the almond flavor from real almonds. The icing on top of the croissant was also overly sweet, detracting from the wonderfully done pastry. It really was a pity actually! 

As for the macarons, I was pretty happy with the flavors of both macarons - the strawberries & cream macaron didn't have much of a strawberry flavour, but in the cream, you could see tiny specks of vanilla seeds, which was awesome - the cream was very wonderfully balanced. As for the salted caramel, in a taste test with Baroque's salted caramel macaron - Zumbo's won in terms of taste - the caramel has just the right balance of sweet and salty. Only fault was the texture of the macaron - I personally like macarons that have a crisp exterior, giving way to a chewy interior when bit into, but Zumbo's macarons were merely chewy and soft. I'm not sure if this is the result of the macaron being placed in the fridge for way too long, but I tried his macarons on 2 other occasions and they had the same texture, so I guess to each his own!

Details
Adriano Zumbo 
Balmain - 296 Darling Street
Rozelle - 114 Terry Street 
Also located in Manly (which I have yet to visit)

Price: $ ($2.30 for a macaron, $9 for an entremet, <$10 for assorted breads and pastries)

PS: My advice is to head to the outlet in Rozelle, because that is where his 'lab' is, and it is the less popular location (no queues!). The Balmain outlet is the original outlet, and when I visited on Saturday and Sunday, the queue snaking out of the shop was crazy! 

Tuesday, June 21, 2011

Travel Tuesdays #8 - Eveleigh Market, Sydney

I know it's a cliché, but time really flies when you're on holiday! I can't believe that it's been close to a month (3 weeks to be exact) since I set foot in Australia, and in a while's time, it'll be time to go home. Already I'm dreading the end, because I'll be going home to reality and I'll have to leave him here. On a happier note, this is what I hope to be the start of a food-based travelogue that I'll be writing about Australia, featuring good eats and sights in and around Australia, but mainly centred around Sydney and Melbourne, and perhaps the Gold Coast if I do any sightseeing there. 

One of the first things that I knew I wanted to do was to visit a farmers' market in Sydney. I had visited many a farmers' market in Europe while I was staying in Belgium, and I absolutely loved the atmosphere. What I regretted was not purchasing more local produce from the stallholders and experimenting with foods. (Back then, I wasn't as creative or culinarily sound as I am now) Naturally, this trip I'm rectifying these regrets. So far, I've bought zucchinis and chokos (or chayotes) and pumpkins - ingredients that I've NEVER touched or eaten in my entire life. Well, maybe pumpkins, but only in cooked form. Yes I know, I've a sheltered life. But I'm trying to expand my horizons now :] I do have other more exotic fruits and vegetables in mind, and I'll definitely be writing about those when I finally set my hands on them and cook/bake them! PS I've tried the rhubarb and berry combination and trust me, it's heavenly!

I went to Eveleigh Market on the first Saturday I was in Sydney, and it was awesome - I bought chilies, Asian greens, beurre bosc pears, a carrot cake and tried chocolates, fudges and other gourmet produce! We drove there, and there's public parking all around the area, though you might have to find yourself walking a bit to get to the market because of the limited lots. You can take the train or the bus there too, it's located pretty close to the train station and bus stop respectively. The market is really cool - it's located in this refurbished old railway station, called Carriageworks; and on certain Saturdays, they have local music acts performing there. See the interior here ----->

Eveleigh Market is a permanent fixture, as it is held every Saturday from 8am to 1pm. It's a farmers' market - this means that it is a market for local farmers and other artisan food producers (think artisan breads, wine the like) to sell their fresh produce to the local community. Of course, you can't have a market without edible food, so naturally things like coffee, muesli, cakes and chocolate are being sold too! On the first Sunday of the month, there's the Artisan Market, which I wasn't able to attend, but you can check out the website here to find out more. 

And here are more pictures from the market - I was relatively trigger happy!

Mmmm look at all those beautiful looking greens!

Oh look here's Kylie Kwong cooking in Eveleigh!


Did you know that carrots were originally purple in color? I just love how all the veggies still have their roots and most of them still have dirt around them. Gives me the feeling that these farmers just harvested these produce in the morning to bring them here for me :]

I finally got my hands on the famed luscious brown pear. It really was perfect poached and in tarts. 

What I love best about these markets - the smell of freshly baked bread. They even have gluten free breads available!

Look! They even have gourmet treats for your best friend!

Organic lemonade that would have been utterly refreshing on a hot summer's day, but I gave it a pass, because it was winter and it was cold. Brrrrr.

How about some organic and personally crafted toasted muesli? Sounds delish?

And to end a wonderful morning at Eveleigh, a luscious cream cheese carrot cupcake, topped with white chocolate curls. Perfectly spicy, and perfect with that cup of organic, single origin coffee on a cold windy winter morning. Cheers, mate!

Saturday, June 11, 2011

[$20 Budget Meal] Mee Hoon Kuay (面粉馃)

Also known as Ban Mian (板面),  Mee Hoon Kuay (or Kueh) (面粉馃) can also be called handmade or hand-pulled noodles. Actually, there is a difference between ban mian and mee hoon kuay - ban mian is the Chinese version of fettucini (in my opinion) - ie, it is made with long and evenly cut strips of dough whereas mee hoon kuay has dough which is torn by hand, and is characterized by uneven shapes. Sadly though, in food courts and many stalls in Singapore, mee hoon kuay is actually machine-cut into squares. I prefer my mee hoon kuay hand torn, because I love the different textures (thick and thin) as well as the different sizes that comes with the manual 'pulling'. I also think that such dough tends to be more "QQ" (this means more elastic in Chinese lingo). 

As I have alluded to previously, I'm currently overseas in Australia for a long holiday, and it being winter here, makes me crave warm and soupy things. Mee hoon kuay was one of the first dishes that popped into my head - the other two being bak kut teh (肉骨茶) and tom yum goong. Having tried mee hoon kuay out from scratch, I'm definitely KIVing the other two :] 

Anyway, not to blow my mother's horn, but my mom is a really good cook, and one of the things that she makes which I absolutely love and will have over anything else outside, is her mee hoon kuay. I usually help here in the tearing of the dough and the general cooking of it, but I have never actually helped her in preparing the dough. So when I called her to ask for the recipe, she told me that there wasn't any recipe and basically just add enough water and some oil to make the flour elastic. And add an egg also. Like huh?! I've heard this often enough, when I was overseas and called my mom almost every other day to ask how to cook X or Y and she gave the most vague instructions! But I'd like to think that because of this, I've actually learnt how to cook by taste and smell, which is perhaps one of the most valuable lessons that any cook can learn :] So anyhow, since I really had no idea of how much water and flour, I decided to go hunting online for some measurements because for a novice, measurements are important! I found myself on Lydia's and Tintin's blogs, where they had prepared their own version of mee hoon kuay. My recipe below is an amalgamation of their recipes and what I'm used to - minced meat and mushroom precooked together, to be added into the soup later, fried anchovies on the side, lots of chili and fried shallots. 

Believe it or not, this was taken with the iPhone. Hate that the sides are a little cut off and the perspective's a little off :/ I was in a hurry to eat it ;p


Mee Hoon Kueh (面粉馃) 
Serves 2 for a meal

For the noodles: 
1 cup all purpose flour
1 egg
Pinch of salt
½ tbl oil (I used sunflower oil)
2 tbl water

For the soup base: 
1.5 litre water
150g anchovies 
Some shallot oil
Salt and pepper, to taste

For the dipping sauce: 
2 bird eye chilies, chopped
1 clove garlic, minced
1 tbl soy sauce

Additional ingredients: 
6 stalks of Choy Sum (or any Asian greens, washed and chopped)
4 fishballs 
2 eggs 
Minced meat and mushroom (about 150g of minced meat and 50-100g of shitake mushrooms)


Additional garnishing: 

Ikan bilis (or anchovies, about 50g) 
Some stalks of spring onion (also known as shallots)
Some fried shallots (small onions)

Method: 
  1. Measure out a cup of flour into a large mixing bowl. Add in a pinch of salt. Make a hole in the centre of the flour, and crack the egg into it. Pour in also the oil and water. Combine the mixture until a rough dough comes together. Start kneading the dough for about 20 minutes (if doing by hand), until you achieve a smooth elastic dough. Cover the dough and let it rest for at least an hour before pulling into pieces. 
  2. After washing the ikan bilis, boil 150g in 1.5 litres of water. Bring to a boil before letting it to simmer for at least half an hour. Season the stock to taste with salt and pepper. 
  3. For the remaining ikan bilis, pat dry after washing and place into a microwave-safe bowl. Place it into the microwave for about 3 minutes on high. The ikan bilis should turn crispy, just like deep fried ones. (Note: there is no need to add oil!)
  4. For the dipping sauce, combine the chilies and garlic in the soy sauce and place in a sauce plate. 
  5. For the minced meat and mushrooms, soak the dried mushrooms in warm water for at least an hour to soften. Slice mushrooms lengthwise into 1-cm wide strips. In a pan (or wok), saute some minced garlic until slightly brown before adding the minced meat. Fry until meat turns light brown and add in the mushroom slices. Cook until softened, before adding light and dark soy sauce. To thicken the sauce, add in some cornstarch dissolved in some water. 
  6. For the noodle dough, using a rolling pin, roll the dough into approximately 3mm thick. To make it more manageable, divide the dough into smaller sizes (about A4 size). Make sure that the stock is boiling before beginning to tear the dough into smaller bite-size pieces. Immediately throw these pieces into the boiling stock. 
  7. Once you have torn all the dough, add in the fishballs and vegetables of choice. Depending on how you like your egg (runny yolk or fully cooked), crack in the egg after the vegetables have been cooked. 
  8. To serve, ladle the cooked dough, fishballs, egg and vegetables and stock into a soup bowl. To garnish, add a few spoonfuls of the minced meat and mushroom, microwaved ikan bilis, some fried shallots and spring onions. Dip into dipping sauce and enjoy :]

Janine's jots: 
  • Notes: If you're doing the tearing of the dough yourself, make sure you work quickly, so that the first few pieces of dough don't cook too long and turn out mushy. What works for me is to make sure that the initial batch of dough is slightly thicker than the later batches to ensure that they take longer to cook. Alternatively, you can tear the dough first and place them on a plate (make sure they are placed apart, otherwise they will stick). 
  • Taste: Fantastic. There really isn't much I'd change in this recipe, except perhaps use more ikan bilis in the stock. 
  • Texture: The mee hoon kuay is sufficiently Q and elastic, and is heavenly, when eaten with the crisp ikan bilis, soft springy fishball accompanied with the sharpness of the chili. 
  • Serving size: I found it pretty manageable to cook the 2-person portion in a large pan. The amounts above are more than sufficient to cook a meal for 2 for dinner. 
  • Modifications: None. I love it! Btw, for ban mian, all you have to do is use a knife to cut the dough into long strips instead of tearing the dough. It's that simple. There's no need to flour the dough if you are going to cook it immediately in the stock. 
  • Storage: The cooked mee hoon kuay does not keep well in the fridge at all. You must consume it within an hour of cooking otherwise it'll become soft and mushy. 
  • Would I make this again?: Definitely!!! 


A little close up of the mee hoon kuay :D
These are the only photos I have now, because unluckily, I dropped my camera on the floor yesterday and the lens broke into two. Yes, it broke. One end got shattered so badly and the other end got stuck to the body. Thankfully, I managed to get it unstuck, and the camera body was unharmed. The sad thing is that I've now lost a lens and only have my wide angle lens left :( I was really upset for the whole day because I really liked those lens and I was planning for all these fine-dining places in Sydney and the UWA is really slow and has a large minimum aperture, which makes it a bad choice especially in all those restaurants. Boo :'( I foresee many photos being taken with my trusty iPhone for the next few posts as well. 

On a happier note, this post will also be killing two birds with one stone because it's my third entry for the Muhibbah Malaysia Monday event hosted by Shaz of Test With Skewer and Suresh of 3 Hungry Tummies. AND, after much much procrastination, I am finally participating in the $20 Budget Meal event that has been hosted by Ellena for the past few months. This month's theme is Noodle, and it has to be a one-pot dish cooked for at least 2 people. Since I'm in Australia now, I'll be using Australian dollar for the calculations below. 

Total cost for this dish is about A$7.06, breakdown as follows: 
- Flour: $0.20
- Ikan Bilis: $1.50
- Minced Meat: $2 (I used minced pork)
- Dried Mushrooms: $1
- Choy Sum: $1
- 3 eggs: $0.36
- Spring onion: $0.30
- Fishballs: $0.70

This makes for a truly cheap and budget meal because eating out in Sydney (where I'm at now), is not cheap at all. The cheapest available meals tend to be Asian food, and even that will cost you at least $8 for lunch and $10 for dinner, per person. If you want to dine in proper restaurants, expect to set yourself back by at least $20 for just the main course. With less than A$8, I have managed to cook an extremely satisfying meal for 2, with homemade and healthy ingredients (ie, homemade stock and no MSG!). Therefore, for those currently living overseas now (and if you happen to be craving mee hoon kuay), please don't hesitate to head down to your Asian supermarket to buy the ingredients. The only ingredient that might be slightly harder to find is ikan bilis. Make sure to call it anchovies or jiang yu zai (江鱼仔) to make sure that the shopkeeper understands what you want. And one final note, making the dough is also not as hard as it seems ;] Do try this out!

Tuesday, June 7, 2011

Travel Tuesdays #7 - Paris of the East: Phnom Penh, Cambodia

It’s Tuesday again (time really flies), and today is exactly 2 weeks since I’ve left Phnom Penh (pronounced as per-nom pen in Khmer) and slightly more than a week since I set foot down under. Today I’ll be covering just 2 places of note in Phnom Penh – the Tuol Sleng Genocide Museum, otherwise known as the S-21 Prison, and the Choeung Ek Killing fields – both of which are sad reminders of the Khmer Rouge regime in Cambodia. It is more than possible to visit both these places within half a day, since the tour of the prison takes about 2-3 hours, followed by a 40 minute bus ride to the Killing fields, and another 2 hour tour there. Also, don’t be stingy and skimp on having a tour guide – having a tour guide really helps, and their fees are really low in Phnom Penh – it’s about US$25 for an entire day of guiding you around! I’d definitely recommend visiting Cheung Ek after you have visited the Genocide Museum, to get better insights into the Khmer Rouge regime. 

Ever wondered why the name Khmer Rouge? Well, Rouge is basically red in French, and the ruling party during the Khmer Rouge regime was the Communist Party of Kampuchea, and as we know, the color red is usually associated with communist regimes – think Mao and his red flag. 


So we visited Tuol Sleng early in the morning. This was the infamous S-21 prison during the Khmer Rouge, and it was formerly a school. Thousands of people were tortured here, before being shipped off in the truckloads to Choeung Ek to be killed. Only 8 prisoners made it out alive from this prison, and their testimonies are written on some of the exhibition panels. I guess what's most shocking is how small this prison was, and yet it contained at least 1,500 people at any one time during the Khmer Rouge Regime.  

You probably can't see this clearly but the board is "The Security of Regulation" - 10 rules that all prisoners had to abide by or else. The wooden frame right in front of the school building is no pull-up bar, it was used to dunk prisoners who were hung upside down into those pots which were filled with waste liquid until an admission was extracted. This otherwise looks like a normal school compound, doesn't it?   
This is what used to be a classroom, now converted into makeshift cells for prisoners before they were tortured in the other rooms. Each cubicle is merely enough for sitting down, and barely enough for stretching out your legs. A seemingly 
A seemingly empty classroom, but the bed frame and the box on it contains torture devices used to torment the prisoners. 
 
Also shocking are the atrocities that Khmer Rouge managed to commit during their four-year reign of terror. The exact number of people who died unclear, but from rough estimates and from what the tour guide told us, pre-1979, Cambodia had about 5 million people in total; post- 1979, 3 million people were left, so do your math. 

For those interested, Comrade Duch - best known for running this S-21 prison, was convicted by the Cambodian Special Court to 35 years' imprisonment for crimes against humanity, murder and torture he committed during 1975-9. Many Cambodians don't think it fair that he be imprisoned for so short a time, but Cambodia no longer has the death penalty (unlike Singapore). Also, many Cambodians appear to want to leave the four years as it is, a horrific reminder of what a fellow Cambodian can do to his people, and many want to let it be water under the bridge. Well.

After a few grim hours walking in Tuol Sleng (the tour guide will guide you through the different classrooms and buildings - there are 3 in total, each with different 'functions'), we took a bus to Choeung Ek. You can also take a tuk-tuk there if there's just a few of you. 

When you head to Choeung Ek, the first thing you see is this tall towering Buddhist stupa standing tall and alone. On its side t is another traditional building - this houses the museum which screens a documentary at regular intervals, explaining more about the Khmer Rouge regime and its atrocities. The stupa is 62 meter tall, 17 storeys high. According to my tour guide, it has over 8000 human skulls, and many other body parts, and each storey contains different body parts uncovered at each site. The bottom few storeys contain clothing garments and other objects found together with the corpses - all of which were chemically treated in 1988 when the stupa was built, to preserve them. 

This stupa was built in 1988, as a memorial, to remind the later generations of Cambodians, as well as visitors from around the world, of the terror that these victims went through. The building of the stupa is also significant, because Cambodians are a deeply religious lot, and many were troubled that these victims were not given a proper Buddhist send-off into the other world. This stupa allow for the Buddhist funeral rites to be performed to allow the spirits to peacefully transit into the afterlife. Furthermore, stupas are sacred structures in Buddhism - they are meant to contain remains of greatly revered individuals. You can't see from the photo, but the sides of the stupa are glass-walled, so that you may look into the stupa and see the dozens and hundreds of human skulls looking eyelessly out at you. 


Dozens and dozens of human skulls - some with fractures from being killed by a fatal blow, some with holes from being killed by a pickaxe, and more. 

It is at Choeung Ek that the tortured prisoners from the S-21 prison was brought. There have been tons of mass graves found, and many more yet to be uncovered (approximately 50 more). Prisoners were forced to kneel at the edge of a pre-dug pit, with their eyes blindfolded and their hands tied behind their backs. Then, they were killed, with the method favored by the soldier(s) at the pit. Simple implements were used to kill, because the soldiers did not want to waste bullets. For example, the branch of the palm tree, with its razor sharp edges, was used to slice a prisoner's neck from ear to ear. Another method for disposing of children was a tree trunk found in the area (as seen below). These children would be lifted by their arms or legs, and the soldiers would continually bash their skulls against the tree trunk, until they died. Talk about improvising with what they had huh? 


A loudspeaker would be hung from the branches of this tree, and because of its size and position in the killing field, it would magnify the music in the loudspeaker and mask the sounds the victims made as they were being executed. This was to prevent the other blindfolded prisoners from realizing that they were in fact, pigs heading to the slaughterhouse, and thus panicking. 

While walking around Choeung Ek, I felt that more could be done to preserve the items - for instance, scraps of clothing found post-1988 are merely placed in glass tanks around the pits. They are not placed in the stupa because those items are chemically treated. This means that in a few more decades, these scraps of clothing would most likely turn into dust. Admittedly, Choeung Ek as a memorial, is less well-done than places like the concentration camps in Germany, some of which I've been to, but it does not make it any less grim. What I brought home from the trip was that Cambodia does need funds urgently - the reason why items or skulls found post-1988 are not chemically treated to preserve them is because funds are not sufficient for these activities. 

A last look at the stupa in Choeung Ek

It is only after you visit Toul Sleng and Choeung Ek that you realize why Cambodia is at the stage it is now, why it continues to be so undeveloped when its neighbours Thailand and Vietnam are racing ahead. The Khmer Rouge regime really did devastate it. In fact, an interesting observation was that in my 3 weeks in Cambodia, I only saw 3 really old people - people whom I’d tag as about 70 years and above, people who were wrinkled and hunchbacked. Everyone else is young, probably around 50 years old or less. This was because so many people, especially scholars and other skilled people, were killed during those 4 years. Cambodia really did start from Ground Zero starting 1979. All its scholars and professionals were killed. One can't help but feel the pain that Cambodians feel when visiting these sites. 

On a lighter note, there are other places of interest in Phnom Penh, such as the Royal Palace and the Wat Phnom, both of which deserve a visit too, but I’ll leave that for another post. Also, unknown to many, Phnom Penh actually has really good shopping – I managed to get things like scarves for about US$2-3, and shirts for less than US$5 each! And they are of pretty good quality, mind you! For those contemplating a trip somewhere in Southeast Asia, please don’t write off Cambodia - I believe it is still an undiscovered pearl, and as a nation, it so very needs our help, in terms of our tourist dollar and our donations, if you are so inclined. Do put Phnom Penh (and Siem Reap) in your to-go-to places today!

PS: It really is worth the 6-hour bus ride to head down to Siem Reap just to see Angkor Wat. 
Related Posts Plugin for WordPress, Blogger...