
Although I have been baking quite a bit in Sydney, experimenting with things I've never done before in my life, such as baking with zucchini and rhubarbs, as well as soy cream cheese, sour cream and ricotta, I have not been diligent in writing down the recipes and taking photographs :/ I have been really happy with much of the baking here, and have even (finally) tried making puff pastry, after avoiding it for so long for fear of failure. I have to admit though, it was mainly a success thanks to the low temperatures - the kitchen was probably about 18 degrees without the heater turned on, so the folding of the butter and flour layers was a breeze!
The only thing bad about winter, in my opinion, is baking bread. I tried making bread once, and I didn't want to give it another go, because the bread here takes about 2-3 hours to rise! This is in comparison to the short 30-40 minutes it takes for my bread to rise in Singapore! Thinking about breads make me miss my bread rolls - for the past few months, I have been baking and modifying a single bread recipe, in a bid to perfect my bread roll recipe. I believe that after more than 10 attempts at the bread, I have come up with my perfect bread roll - which I have found to be really similar to the western recipes for "soft dinner rolls" and the Japanese pan. I have also attempted variations with this basic recipe, and have found them to be equally nice.
Japanese Soft Rolls

Ingredients:
300g bread flour
30g butter, unsalted
210ml milk (weighed together with one yolk)
30g castor sugar
4g salt
5g yeast
Method:
- Let the butter soften to room temperature and allow the milk to stand to room temperature as well.
- Using the recommended addition of ingredients of your bread machine, place the ingredients (flour, milk+yolk, sugar, salt and yeast) into your machine and allow it to start kneading. I recommend using the basic kneading program because you will eventually remove the dough to bake in the oven. (If hand kneading, mix flour, sugar, salt and yeast together, before adding in the milk and yolk. Knead for about 5 minutes, before adding the butter as below.)
- After a rough dough is formed, add in the butter in small cubes into the dough, allowing the butter to be kneaded into the dough.
- Once the dough is tacky, allow it to rest for approximately one hour, or until it has risen to twice its size. Alternatively, just use the basic white bread program on your bread machine, which includes the rising time.
- Punch down the dough and remove it from the bread machine. Shape the dough into your desired shapes. You can also weigh the dough to make sure you get evenly sized rolls. Place the shaped rolls into a baking tray or pan and cover it with a tea towel, allowing it to rise again for another hour or until doubled. If you wish to get rolls to stick together, make sure that you allow about 1-2 finger's space between the rolls because they will expand during the second rise.
- Meanwhile, preheat your oven to 170 degrees. Once the rolls have doubled in size, apply an egg wash or milk wash on the tops of the rolls to get a nice browning when baking.
- Bake the rolls for about 20-30 minutes, depending on the shape of the rolls. Once the tops get your desired brown hue, remove from the oven. Allow it to cool in their pans for about 5-10 minutes, before removing it to cool on a cooling rack. Make sure to cool it on the rack, otherwise moisture will form on the bottom and result in a soggy bottom. Also refrain from eating the rolls too soon, because the insides are still hot and are still 'baking'.
Janine's jots:

- Taste: The rolls are slightly on the less-sweet side, so you can choose to add a little more sugar if you wish - my advice is not to, because sugar will inhibit the yeast from working as well, and you will have to add more yeast to get the same fluffy texture. In
- Texture: The bread tastes the nicest when it is fresh out of the oven, and is able to retain the same texture up till 24 hours later (ie, the next day). On the subsequent days, the bread will harden and it will tend to crumble when bit into. To make your buns even softer and fluffier, do try to make small dinner rolls, and make sure they stick to one another after proofing so that you can the 'tear-apart' rolls.
- Serving size: This recipe is enough to make approximately 5 100g sausage rolls, or about 6 80g dinner rolls. For the pictures below, I made a combination of them both.
- Storage: Best consumed within 24 hours. Freezes well for about a week.
- Would I make this again?: Definitely! Do check out the variations I have recommended you can make with this basic recipe.
- Other comments: Although I believe in hand kneading bread, I highly recommend using a bread machine or a stand mixer for kneading this bread. This is because the dough is really wet and hard to handle, especially for new bread bakers and you might be tempted to add more flour than you should.
The above is really the stripped-to-the-bones, basic recipe, but having used this recipe on a regular basis for the past few months (I baked every other day to provide my family with bread for breakfast), I have come up with variants, all of which I find equally delicious. I don't have pictures of these variants, but feel free to experiment! Below, I have also tried to explain the science behind the variations, which I hope will help you because I find that an understanding of the science behind the ingredients help when I'm doing modifications to recipes.
Variations:
- Flour: For the 300g of flour, you can substitute up to 100g of all-purpose flour. I do not recommend using more than that amount, because the bread will not turn out as fluffy. This is because all-purpose or pastry flour has a lower gluten content, which means that the flour is unable to form as much gluten, and gluten is the key to introducing air and fluffiness to the bread. I have also tried substituting some of the bread flour with wholemeal flour (again, up to 100g, but preferably 70g) and it works fine as well. The wholemeal bread will not be as soft as white bread, but that is merely because wholemeal flour contains husks and particles which cut the gluten strands, reducing the amount of gluten and air that can be introduced into the bun. Alternatively, just increase the amount of yeast by 1g to ensure that there is more yeast to form more gluten.
- Butter: You can use salted butter, but be sure to reduce the salt to about 2g so that the bread doesn't turn out too salty. If you are far too lazy to wait for the butter to soften, you can also melt the butter in the microwave and use it in the dough. Alternatively, you can also use oil (sunflower or olive oil) - both work as well - the only drawback is that the bread will not have the buttery taste which is oh-so-nice :] Also, if you use olive oil, try to use extra virgin or your bun will have that strong olive smell which some might not like. Also, reduce the oil to 20ml, because oil tends to be 'oilier' than butter, if you get what I mean (no pun intended).
- Milk: The original japanese recipe calls for 210ml of milk+yolk, and I have stuck to this in my basic recipe because I find that this gives me a really fluffy and nice tasting bread. Naturally, you can also use just 210ml of milk, which tastes just as nice. You can also reduce the amount of milk to approximately 100ml and top up the rest with water - the end result just doesn't taste as rich and buttery. Other variants I recommend are using cream - you can substitute about 30g of the milk for cream and choose not to use the yolk. The yolk merely acts as a tenderizer for the bread. Yogurt and sour cream substitutes work as well, but do not substitute all the milk for it, because you need that amount of liquid in the recipe to ensure a wet dough and to achieve the fluffiness.
- Sugar: I have used both castor and granulated sugar - there is not much difference in the end product. As for brown or raw sugar, I do not recommend it in this recipe, because you might get some of the graininess when kneading the bread. I have also tried to reduce the sugar to 20g - the bread to me tastes fine, but according to my mother, the 30g-sugar bread tastes the closest to those in stores. I have also used honey instead of sugar, and the result is a even softer and fluffier bun, but with a slight honeyish taste to it. Do try it if you're aiming for a sweet roll!
- Salt: I have used table and sea salt - you might have to reduce the amount for sea salt a little because it is extra salty.
- Yeast: You can use up to 7g of yeast, but avoid using more than that because the bread will have a yeasty smell. 4g of yeast is really the least you can use, but you will have to put in extra effort to knead because the gluten takes a longer time to form due to less yeast. You can use less yeast if you want to knead for a longer time, or if you are keeping the dough overnight to rise in the fridge. Otherwise do increase the amount of yeast if you are using lower gluten content flour or wholemeal flour.
- Other variations: You can also try the tangzhong method for this recipe, which I have tried countless of times. For times I am lazy, I just use the straight dough method. I know there are detractors from the tangzhong method, saying that it doesn't produce fluffier breads, but I sincerely believe that there is a slight difference, and scientifically there should be a difference. The bread instead of turning crumbly after just 24 hours, take slightly longer to stale and retain to the fluffier texture for a longer time. Of course, since we do not use bread improvers or dough softeners, there is no way for our homemade bread to retain to the soft fluffy texture for long. Trust me, I've tried.
- For the tangzhong, use 20g of flour and heat it with 100ml of milk or water. Follow the method illustrated here. You then mix the 280g flour together with the remaining 110ml of milk. Add the tangzhong into the dough after you have mixed the other ingredients together. You can add up to 50ml of extra liquid, but do not be tempted to add anymore because it will be really hard to handle. I find that the tangzhong method enables me to hand-knead with greater ease, because some of the liquid is already 'cooked' into the tangzhong.
- You can also try the overnight rise (also known as the 17h method or 中种法) - the end result is delicious too! I have also tried the overnight rise together with the tangzhong method, and the result is a really soft and fluffy method, but the effort isn't really worth it, in my opinion.
 |
| Lovely brown tops! |
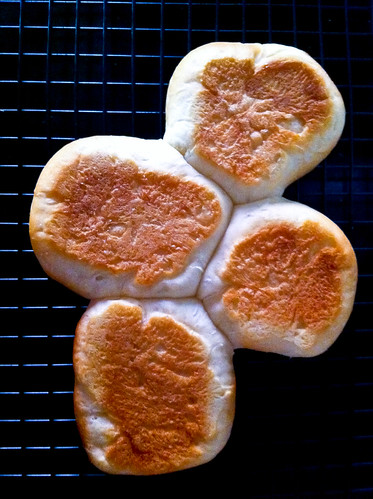 |
| Oooh look at the bottoms - well baked too :] |
 |
| I just love this moment when you pull the rolls apart and see the 'strands' connecting them together :] |
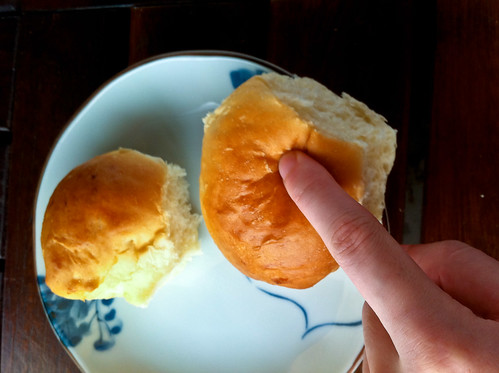 |
| Look at how soft the bread is! Boing-boing! |
I hope that someone will be encouraged to try this basic recipe out, as well as the variations I have recommended, because this really is the result of many attempts at perfecting this bread recipe. I will be submitting this for Jasmine's Aspiring Bakers #8: Bread Seduction - bread is really my favorite thing to bake, but I haven't been able to bake as much bread as I'd like here in Sydney since winter's a real pain in the ass for baking bread! Anyway, do try this recipe and let me know what you think! :]
8 comments:
Lovely buns!! And I can see that you must have love this recipe a lot, seeing all your notes and variations! :)
Thanks Hanushi - yes I do love this recipe :D
Soft and fluffy buns there !! Looks good !
nice! soft and fluffy - my kind of bread :)
@Joyce and Alice: thanks :D
Hi, I followed your recipe here and compliment you on your clear instructions and variations. I have tried Tangzhong but was not too impressed. The bread is soft at first but hard and dry the very next day. But your recipe was soft for several days after so it's a winner for me. Am doing all kinds of styles with it. I hand knead everything, and it still works fine.
thanks for the feedback kipmum! I'm happy that my recipe works well for you :) I have found also that you can use this recipe, and try retarding the dough after the 1st proof in the fridge and you'll get pretty soft bread as well!
now u r giving me confidence to want to try baking bread. As an impatient person, I find it hard to wait for the bread to rise instead of cakes where they can be done and baked. I will try :)
Post a Comment