I am working my way up the French pastry food chain, slowly and steadily. Over the span of the last year, I’ve attempted choux puffs, éclairs (which are essentially choux puffs with cream and chocolate), tuiles and macarons, and I’ve diligently noted down the recipes that work for me and other comments in my handy little spiral bound notebook.
I am a girl on a mission, really. I am on a mission to master baking techniques, and I think French pastry is a good way to start. Nowhere else have I encountered such need for precision and skill as I have in the making of French pastry. The fact that I love French pastry is a huge plus, of course. I still remember the day when Jon and I stepped into Ladurée, and I bought a huge box of macarons, as well as this tiny delightful pastry, which I forgot the name of, because I was so bedazzled by all that variety of pastries. But nevertheless, the first bite into the pastry brought me to pastry heaven. I realized then why I paid 3 euros for a tiny little thing which was half the size of my palm, and why Ladurée is as famous as it is today. The outside was crispy, but the moment you bit into it, the crisp exterior gave way to a soft flakey, buttery interior which contained just the right amount of sugar and flavor within those layers. (Not that its macarons were not good, but that tiny pastry left a deeper impression on me than the macarons because I’m not too much for overly sweet pastries.) I want to accomplish that one day – that something of mine will evoke such great enjoyment on another that it will leave an indelible impression in that person’s memories. That, to me, is the epitome of good baking.
Anyway, rambles aside, I’m working my way down my imaginary pastry list and today, I can tick financiers off it. I’m actually moving onto viennoiserie items such as pains (which is French for bread and not pain as in ouch) and croissants pretty soon because I’ve been buoyed up by the fact that the flakey piecrust I made was a huge success with my parents and puff pastry has been calling my name for the longest time! After that, I’m gonna hop on back to harder types of French pastry (in my opinion), like the croquembouche (which figuratively killed many contenders in Masterchef Australia), mille-feuille and most importantly, those complicated gateaus that I’ve been dying to try!
Now, time for a little history. You can skip this entire part if you’re not history-inclined but I am a history buff and information junkie, and I really like to research extensively about any new ‘thing’ I’m trying out. Well according to Dorie Greenspan in
Paris Sweets and
here as well, “The financier is a pure-bred Parisian, having been created in the late nineteenth century by a pastry chef named Lasne, who had a shop on the rue Saint-Denis near the Bourse, the city's stock exchange. Lasne had a bead on his clients: he knew that they were rich, discriminating and always in a hurry, so he designed his little unglazed cookie-cake so that it could be eaten without a knife, fork or spoon and without risk to suit, shirt or tie. It was an early and classy form of fast food.”
Now, I do believe it was intentional on Lasne’s part, that he did a number of intelligent things with the financier. First, he named it financier, which we all know in plain English means someone (usually rich and a big shot) in the finance industry – this must have really piqued those financiers’ (the person) attention! Second, he baked these cakes in shallow rectangular pans, such that they resembled ingots or gold bars, lending itself to its namesake. And most importantly, he used really rich and expensive ingredients like butter and almond (back in those days they were luxurious and rich), and I can bet my money that those financiers got a kick out of being able to afford these ingot-like tea cakes which plebian people could not afford!
Onto the cake itself – the main reason I attempted this recipe was because I had pistachios lying around which I had originally intended for pistachio macarons, but I decided on financiers instead because I wanted to try something different, something cakey instead. Usual financier recipes use almond meal - like you see in Dorie's recipe which I've linked above. The other attractive thing about the financiers was the fact that they used browned butter, and that they would be tiny cookies with a crispy exterior giving way to a nutty, not-so-crumbly interior. This was what drew me in the most. I love food with hard or crispy or crunchy exteriors!
Now for my blasphemous admissions - I’ve to admit that though I did try chouquettes and madeleines in France, I never did come across a financier. It might be because my eyes weren’t exactly on a lookout for them or maybe because I was too eager hoping into boulangeries to get baguettes and croissants that I didn’t have much time for financiers. So I’m actually making these financiers with no basis of comparison. Second, I didn’t have those shallow rectangular pans which are characteristic of a financier, so I settled for my muffin pan instead. And, I used a recipe which asked for whipped egg whites despite reading that a quick mix with normal egg whites will do =/ Nevertheless, I thought this recipe turned out pretty well!
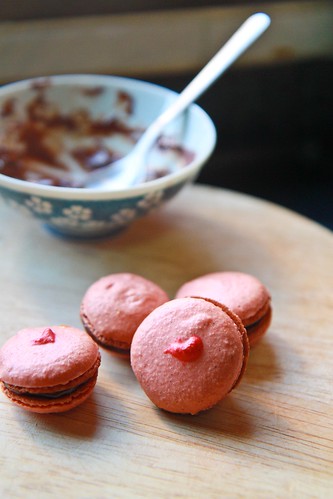
Strawberry & Pistachio Financiers
Makes 6 6-cm (Ø) financiers, adapted from
Leemei (do check out her photos of these financiers - they look awesome!)
Ingredients:
25 g ground almonds
50 g ground pistachios
45 g unsalted butter
40 g icing sugar
15 g all-purpose flour
45 g egg whites (about 1.5 eggs)
⅛ tsp salt
¼ tsp vanilla extract
Method:
- Grind the pistachios and almonds into powder. You can roast them for about 10 minutes at 160°C if you want a nuttier taste to emerge in your financiers.
- In the meantime, place the butter into a saucepan and put it on medium heat to start ‘browning the butter’. This basically is melting down the butter until it turns slightly brown and emits this nutty aroma. Take off heat once it’s done and allow it to cool.
- In a bowl, sieve the ground nut powders, together with flour and icing sugar.
- Beat the egg whites until you get soft peaks.
- Make a well in the centre of the dry ingredients and add your vanilla extract. Mix in the whipped egg whites. Once incorporated, mix in the cooled browned butter. Be sure to only use the liquid from the browned butter and not the solids. *In my ingredient proportions above, I’ve taken into account the loss of weight from browning the butter (the original recipe only needs 37g worth of melted butter).
- After mixing everything, you should get a batter which is almost similar to a madeleine batter. Cover this up and put it into the refrigerator to chill for at least 2 hours. (I left mine overnight.)
- Preheat your oven to 180°C. In the meantime, take your batter out of the fridge and spoon your mixture into the mould.
- Wash, hull and slice your strawberries before placing them on top each of your financier. If you wish, you can chop up some more pistachios to sprinkle on top.
- Bake for 20 minutes or until the tops of the financiers turn golden brown and are dry to touch. Remove from the moulds and allow to cool for at least 15 minutes before consuming them. You can add some icing sugar atop each for decorative purposes (or added sweetness) if you like =)
Janine’s tips:
- Be sure to mix the batter as little as possible, because you don’t want the gluten in the flour to form extensively and give you a tough financier. Some recipes require a resting period for the financier (like this recipe), but others do not. I’m not too sure why, but I suspect it’s to enhance the contrast between the crusty outside and a soft, moist inside.
- After chilling your mixture in the fridge, you might have to wait for a couple of minutes before the batter is amenable to scooping because the batter hardens a fair bit after it's chilled! Also, you don’t need to grease your moulds because the batter is quite rich and should come off easily when the financiers are baked.
- Some people don't recommend the use of strawberries, because its high moisture content might result in it sinking to the bottom of the batter. I didn't face such a problem but if you are afraid of sinking strawberries, one tip is to bake the batter for about 2-3 minutes, before opening the oven door to add your strawberry slices. You don't need to be afraid of sinking tops because there isn't any rising involved for financiers!
- Most importantly, pay attention to your butter when you’re browning it! Because of the small quantity of butter, it melts really quickly and the entire process is but a few minutes! Keep your nose close to the saucepan to smell for that ‘nutty’ aroma and once you do, take the pan off the heat! If you get a dark brown liquid, my advice is for you to throw it away and to start again, because it’ll taste bitter.
- I also discovered something amazing you can do with your food processor (or in my case, my chopper!) I used my mini food chopper to grind up my nuts, and because I saw that some recipes required whipped egg whites and some did not, I wasn't too concerned about clean bowls and equipment for the egg whites, so I dumped the whites into the same chopper I'd used before and pulsed it for about 5 minutes. The egg whites emerged softly whipped, similar to what you get from a mixer! The only downside is that my chopper did get pretty heated up and it is small, so perhaps whites from 3 eggs would be the maximum it can take.
In pictures:
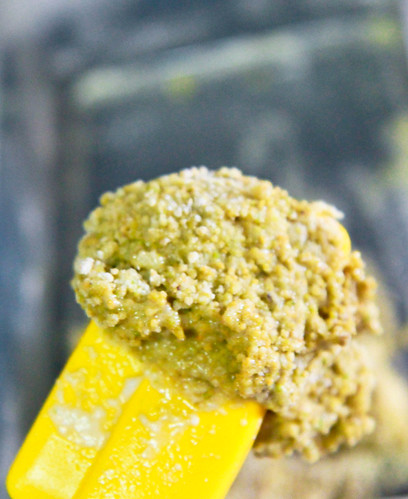 |
| The batter before I started folding in the egg whites. My dry ingredients look a little gravelly because I didn't grind the nuts finely since I wanted a more 'chewy' texture |
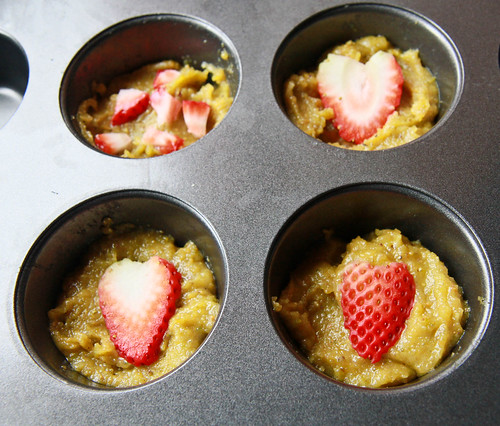 |
| Spoon the batter into the moulds and place your sliced strawberries on top! You can slice them or chop them, as you wish =) |
 |
| And here's another photo, just because the light was soooo good today :) |
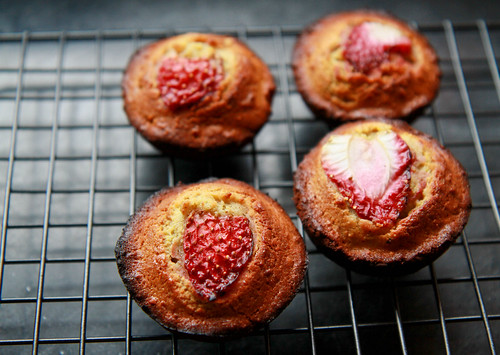 |
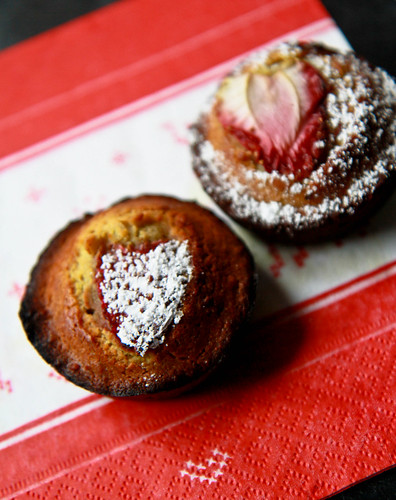
| Some of my financiers were a little overbaked - spot the black parts? =/ |
Also, from what I’ve read, friands are like an Australian relative – I’ve compared several recipes and friands basically contain almost the same proportion of nut meal to butter as do financiers. The only difference it seems is that friands are typically baked in small oval pans.
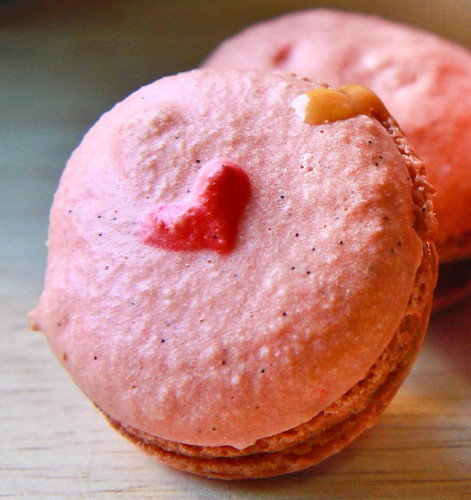
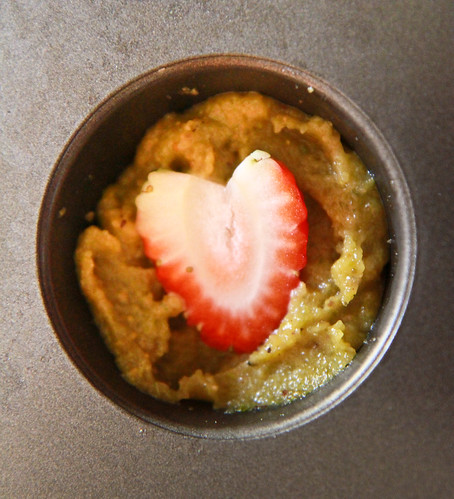 |
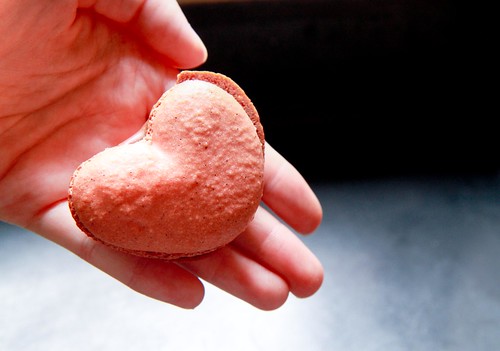
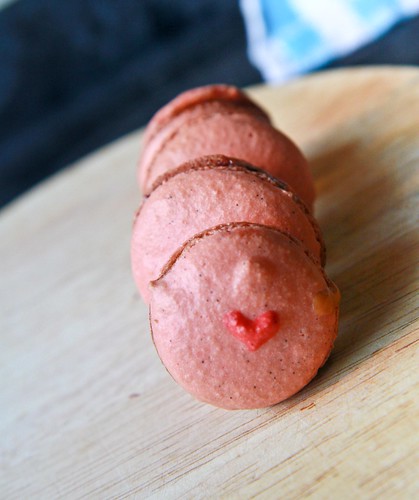
| See the heart shape from the strawberry? |
Strawberries lend themselves really well to Valentine's and I think it's partly because of its shape! If you slice the strawberry properly, you’ll get an instant heart shape!
But most importantly, I think strawberries depict love and what it entails very well - they are actually really ugly looking on the outside -
I mean, come on, look at those pits with seeds and tiny hairs sticking out of them! but if you bite into them, you'll be rewarded with this sweet, and sometimes tart, flesh. And so, because I believe that love should not be celebrated merely on Valentine's, this is another post dedicated to my
valentine, assuming he still has the time to read my blog. I hope you are eating your mandatory
4 pancakes every morning! I'm also submitting it to
Aspiring Bakers #4: Love is in the Air (Feb 2011), which is hosted by Ellena this month.